

You are using an out of date browser. It may not display this or other websites correctly.
You should upgrade or use an alternative browser.
You should upgrade or use an alternative browser.
Top end rebuild
- Thread starter vaultsman
- Start date
vaultsman
Well-Known Member
harveyp6 said:I've had a quick look and it is an improvement over yours, but it's by no means perfect, although they rarely are.
I have yet to totally dismantle it though.
That's great, Harvey. Let me know if you think it's useable, and what you'd be looking for.
I was pointed to an alternative solution by a V8 forum poster..has anyone come across this oil pump kit before?
Listed for the Buick 215 from Melling in the USA...
http://www.mellingengine.com/
..and I've yet to find out who the UK disributor is. And how many pennies for one!
Attachments
unstable load
Well-Known Member
The GM/Opel/Buick 3.9 V6 front cover is a bolt on part and has (in South Africa at any rate) the higher capacity oil pump. Lurking at a breaker's near you, maybe?
vaultsman
Well-Known Member
quattro said:In your position I would fit an uprated oil pump kit available from Real Steel at around £50.00.
I am not sure if the cover plate is part of the kit though :? - worth a phone call perhaps.
Richard
Hi Richard,
Yes..I've already got the kit. It includes a spacer plate to accommodate the taller gears but the existing cover is re-used.
I may surface grind and lap the existing cover..it seems loads of people have gone this route. I've had a thread running on the V8 Forum...
V8 Forum Thread
Real Steel or one of the others don't sell new cover plates perchance?
How about reanodising your plate, after flattening it off
I found this http://homepages.pavilion.co.uk/nickfull/anodise.htm
Don't know if it works, just found it surfing about (off work ill today )
)
How about reanodising your plate, after flattening it off
I found this http://homepages.pavilion.co.uk/nickfull/anodise.htm
Don't know if it works, just found it surfing about (off work ill today
)arthuy
Well-Known Member
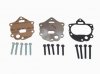
Just a note about the high volume kit.
I got one from a friend. Whilst checking the new gaskets I got (some don't have all the holes punched out) i realised that the spacer didnt have a hole where there was one in the gasket. I think it must have been for drain back or by pass.
The attached photo shows the outline of a rectangle and the hole I drilled to match the gasket.
Just compare old and new before fitting, A friend fitted gaskets that hadnt been punched and his oil pressure relief didn't work, it was only discovered when the pump was stripped to check.
Colin
Hello Colin,
As I mentioned over at the V8 forum, sanding the surface of the oil pump front cover and using it in this way in my opinion a huge false economy.
The covers were anodised for a reason. The oil pump gears sit against the cover with just a thin film of oil separating the two. With the anodising gone and the soft aluminium alloy beneath exposed, the rate of wear will only increase. The evidence of that is clear when you examine your own cover. Where the anodising has been worn through, the degree of wear into the aluminium is greater.
Just because hundreds of other people may have gone down the same path and fitted covers which have been sanded does not make it right!
I would rather spend 50 Pounds on a new cover and do the job properly than use a sanded one and at some point sooner rather than later have to rebuild the entire engine at a considerably greater expense!
Ron.
vaultsman
Well-Known Member
Not ready for them yet, but I thought I'd have a look at building up the rocker shafts.
What's the trick in getting the pedestals onto the shafts? I've thought about freezing the shaft and heating the pedestal...at room temperature the shaft won't look at the pedestal bore.
What's the trick in getting the pedestals onto the shafts? I've thought about freezing the shaft and heating the pedestal...at room temperature the shaft won't look at the pedestal bore.
ghce
Well-Known Member
If funds allow you could consider the Weber 500 carb upgrade which will give you an extra 50bhp and also improve your fuel consumption, though by far one of the best benefits is being able to squirt raw petrol into the engine for instant pedal response somthing those SU people never got there head around
Graeme
Graeme
vaultsman
Well-Known Member
ghce said:If funds allow you could consider the Weber 500 carb upgrade which will give you an extra 50bhp and also improve your fuel consumption, though by far one of the best benefits is being able to squirt raw petrol into the engine for instant pedal response somthing those SU people never got there head around
Graeme
Hi Graeme,
Think I'll be sticking with the SU's...at least for the foreseeable. Even so this top-end rebuild will set me back around £550..but I'm sure it'll be well worth it! Add to that new clutch & brake master cylinders, new clutch slave and still a long list of other things to look at...funds will be a tad stretched! :shock:
I'd be interested (as I'm sure all the forum would) in how you get on with your Mallory upgrade.
Cheers,
ghce
Well-Known Member
Like you the funds make a major part of the upgrade work and here in NZ prices are not cheap. I was quoted NZ1298.00 for the distributer :shock: though if I import direct from the US as I normally do just US$315.00. I found the same amount of price gouging when I changed to the Weber and Edelbrock inlet where in NZ I was quoted roughly NZ1100.00 for one and NZ1200.00 for the other making an out lay of over 3300.00 for those 2 componants alone let alone things like the air cleaner and thermo stat mount. Fortunatly a US supplier came to the rescue and I managed to get all the parts for under NZ500.00 including freight!!!!!
So much for supporting local bussiness.
Graeme
So much for supporting local bussiness.
Graeme
vaultsman
Well-Known Member
arthuy said:Put the stud into to a metal work vice then give the hole manifold a sharp twist. This worked on 3 out of my 6 studs which save lots of hassle.
Colin
Many thanks for the tip Colin...it worked on 2 of the studs. The rest decided to make life a touch more difficult and sheared off. So...some careful drilling and retapping...

One of the threads had completely gone..burnt away..thought about helicoil-ing but decided to go with a bolt, for which I've needed to grind some clearance/location for the head.

vaultsman
Well-Known Member
The original inlet manifold was in a pretty bad state. One thermostat housing thread semi-stripped, all three of the #10 UNC screws that hold the choke switch sheared off and corroded in, and the internal steel heater return pipe eaten away.
Finally found what looked like a good one on ebay...and does look good in the metal! If the numbers on the side are a date then it's 1985 vintage. Probably off a Range Rover.


And no...I won't be using the Strombergs. Back on ebay for them...unless anyone's interested....?
Finally found what looked like a good one on ebay...and does look good in the metal! If the numbers on the side are a date then it's 1985 vintage. Probably off a Range Rover.
And no...I won't be using the Strombergs.
Back on ebay for them...unless anyone's interested....?vaultsman
Well-Known Member
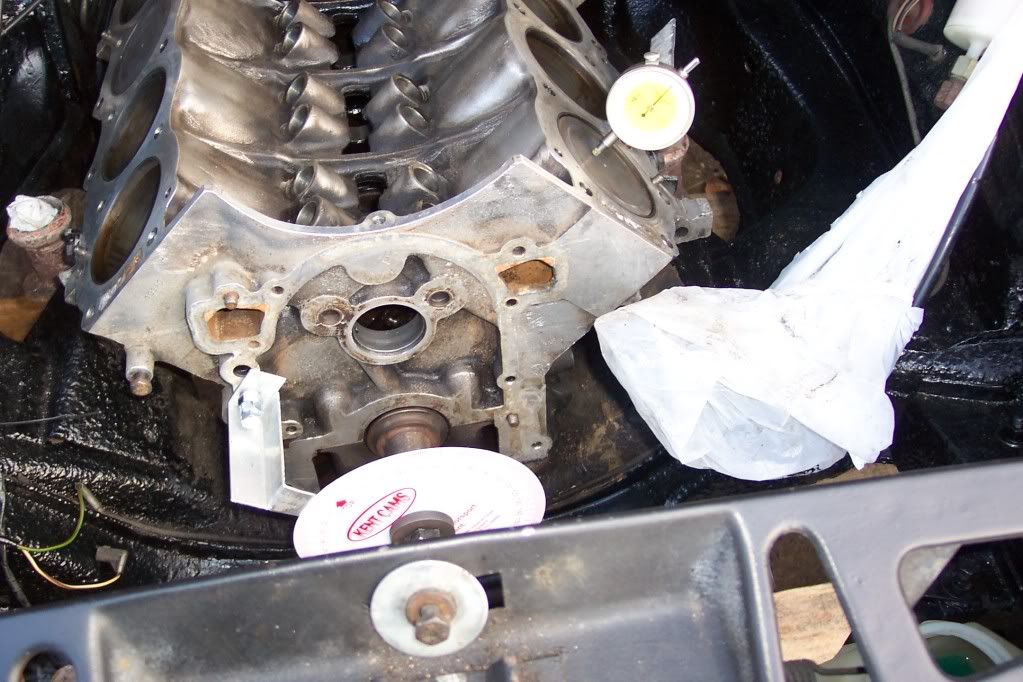
Well..this weekend's been a washout in terms of getting anything done..but hopefully I'll get some time to start putting everything back together soon!
I'll be using composite head and inlet gaskets to lower the CR a touch from the 10.5:1. Also using 3.9 EFI heads (still got to get a light skim on them) and the standard 3.9 EFI cam.
This is the timing set..
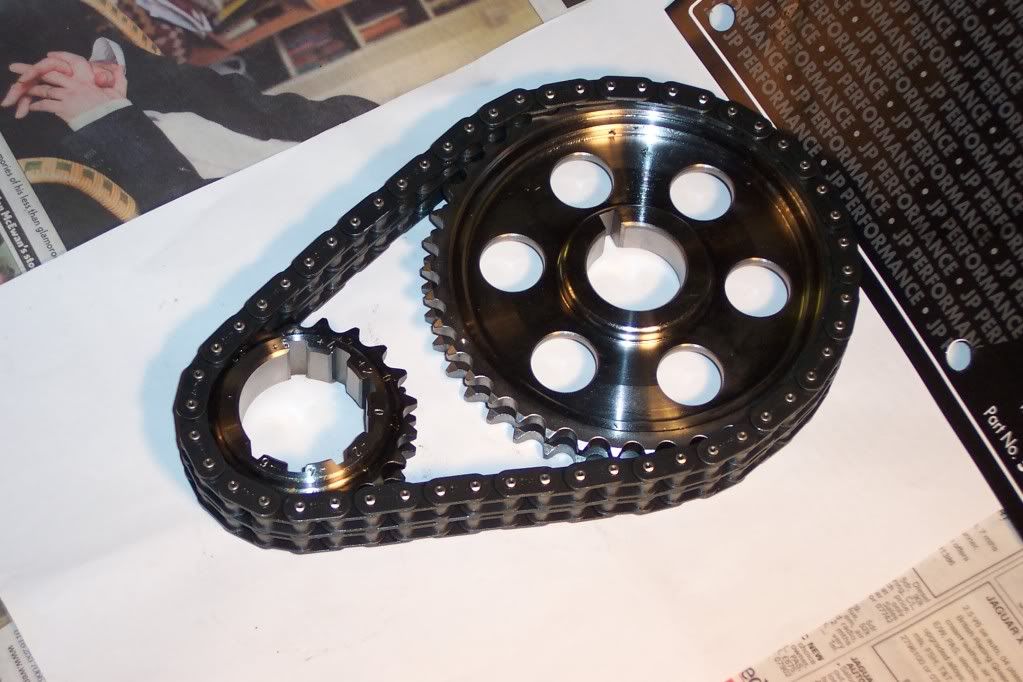
..with crank keyways from -6 retard up to +6 advance, in 2 degree steps. Given I'll be unlikely to be revving to the limit, would it be wise to change the cam timing slightly for better low-end torque? I seem to remember seeing that the 3.9 camshaft is advanced compared to the 3.5 cam..but I may be wrong on this.
What do you think guys?
I'll be using composite head and inlet gaskets to lower the CR a touch from the 10.5:1. Also using 3.9 EFI heads (still got to get a light skim on them) and the standard 3.9 EFI cam.
This is the timing set..
..with crank keyways from -6 retard up to +6 advance, in 2 degree steps. Given I'll be unlikely to be revving to the limit, would it be wise to change the cam timing slightly for better low-end torque? I seem to remember seeing that the 3.9 camshaft is advanced compared to the 3.5 cam..but I may be wrong on this.
What do you think guys?
Hello Stan,
From the Land Rover workshop manual covering all V8 engines from 3.5 to 4.6, the standard timing sets were set so that the camshaft ran at zero degrees, neither retarded nor advanced. However, the Range Rover specialists who built my 4.6 fitted a custom camshaft along with a timing set which allows for variable camshaft timing. They set the camshaft to 2 degrees advance, for the very reason you surmised,..to increase low end torque. So I would advance your camshaft by 2 degrees Stan.
Given the changes, especially the 3.9 heads which have improved air flow characteristics and larger valves compared to the P6B heads, have you decided on which needles you will be fitting to the carburettors? The ones that were fitted originally I dare say will now be too lean.
Spark plugs too are no longer compatable, given that the early heads manufactured up until 1976 use short reach plugs, where as all later heads use long reach plugs. I can certainly recommend Champion N9YC for the task.
Ron.
vaultsman
Well-Known Member
Hi Ron,
I'd just about decided on +2, or should that be -2??? There's a good write-up on cam timing, together with a calculator, here...
V8 Info (Click Tuning at the top, then Camshaft links on the left)
I've mackled up a DTI bracket and pointer so that when I fit the cam I can check the actual cam timing anyway..and see what I find...
As far as the carbs are concerned there's a good outfit almost on my doorstep so I'll refit the carbs as they are then get them to set them up once running.
For the plugs, yes, 3/4" reach required and I may go with NGK (shock, horror! )
Cheers,
I'd just about decided on +2, or should that be -2??? There's a good write-up on cam timing, together with a calculator, here...
V8 Info (Click Tuning at the top, then Camshaft links on the left)
I've mackled up a DTI bracket and pointer so that when I fit the cam I can check the actual cam timing anyway..and see what I find...
As far as the carbs are concerned there's a good outfit almost on my doorstep so I'll refit the carbs as they are then get them to set them up once running.
For the plugs, yes, 3/4" reach required and I may go with NGK (shock, horror!
)Cheers,
Hello Stan,
That is a great looking timing set.. 8) Could I please ask what brand it is?
Yes, +2 is to advance, while -2 is to retard.
Many thanks,
Ron.
That is a great looking timing set.. 8) Could I please ask what brand it is?
Yes, +2 is to advance, while -2 is to retard.
Many thanks,
Ron.
vaultsman
Well-Known Member
SydneyRoverP6B said:Hello Stan,
That is a great looking timing set.. 8) Could I please ask what brand it is?
Many thanks,
Ron.
Hi Ron,
Timing set is from RPI via ebay..I paid £58 + postage, say £64 all up. It's made by JP Performance, which ISTR is an Australian company.
RPI have another of these Timing Sets on ebay UK at the moment.
Cheers,