

You are using an out of date browser. It may not display this or other websites correctly.
You should upgrade or use an alternative browser.
You should upgrade or use an alternative browser.
The inheiritance. 1976 P6b
- Thread starter ewokracing
- Start date
ewokracing
Active Member
Ron - coolby. I have to pull the engine out of the Mazda as I stripped a bolt on the back of the newly reco'd head. *sigh* so it might be next week.
Brenten - yeah! The guy that I spoke to was about our age, he said "we've got the old decals, would you like me to paint them up for you as well" Sure! why the hell not!
Apparently these shocks were made in 1997, Chris York has my other set (which are for sale if anyone is interested), I'm guessing they might be from the same era.
Do I set the shocks to their middle setting for the front and rear? I have rubber bushes for the front as well.
Next weekend is fine Geoff, I shall be around.
Your Rover still has the original springs? If so, you could set the rears at the half way point and the fronts at maximum. The ride will be much firmer with a significant reduction in both body roll and diving. If you prefer a softer setting, what ever you set the fronts to, set the rears at least one full turn less.
Ron.
ewokracing
Active Member
Yep, original springs. I was thinking of getting King Springs* for the front to firm it up, but leaving the originals in the back to let the tyres grip (thinking well ahead for possible track time).
* way down the track
* way down the track
It's not a hard job to swap them out, only tricky bit is getting the bush compressed enough to get the split pin through the correct mounting hole. Mine were in the incorrect outer hole when i got the car and were mangled as a result.
I enlisted the help of my partner who is ever cheery when requested to help with car stuff (just loves it, can't get enough, never complains at all ), made it a lot easier having 2 people to compress everything to get it in place properly.
Let me know if you need a hand and I can drop down.
I enlisted the help of my partner who is ever cheery when requested to help with car stuff (just loves it, can't get enough, never complains at all
), made it a lot easier having 2 people to compress everything to get it in place properly.Let me know if you need a hand and I can drop down.
ewokracing
Active Member
tvr_v8 said:It's not a hard job to swap them out, only tricky bit is getting the bush compressed enough to get the split pin through the correct mounting hole. Mine were in the incorrect outer hole when i got the car and were mangled as a result.
I enlisted the help of my partner who is ever cheery when requested to help with car stuff (just loves it, can't get enough, never complains at all
Let me know if you need a hand and I can drop down.
You know your partner is a saint though Al....
I have dragged my poor friend/work colleague to my house umpteen times over the last few weeks to help me put the new head on the green wagon, he's coming back tonight as we broke a bolt off in it last week and now we need to pull the engine out again... sucker for punishment.
I'll keep you in mind though. I still have to pull finger out and buy some pins.
ewokracing
Active Member
rear shocks.
Been distracted with other things (Triumph has fried the rec/reg, wagon has been a bit of a saga, getting married in 4 days) but I did find a few hours to start changing over the rear shocks.
Rang up Ron and had a chinwag, then went to see some guys at work that I'm mates with in one of the engineering schools.
I measured up using a hacksaw blade and thought that some solid bar about 20-25mm thick and about 300mm long would be perfect. 2 minutes later...
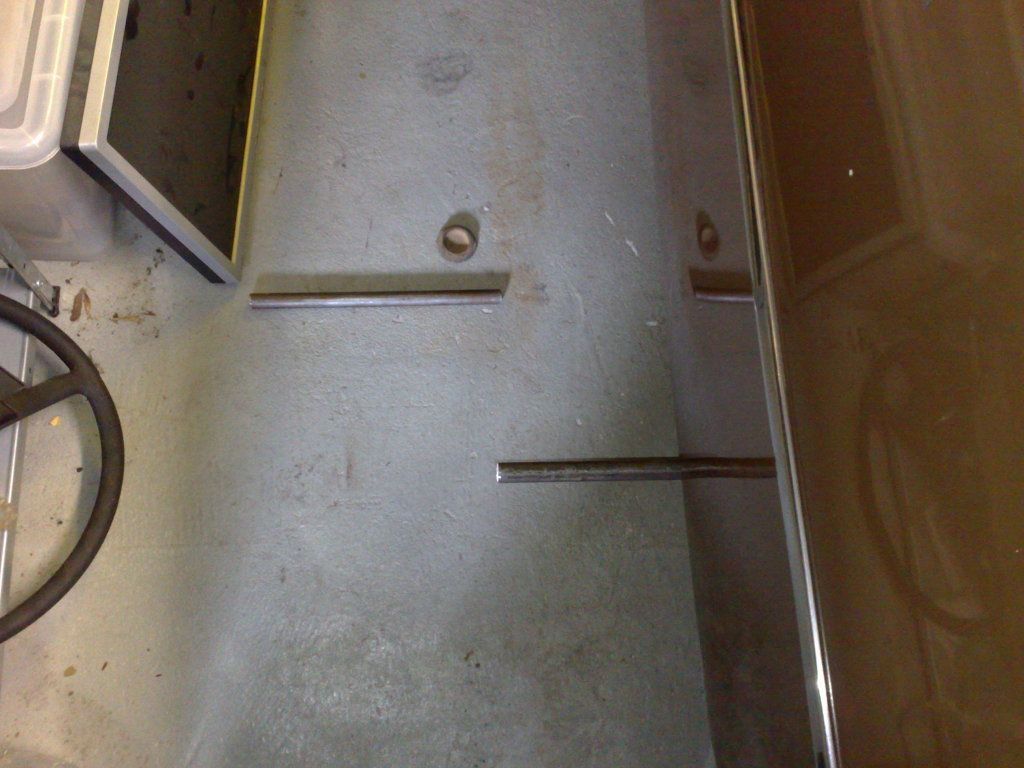
Gave it a test run, bar was a little bit small, we used 22mm stock:
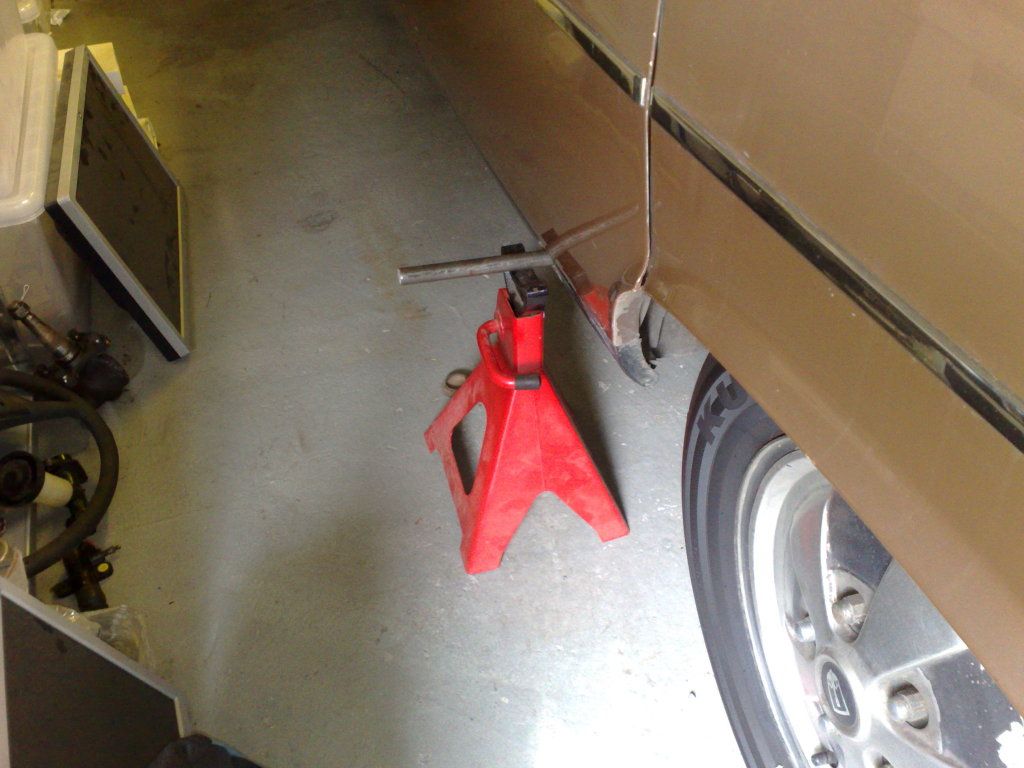
But it took the weight and I have my good jack under the rear jacking point just in case at all times.
Started pulling out the rear interior - pretty much the only people that have been in the back are me, my brother (as children), a fat golden retriever in the 80's and an old lady from up the road. The old sound deadening was extremely dusty and the tops of the original lambs wool seat covers are deteriorating in the Australian sun, so I might pull the sound deadening out and use felt underlay or car audio sheeting. Undecided for the moment.
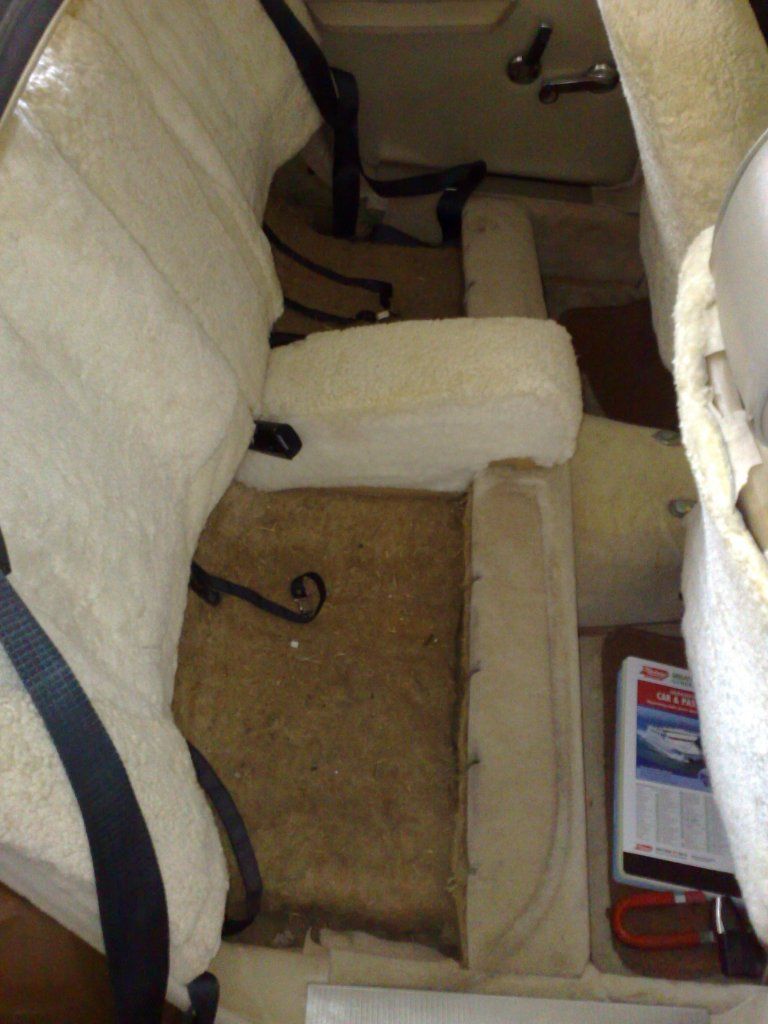
Can't get over how easy it is to get the rear seat out, it's great! One phillips head screw!

Hiding behind the insulation, I noticed that the Koni's I got off Brenten were missing one dust cap, my car's got them which is a nice bonus. I was expecting them to all be missing.
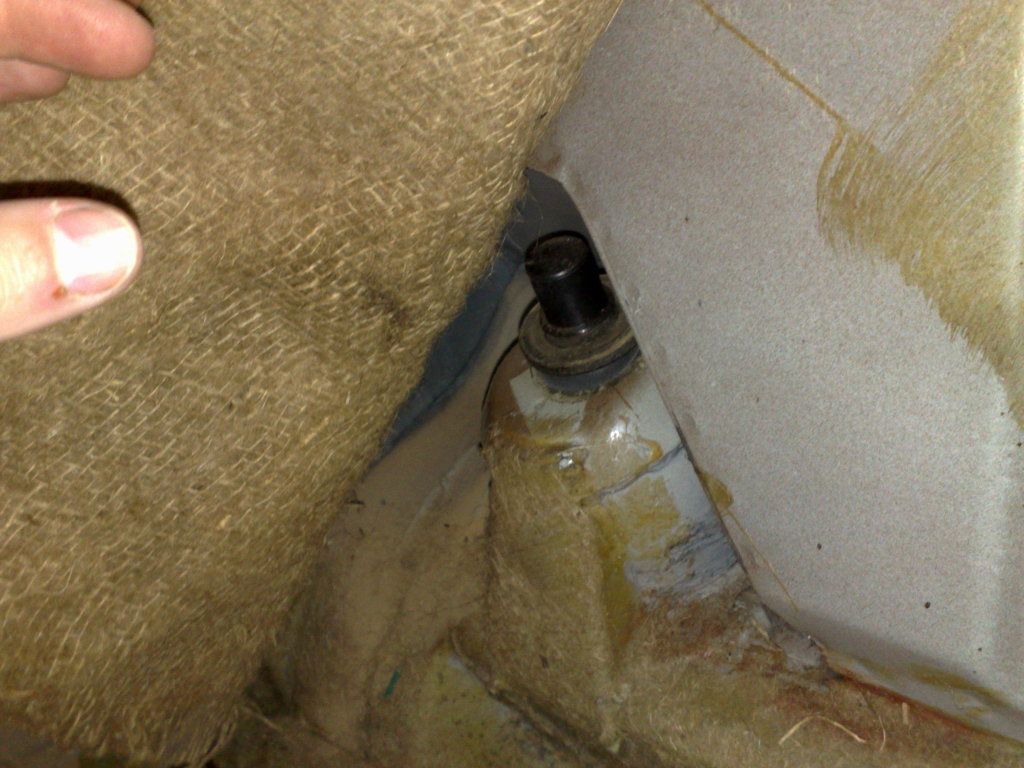
I undid the top nuts (curious sized nuts - I think I had to use a metric ring spanner as none of my imperial stuff would fit?). I sent a message to Al and Ron, yes, the top bush is indeed stuffed!
Compared to an original V8 top bush on a Monroe (guessing here re bushes. It is a Monroe shock though).
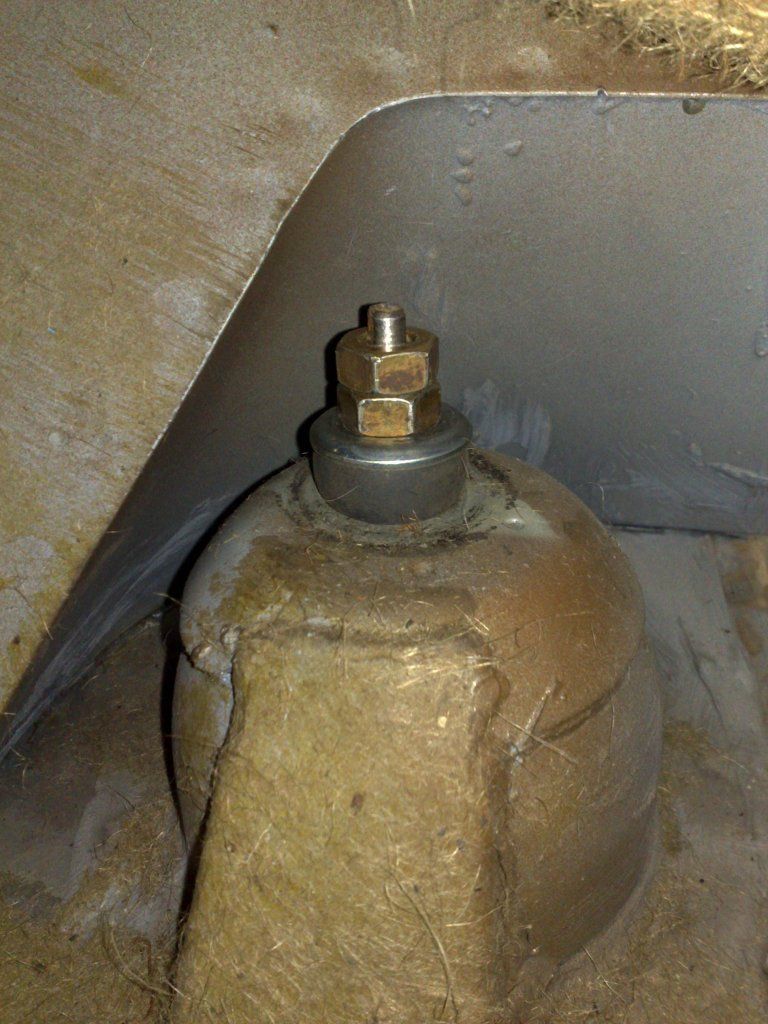
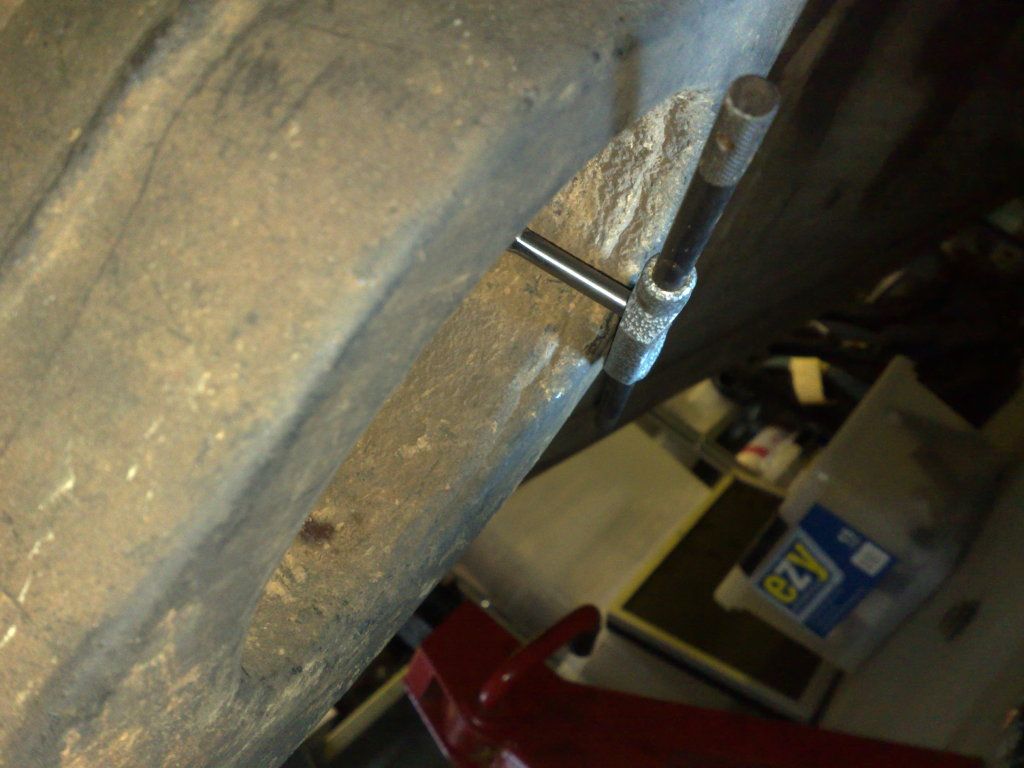
When I got under the car, I noticed this. Is there meant to be a bush between that large washer looking thing and the bodywork?

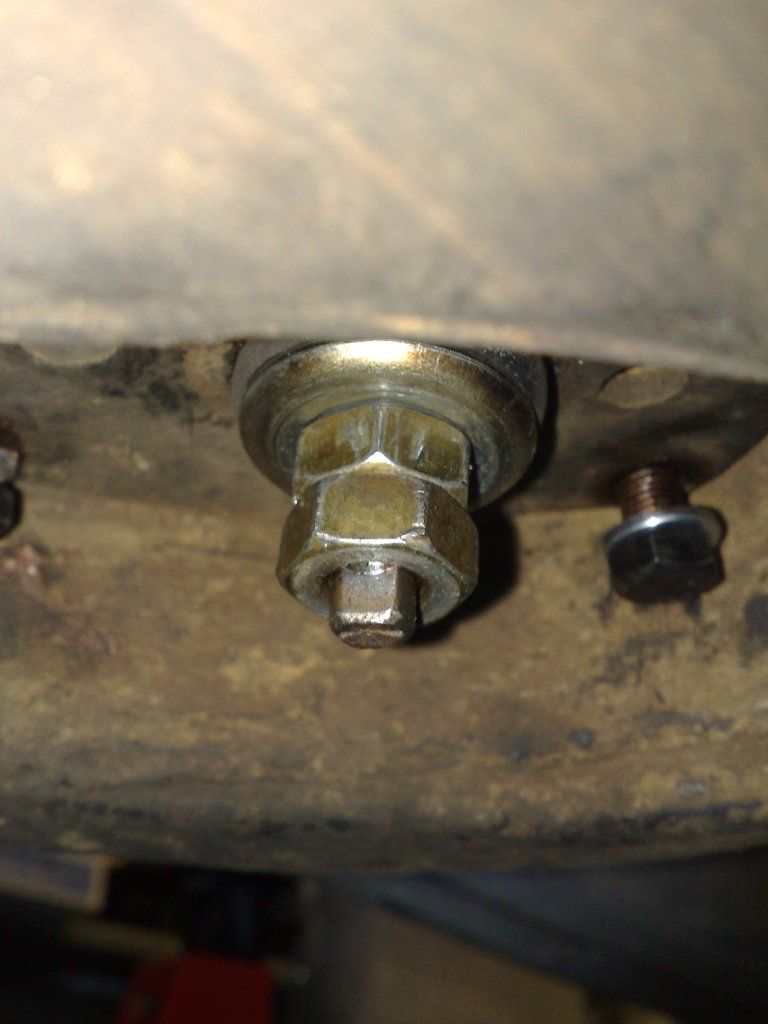
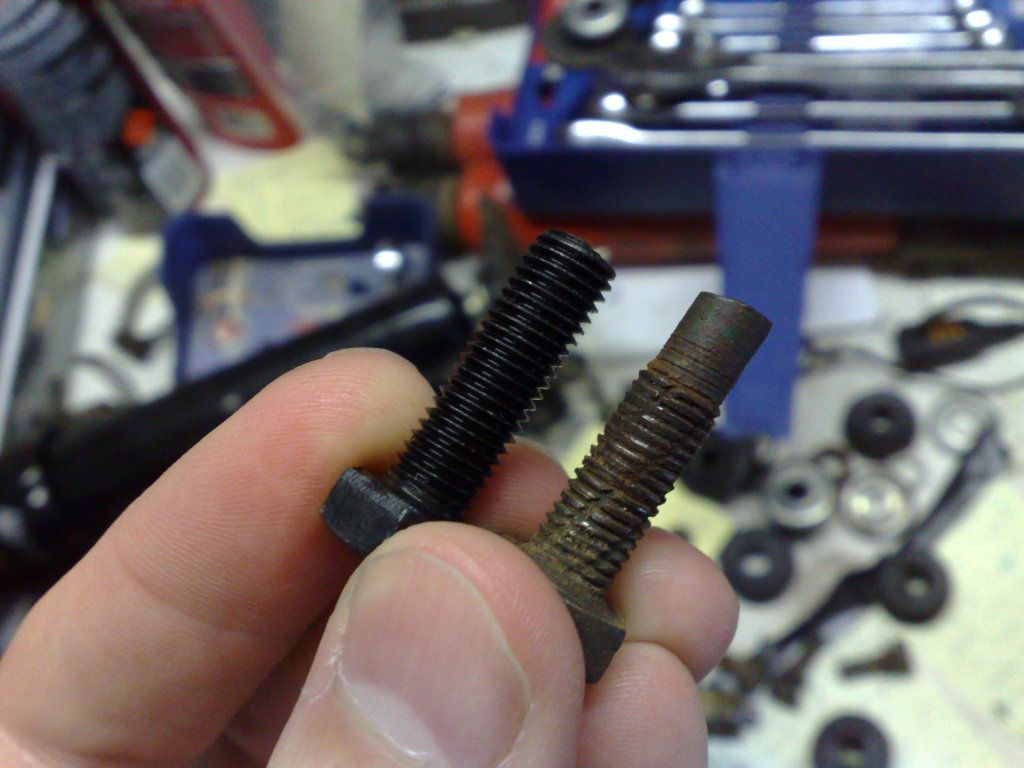
Moving along, four bolts hold the bottom plate that holds the shock in place. Undid those. One bolt was different to the other three. Undecided on how anal I want to be and whether I want matching bolts or not. Anyone know what thread type those bolts are and what should be in there? The three bolts have thread absent on the last 1/3 or so of the bolt.
Before I undid them, I thought I had better not risk it and let them all soak in Penetrene for a bit. One bolt was a bit loose (fingertight - not the odd one either), the rest came out without a struggle.
Even though I had the rear of the car up pretty high, I still had to gently extract the shock and plate out at a weird angle. Funny part is, while jacking the car up I thought, "wouldn't it be my luck that after all of the hassle I've had in the last year or so, I find that this car has Koni's in it......"
yeah... guess what?

IT HAS FREAKING KONIS IN IT. Well the rear ones anyway. I also gave the springs a good hard look and they look like King Springs. No idea why my grandfather put King Springs and Konis in the back, but I suspect that he had the rear end beefed up for towing OR the suspension got rebuilt in the 90's as part of an overhaul my uncle did and the Konis and king springs were part of it (I think and by the look of it I could be right, but Monroes got fitted to the front with the factory springs).
Anyway. I've pulled the other side out as well and it looks like the Drivers side was leaking anyway, so just as well that I have a new set to go in. The King springs might also explain why the rear end doesn't sag much even when I've had the boot full. Hoping to get the new shocks in next weekend.
Been distracted with other things (Triumph has fried the rec/reg, wagon has been a bit of a saga, getting married in 4 days) but I did find a few hours to start changing over the rear shocks.
Rang up Ron and had a chinwag, then went to see some guys at work that I'm mates with in one of the engineering schools.
I measured up using a hacksaw blade and thought that some solid bar about 20-25mm thick and about 300mm long would be perfect. 2 minutes later...
Gave it a test run, bar was a little bit small, we used 22mm stock:
But it took the weight and I have my good jack under the rear jacking point just in case at all times.
Started pulling out the rear interior - pretty much the only people that have been in the back are me, my brother (as children), a fat golden retriever in the 80's and an old lady from up the road. The old sound deadening was extremely dusty and the tops of the original lambs wool seat covers are deteriorating in the Australian sun, so I might pull the sound deadening out and use felt underlay or car audio sheeting. Undecided for the moment.
Can't get over how easy it is to get the rear seat out, it's great! One phillips head screw!
Hiding behind the insulation, I noticed that the Koni's I got off Brenten were missing one dust cap, my car's got them which is a nice bonus. I was expecting them to all be missing.
I undid the top nuts (curious sized nuts - I think I had to use a metric ring spanner as none of my imperial stuff would fit?). I sent a message to Al and Ron, yes, the top bush is indeed stuffed!
Compared to an original V8 top bush on a Monroe (guessing here re bushes. It is a Monroe shock though).
When I got under the car, I noticed this. Is there meant to be a bush between that large washer looking thing and the bodywork?
Moving along, four bolts hold the bottom plate that holds the shock in place. Undid those. One bolt was different to the other three. Undecided on how anal I want to be and whether I want matching bolts or not. Anyone know what thread type those bolts are and what should be in there? The three bolts have thread absent on the last 1/3 or so of the bolt.
Before I undid them, I thought I had better not risk it and let them all soak in Penetrene for a bit. One bolt was a bit loose (fingertight - not the odd one either), the rest came out without a struggle.
Even though I had the rear of the car up pretty high, I still had to gently extract the shock and plate out at a weird angle. Funny part is, while jacking the car up I thought, "wouldn't it be my luck that after all of the hassle I've had in the last year or so, I find that this car has Koni's in it......"
yeah... guess what?
IT HAS FREAKING KONIS IN IT. Well the rear ones anyway. I also gave the springs a good hard look and they look like King Springs. No idea why my grandfather put King Springs and Konis in the back, but I suspect that he had the rear end beefed up for towing OR the suspension got rebuilt in the 90's as part of an overhaul my uncle did and the Konis and king springs were part of it (I think and by the look of it I could be right, but Monroes got fitted to the front with the factory springs).
Anyway. I've pulled the other side out as well and it looks like the Drivers side was leaking anyway, so just as well that I have a new set to go in. The King springs might also explain why the rear end doesn't sag much even when I've had the boot full. Hoping to get the new shocks in next weekend.
Hi Geoff,
Fancy that, Koni's there all the time. There are bushes that reside in wells behind the fibre screen within the boot that locate the plate that holds the diff. (Felt like I was having a Danny Kaye moment there for a sec). You can just see the lower section of the bush between the body and the large washer above the diff plate.
The OEM bolts for the shock absorber retention plates do have a bare section on the end, in the form of a locating pin. My understanding is that the threads in the trailing arms were not finished and the act of fitting the bolts, which have flutes along their length, will perform that task. From memory I used a 5/16" UNF tap to clean the threads in the arms and then fitted high tensile bolts along with new spring washers in their place. I have always used graphite grease on these bolts, and never had a problem with their removal.
When you refit the shocks with new bushes, be they genuine Koni rubbers or the Kelpro ones that I mentioned to you, if I might suggest, tighthen them to the point that the lock nut is no more than one turn of the thread below the section with the spanner flats. This way the bushes are not unduly compressed and the plastic caps will fit snuggly right over both nuts with no gaps at either end.
My very best wishes for your forthcoming Wedding Geoff
Ron.
ewokracing said:When I got under the car, I noticed this. Is there meant to be a bush between that large washer looking thing and the bodywork?
Glad you asked that question Geoff...been wanting to know the same thing.
One point that I neglected to mention in my post above Geoff is, there are actually two attachment points for the backs of the rear seats. There should be a second one in the form of a wire loop that is attached onto the box sill section.
Ron.
Ron.
corazon
Well-Known Member
Re: rear shocks.
Jim
Congratulationsewokracing said:Been distracted with other things...getting married in 4 days)
Jim
ewokracing
Active Member
ta people!
Ron - is this how the bushes should be set up on the top of the shock?
^ one more nut needs to go on, but basically the raised ridge of the bush faces towards the body? So the rubber under the car points up, the rubber inside points down, so the ridges go into the bodywork hole?
^ is how the old shocks were set up, I reckon the bushes were a different type, not the same Kelpro ones but similar. The wad of post it notes is where the bodywork metal layer would be
This is the bottom, is this right?

Cheers.
Ron - is this how the bushes should be set up on the top of the shock?
^ one more nut needs to go on, but basically the raised ridge of the bush faces towards the body? So the rubber under the car points up, the rubber inside points down, so the ridges go into the bodywork hole?
^ is how the old shocks were set up, I reckon the bushes were a different type, not the same Kelpro ones but similar. The wad of post it notes is where the bodywork metal layer would be
This is the bottom, is this right?
Cheers.
Hi Geoff,
The order of all the parts and the orientation of the rubbers are correct, except don't use the large flat disc washer. The first nut sits directly against the Koni cup washer, with the lock nut going on next. Once both are tightened to a setting that I have found to work particularly well, the locknut will be typically no more than one thread down from the little square section with the spanner flats. When you tighten the first bolt on the top of the shock when inside the car, using a spanner on the top square section will prevent the shock from turning. The nuts and the square top all except imperial spanners perfectly.
You could if you wish also replace the 8 shock plate retention bolts with high tensile 5/16" UNF bolts. Run a 5/16" tap through the threads within the arm by hand, a little graphite grease on the bolts prior to installation. The socket to use to install them is a 1/2" AF.
Ron.
ewokracing
Active Member
Ah ok. Cheers for that Ron.
I will drop in to the bolt shop next weekend and get some new bolts and split washers then.
I'll also stick my head under the front at some stage and see what washers are on the front shocks.
I will drop in to the bolt shop next weekend and get some new bolts and split washers then.
I'll also stick my head under the front at some stage and see what washers are on the front shocks.
lukewilliam1_75
Member
Hey Geoff
Met Al over the weekend, he suggested once you get your P6 on the road, we should go for a run somewhere, as some of the younger memebers of the club, he did point out that his Jag is classified as British Leyland, so still from the same family, and i must say looks a ripper too!
Met Al over the weekend, he suggested once you get your P6 on the road, we should go for a run somewhere, as some of the younger memebers of the club, he did point out that his Jag is classified as British Leyland, so still from the same family, and i must say looks a ripper too!
ewokracing
Active Member
Definitely. After the shocks I'll be reading up on the front end threads. I plan to take the front guards off and see what's going on under there.
ewokracing
Active Member
light bulb moment
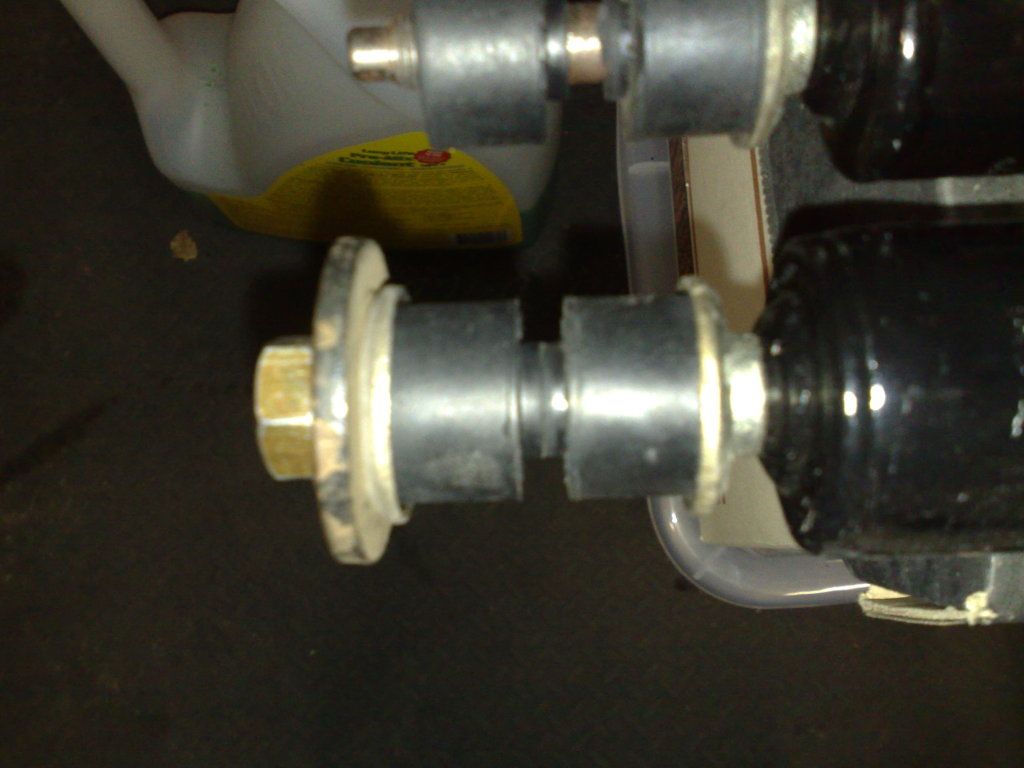
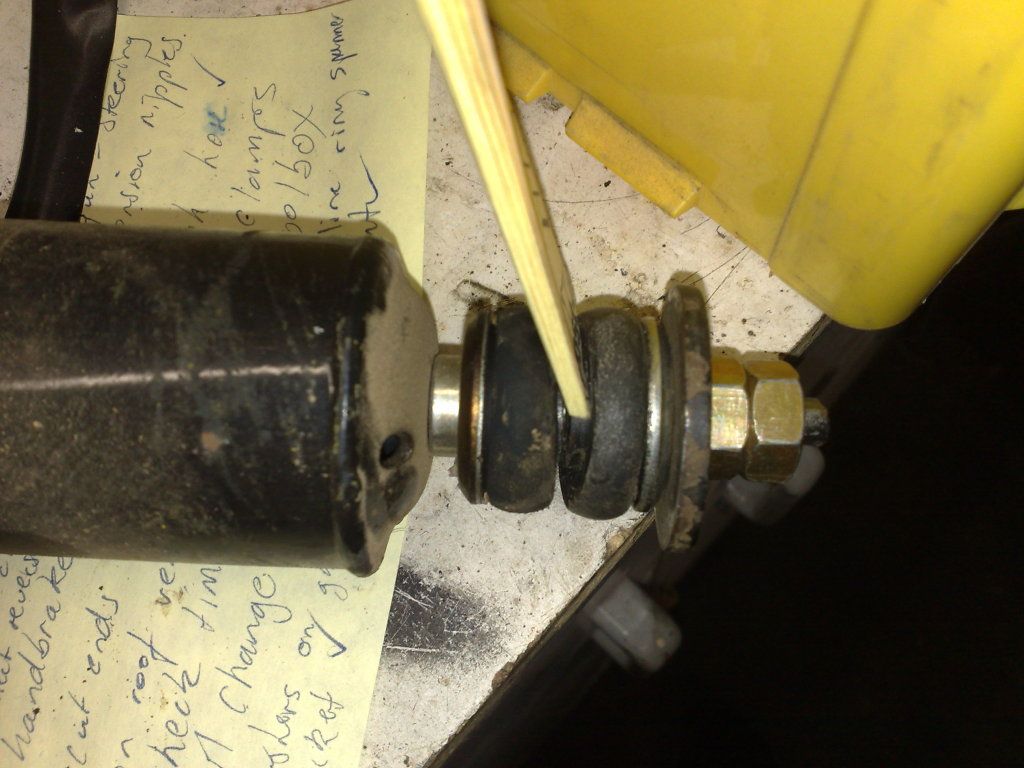
I get now why Ron was saying to jack up the suspension so that the bushes aren't compressed when doing up the shock absorber nuts now. However, even with the suspension jacked up, the bushes still compressed a fair bit. (You can see this in the pictures below).
Ron - do I have the sequence of nuts, koni washer and the nuts tightened up right on the top and the bottom?
Top of shock looks like this now:
Bottom of shock looks like this:
I think the shock bush may be too compressed, so I may undo the two nuts while the car is flat and the shock absorber is not at full droop, then tighten the nuts again. Thoughts? Or is this ok?
One of the shocks I got off Brenten had a washer on it that had a raised ring, I didn't use those type, I used the one at my finger tip that had a slight depression. The nut sits inside that depressed bit.

Can also see myself becoming close friends with my local nut and bolt bloke.
Also borrowed a great tap set from my old mate at work, so the threads got cleaned out as well. Only had a slight issue with the tap handle hitting the suspension part.
2 or so hours going at snails pace because the dog kept lying in my way every 5 minutes and I was super extra careful not to destroy the threads for the new bolts. Still have to refit the RHS.
I get now why Ron was saying to jack up the suspension so that the bushes aren't compressed when doing up the shock absorber nuts now. However, even with the suspension jacked up, the bushes still compressed a fair bit. (You can see this in the pictures below).
Ron - do I have the sequence of nuts, koni washer and the nuts tightened up right on the top and the bottom?
Top of shock looks like this now:
Bottom of shock looks like this:
I think the shock bush may be too compressed, so I may undo the two nuts while the car is flat and the shock absorber is not at full droop, then tighten the nuts again. Thoughts? Or is this ok?
One of the shocks I got off Brenten had a washer on it that had a raised ring, I didn't use those type, I used the one at my finger tip that had a slight depression. The nut sits inside that depressed bit.
Can also see myself becoming close friends with my local nut and bolt bloke.
Also borrowed a great tap set from my old mate at work, so the threads got cleaned out as well. Only had a slight issue with the tap handle hitting the suspension part.
2 or so hours going at snails pace because the dog kept lying in my way every 5 minutes and I was super extra careful not to destroy the threads for the new bolts. Still have to refit the RHS.
ewokracing wrote,...
Hi Geoff,
Yep that's right. One thing I would do though is actually tighten the compression nut slightly more so that the top surface of the locknut is flush with at least the first thread so that all of the square section (where you place a spanner to prevent rotation) is visible. Looking at your photos, that will likely be at least one full turn more. No problem with tightening them when the wheels are on the ground or indeed if you drive the rear up onto ramps.
The other washer with the raised lip actually looks very much like the two inner guide washers (p/n 240800) used on the V8 engine tie rod.
It 's all looking excellent
Ron.
Ron - do I have the sequence of nuts, koni washer and the nuts tightened up right on the top and the bottom?
Hi Geoff,
Yep that's right. One thing I would do though is actually tighten the compression nut slightly more so that the top surface of the locknut is flush with at least the first thread so that all of the square section (where you place a spanner to prevent rotation) is visible. Looking at your photos, that will likely be at least one full turn more. No problem with tightening them when the wheels are on the ground or indeed if you drive the rear up onto ramps.
The other washer with the raised lip actually looks very much like the two inner guide washers (p/n 240800) used on the V8 engine tie rod.
It 's all looking excellent
Ron.
ewokracing
Active Member
Just for giggles, I bid on two P76 V8's, one of which had a dellow bellhousing and toyota 5spd attached. Didn't win which is possibly a good thing.