You are using an out of date browser. It may not display this or other websites correctly.
You should upgrade or use an alternative browser.
You should upgrade or use an alternative browser.
Rover NADA 3500S Auto
- Thread starter keynsham1
- Start date
josephp6man
New Member
Hi Richard,
what colour coachline are you putting down it white or black ! i can't wait for mine to come back now, i am getting rather jealous :twisted:
joseph
what colour coachline are you putting down it white or black ! i can't wait for mine to come back now, i am getting rather jealous :twisted:
joseph
keynsham1
Active Member
The coachline will be white as the original was. I bought a special tool to paint it on myself! I know that sound brave, but it seems pretty foolproof. I have tried it out and it really is easy to use. It is made by a company called Beugler. The paint is slow drying so if it goes wrong, you can wipe it off with white spirit and try again. It also has a guide arm so I can set it against the side trim to get it perfectly horizontal. I will practice on an old wing first though. When I have fitted the rear wings, I will have a go on the car. That might be some time yet though!
GrimV8
Active Member
They're a great toolkeynsham1 said:The coachline will be white as the original was. I bought a special tool to paint it on myself! I know that sound brave, but it seems pretty foolproof. I have tried it out and it really is easy to use. It is made by a company called Beugler. The paint is slow drying so if it goes wrong, you can wipe it off with white spirit and try again. It also has a guide arm so I can set it against the side trim to get it perfectly horizontal. I will practice on an old wing first though. When I have fitted the rear wings, I will have a go on the car. That might be some time yet though!
") Used to have one but someone asked to borrow it :roll: can't remember who it was :cry:
Used to have one but someone asked to borrow it :roll: can't remember who it was :cry:Hello Richard,
Your Rover is such a credit to you! Fantastic work, fantastic restoration.
Ron.
Your Rover is such a credit to you! Fantastic work, fantastic restoration.
Ron.
grifterkid
Member
Richard that is a truly stunning P6... I am amazed & it's not even finished yet...!!! I assume your getting it ready for the summer season? If so I really do hop I get the chance to see it. With regards to the aerial on the wing is this a NADA spec irregularity i.e why is it not on the roof as per UK P6's...?! Anyhow, I cannot wait to see ow this progresses, I doff my cap to you squire... :wink:
josephp6man
New Member
hi,
all the NADA's i fetched over had a wing mounted aerial, all on the passenger side, so has not to be in the way i presume of the driver's view. i do have handbooks and literature for them that i have not looked at for years, so can not remember if they were on as standard or put on by dealers over there.
joseph
keynsham1
Active Member
No glossy photos today I'm afraid. I just spent four hours removing my rear brake calipers. The car is on four ramps at the moment so access is not too bad. After forty years, however, most things didn't want to budge. I needed a 1 1/8" socket for the caps that cover the mounting spindles. I had to go out and buy one. It didn't fit as the disc is so close to the cap there is very little clearance, so a but of judicious angle grinding of the socket solved that. They were tight, but eventually them were off. The spindles themselves were another sticking point. I loosened the rear end hex in the end to move them. I had already removed the old pads and that task in itself required at least two cups of coffee! I am not going to mess about with the calipers. I am going to replace them with reconditioned units and also all the pipes, and probably the discs. I did notice that the link pipe seemed to be completely blocked. I have seen other posts commenting on this. I cut it in two and looked inside. No obvious degradation, but enough it seems to block it up.
Once I have sorted the brakes, replaced the reserve tap cable, and possibly the fuel pump, and after a lot of undersealing, the underneath will be complete. I am still miles from finishing though, and 2010 Rover rallys are beginning to look a bit optimistic!
Once I have sorted the brakes, replaced the reserve tap cable, and possibly the fuel pump, and after a lot of undersealing, the underneath will be complete. I am still miles from finishing though, and 2010 Rover rallys are beginning to look a bit optimistic!
keynsham1
Active Member
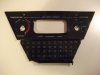
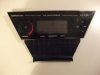
Today I have been playing with making a replacement centre console panel. My NADA car has air con and electric windows so the centre console cover is very different form standard spec, and mine is rather tatty.
If you have ever made an Airfix kit, you will be familiar with wet slide transfers. My plan was to cut out a shape from 3mm thick transparent polycarbonate sheet and make a tansfer to place on the rear side. I found a place on the internet that sells wet transfer inkjet printer paper. I made a picture using VISIO on my computer to replicate the panel and printed a transfer in reverse. I cut out a piece of the polycarbonate sheet and applied the transfer. It is a prototype at the moment, but I think I can make a good job with some care and a little more time. I will make the remainder of the panel by cutting a standard radio speaker grille panel.
Lessons learned so far... don't dry transfers on the radiator, because they shrink!
Attachments
keynsham1
Active Member
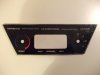
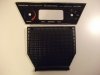
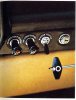
I have thought about flaring the panel out around the window switches and have come up with two solutions. I am working on the idea here that most people will not have seen the interior of a NADA car and so will not notice if it is slightly different to the original. I am not concerned about concourse but I would like it to be as close to original as possible. Also, I would rather have an undamaged panel that is slightly different in design, than an original but tatty one, bearing in mind it will be in my line of sight! So my plan is either to cut the hole and file it very accurately so it is a close fit around the switch block and maybe filling the gap with some sort of black sealant, or to make it a few millimetres wider and line it with edging similar to the stiff used on the overriders. I shall be doing some more prototyping and fitting trials over the next week or so. I will post my findings here.
thebaldyman
Member
Hi
Stunning looking car!!! The chrome strip along the front of your bonnet is it NADA fitment only?? I only ask as I have just found one in the garage full of parts I have just bought.
Stunning looking car!!! The chrome strip along the front of your bonnet is it NADA fitment only?? I only ask as I have just found one in the garage full of parts I have just bought.
03211 22 50
No, it is series 1 V8 only.
Mad_Dan_Eccles
Member
josephp6man said:hi,
all the NADA's i fetched over had a wing mounted aerial, all on the passenger side, so has not to be in the way i presume of the driver's view. i do have handbooks and literature for them that i have not looked at for years, so can not remember if they were on as standard or put on by dealers over there.
It was a dealer fit. As far as I know the only factory fit options were A/C, Sundym, leather seats, and heated rear window (though I don't think you could have AC and a heated rear window at the same timem as the isolating switch for the compressor was fitted where the rear window switch would otherwise have been)
I have two cars - one had the aerial on the wing, while the other had it on the rear decker panel, opposite the petrol cap
Aidrian
keynsham1
Active Member
Just a quick update on my progress. Actually there hasn't been much as I have been decorating a flat to sell! My car now has rear brake calipers and hoses fitted. It took me ages to fit the calipers until I twigged that you need to fit the flexible pipes on the bench and then fit the offside caliper by manouvering it over the diff housing. If you don't do this, there is no way you can tighten the hoses as there is not enough room. For those who have tried this job, I suspect you are all grinning now. Still I will know if there is ever a next time.
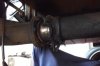
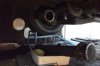
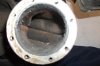
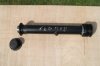
I took my DeDion tube out to replace ther seals and replace the gaitor. I removed it whilst the car was on ramps as shown in another post, and it was fine. Very little movement, but if you push the car sideways without it fitted, the sway is incredible. It makes you realise how much that tube does.
Interestingly, it has P6B MkII written on it in white paint under the grime, so it is either not the original, or it is a replacement, or a very early factory MkII unit? Who knows... It is oil filled so that might be a clue?
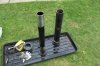
My exhaust is about to be replaced. The car has a back box, but no middle box. There is a pipe welded in it's place. I am replacing this as it is wrong, and a bit noisey! After that, some brake bleeding and a bit more undersealing, oh, and mudflap fitting, I can put the car on the ground from its ramps and finish the exterior. That includes fitting rear valence, rear wings, rear lights, various rubber seals, bumpers, overriders, number plate plinths...etc.etc.. and of course, the one job I am not looking forward to, which is refitting the doors with locks and window frames!
Hopefully I will have some more pictures to post soon. I have taken some from under my car, but as I cannot get far away, they are not too good.
I took my DeDion tube out to replace ther seals and replace the gaitor. I removed it whilst the car was on ramps as shown in another post, and it was fine. Very little movement, but if you push the car sideways without it fitted, the sway is incredible. It makes you realise how much that tube does.
Interestingly, it has P6B MkII written on it in white paint under the grime, so it is either not the original, or it is a replacement, or a very early factory MkII unit? Who knows... It is oil filled so that might be a clue?
My exhaust is about to be replaced. The car has a back box, but no middle box. There is a pipe welded in it's place. I am replacing this as it is wrong, and a bit noisey! After that, some brake bleeding and a bit more undersealing, oh, and mudflap fitting, I can put the car on the ground from its ramps and finish the exterior. That includes fitting rear valence, rear wings, rear lights, various rubber seals, bumpers, overriders, number plate plinths...etc.etc.. and of course, the one job I am not looking forward to, which is refitting the doors with locks and window frames!
Hopefully I will have some more pictures to post soon. I have taken some from under my car, but as I cannot get far away, they are not too good.