Wild Rover - NADA 3500S

You're really cracking on with the strip down Alan. I think there are quite a few of us with our first P6's on here so we're all on the same learning curve as you - just a little bit further round the corner!

Most of the things you've taken off so far just need cleaning and checking over before painting and refitting so nothing too difficult other than remembering where it all goes.

I'm pretty sure the factory differential can take anything the 3.5l engine can throw at it even if it's tuned up a bit. If you increase the capacity then you'll start to get closer to it's limits, but I don't think it worth you spending a year re-engineering the back end of your car for.
 
I agree, Paul. To my mind there are only two reasons for changing to a Jag diff, first is if you are pulling 300 bhp plus and need an LSD to stop the rear lighting up all the time. Second is if you have broken the output shafts and can't get replacements. The output shafts don't break from power, but from the very harsh drive take up from the BW if not properly set up - the dreaded clonk!

Chris
 
Hi Alan,

Well done on dropping that rear end! I have my own "wallop and see" approach to car mechanics. I've often failed to walk away when I should have though, and consequently broken stuff in frustration. I've never had to contend with seized components bar front caliper pistons that I forced out using two screwdrivers jammed in the dust-seal lip, one from either side. If you have got the rear calipers off you've already been at them with a chisel I presume? When it comes time to crack them open, Quattro's overhaul sticky under "Brakes" tells you what the manual doesn't.

I degreased, pressure washed, wire brushed and coated the components twice with rust converter. After fitting new bushes I suspended the lot from a carport rafter using bits of wire coathangers, masked the bushes, put on a coat of zinc primer and a random topcoat whenever the wind didn't deposit the dust on parked cars. I would've used POR-15 instead of zinc over the rust converter (not on plain rust) if I found any locally.
 
The treatment that breaks the differential output shafts the easiest is allowing one wheel to break free while hooning through a corner. The loss of traction and then the sudden gain of adhesion places enormous strain on the output shafts.

Ron.
 
hi all,
back from the USA. i was close, but thankfully far enough away from the tornado. when ever you are ready for the parts alan, i am ready to post them. we had a really good time over there and the rally itself was superb, with people driving from all over, one gentleman and his wife did a 1400 mile round trip, that is what i call dedication. there were some stunning cars and when i get time i will upload some pictures for you all.

ian
 
josephp6man said:
hi all,
back from the USA. i was close, but thankfully far enough away from the tornado. when ever you are ready for the parts alan, i am ready to post them. we had a really good time over there and the rally itself was superb, with people driving from all over, one gentleman and his wife did a 1400 mile round trip, that is what i call dedication. there were some stunning cars and when i get time i will upload some pictures for you all.

ian

Ian,

Glad you made it back in one piece - I knew you were a fair distance from that tornado, but it must have been a shock to you all the same - they rarely get them that side of the country! We don't see them on the left coast usually but I think there was one up north recently.

I will get the rears stripped down and get all the parts sent at one time - I will give you a shout with the info as soon as John lets me know what's needed.

Alan.
 
I dropped the complete rear end off with John last week - his first comment was that it looked like it had come out of an English car rather than a California car.

The offending right caliper wouldn't let go of the disc - it took a ton of WD40 and progressively larger hammers to get the disc out. I hung around with John and had a cup of tea before leaving him to the joys of stripping the calipers off - I've not spoken to him this week, but I am pretty sure that the news on the brakes won't be the good kind...

Ian has all my parts lined up and ready to go, I am just waiting for John's diagnosis before having the stuff shipped - I don't want to have to put in another order if we forget something. I will have the calipers powder coated - I am thinking black, although I think I told John to choose any old colour - could be a surprise then :shock:

*whinging alert - those of you with UK cars please ignore the following - I know it's far worse over there*

I knew I had some rust in the front right wing - when I sanded the paint back to deal with the fire damage I saw there was some rot - it is right where the short diagonal brace is located. I thought that the left wing was in much better shape - I stripped back the paint just to be sure and it all looked okay. Then I decided to get the whole wing sand blasted to get all the crap cleaned of the inside. The same damage showed up on the left wing. There are also a few other areas where the metal has gone through, just pin pricks really, but still not a perfect rust free wing.

I have taken the right wing to the sand blasters - I ended cutting the diagonal brace out as it was pretty rotten, and I cut away the rot I knew about - fingers crossed that the rest of the wing is okay. I am hoping that the damage I have found is easily repairable as sourcing good spares locally won't be too easy.

While I was in a sandblasting frame of mind I dropped off the lower valance and the removable cross member that protects the oil filter (I am getting that powder coated).

I also had the valve covers blasted - I don't know whether or not to get them powder coated or polished - any thoughts?? I bought a polishing kit from Amazon, so I might give it a whirl and see how they turn out. I can get them professionally polished for $30 each or powder coated for the same money.
 

Attachments

  • 01. Nasty.jpg
    01. Nasty.jpg
    36.2 KB · Views: 677
  • 06. Rusty brace.jpg
    06. Rusty brace.jpg
    46.5 KB · Views: 677
  • 02. Wheel arch damage 1.jpg
    02. Wheel arch damage 1.jpg
    20.5 KB · Views: 677
  • 09. Valve covers 1.jpg
    09. Valve covers 1.jpg
    32.8 KB · Views: 677
  • 04. Left wing damage.jpg
    04. Left wing damage.jpg
    35.6 KB · Views: 677
The wing bracing is a known rust point, I beleive that others just remove the brace and leave it off to prevent future problems.

Graeme
 
Chris, Paul and Ron - sorry, I meant to thank you earlier for your responses to my question about rear ends and horse power. I do plan to squeeze a little more out of the 3.5, but I don't think that I will be hitting the 300 hp mark, so no need for an expensive re-engineering of the final drive unit then.

I keep getting ahead of myself with some of these things, but it's a nice distraction to be able to think ahead. I have been browsing at the the wedge shop's website, and they have a nice little selection of goodies to upgrade my 3.5. I have also been reading through a few of the threads on the forum and I know a few of you have made some performance upgrades - I will be paying closer attention as my build progresses, but I know of a few people that I will be asking for input when it comes time to rebuild the engine.

I am also really looking forward to Ian's thread about the installation of a 4hp22 transmission - just another option to keep in mind.

I have just had the lower valance all cleaned up of paint and underseal, and it is in pretty good shape - better than the wings anyway. I have given it a quick coat of primer to stop any flash rusting and now it will go and wait patiently in a corner until it's time (and I have the money) for paint.

For those of you with a well developed sense of irony I believe that I will have a post in the near future to satisfy you, but first I have to phone Ian to ask a few questions :?:


My recent acquisitions...
 

Attachments

  • Bare metal 2.jpg
    Bare metal 2.jpg
    36.6 KB · Views: 642
  • Bare metal 3.jpg
    Bare metal 3.jpg
    31.8 KB · Views: 642
  • ET 1.jpg
    ET 1.jpg
    25.7 KB · Views: 642
  • Primer 1.jpg
    Primer 1.jpg
    50.4 KB · Views: 642
Those headrests are the super rare early type with the shaped and stiched front! They will be leather too! 99% of ET headrests are vinyl and have a straight unstitched front face.

Chris
 
Very nice headrests! Now all you need are a set of rear ones to really complete the interior ;)
 
I also had the valve covers blasted - I don't know whether or not to get them powder coated or polished - any thoughts?? I bought a polishing kit from Amazon, so I might give it a whirl and see how they turn out. I can get them professionally polished for $30 each or powder coated for the same money.

Very tough to polish alloy that's been sandblasted or beadblasted; it makes a hardened surface and once you've polished through that then it only stays shiny for a short time + constantly needs polishing thereafter.... Powder coating will never need redoing + a variety of colors are available...

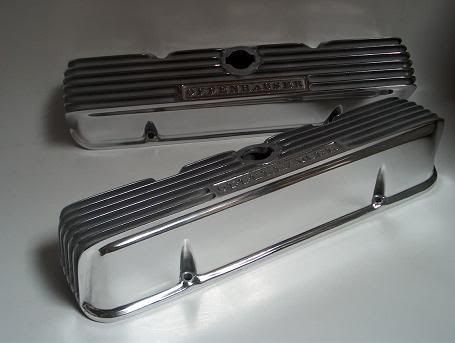
The nicest valve covers are the aftermarket Offenhausers which are polished with a clear finish; made for the Buick 215 but bolt straight onto Rover cylinder heads ( Offenhauser part number 5189 ) I see you already know the Wedge Shop +www.aluminumv8.com (D +D) are both a pleasure to deal with...

offy_5189.jpg


Good luck!

GW
 
Thanks for the info Graham - I guess that really only leaves powder coating as an option if I want to keep the original rocker covers.

There are a few gouges and lumps missing from the rocker covers, but as they are the originals I may just keep them as part of the character. The next question is what colour to powder coat :?: I still haven't decided on an overall colour for the WR - decisions, decisions... And, of course there are the shiny Offenhausers if I change my mind...

chrisw said:
Very nice headrests! Now all you need are a set of rear ones to really complete the interior ;)

Not sure where I would find those in this part of the world Chris...
 
The original colour is a very classy medium grey. But then if you are after something a little more in yer face?

Rear headrests are available new from the UK, ask again when you get near that stage!

Chris
 
Rear brakes are finally apart. So I will be completing my order with Ian shortly for all necessary supplies - I am sure he'll be happy as I have been putting him on hold for a while now - thanks for your patience Ian.

Attached is a pic of one of the offending rear pistons - what do you reckon, is it cream crackered or what?
 

Attachments

  • 01. Piston Rear caliper.jpg
    01. Piston Rear caliper.jpg
    50.2 KB · Views: 1,207
hi alan,
as they are obsolete, it will do. also as it does not rely on it being perfect as no fluid passes it, it is only a piston for pushing the pads out, a good clean and it will be fine.

ian
 
Alan at Classeparts makes these from stainless steel, you need to retain the metal plate from the end of your very corroded piston to attach to the stainless replacement one. Mine actually needed a tiny bit more material removing on a lathe before the end plate could be attached properly.
 
Back
Top