Wild Rover - NADA 3500S

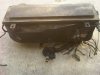
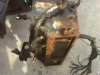
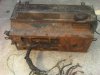
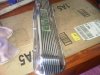
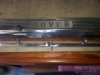
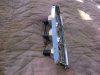
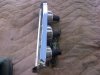
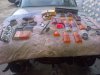
Another small step forward with stripping down the Wild Rover - I have managed to get the heater/air-con box out. Like most things, it is always more difficult and fiddly than necessary - now that it is actually out I can see that it shouldn't have been as awkward as it was as it really is only held in by four bolts.

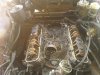
Having melted and crusty wires and piping in the engine bay doesn't make it any easier, plus there is still a massive layer of leaves and twigs that have collected over the years. There is a fair amount of rust on the outside of the heater box - I am hoping that it's just superficial and will clean up easily enough. I will drop it off with my mechanic this week - hopefully we can find someone locally that can overhaul the unit without breaking the bank.

One of the most annoying things that resulted from the removal of the heater - a/c box was the loss of one of my better screwdrivers. I cannot for the life of me find it - as Quattro would say, it's gone all hidey. I have searched high and low, but still can't find the little bast**d - really, really annoying, even more so than splitting my head open when I walked into the air filter box I left hanging up while the primer dried.

**Update** Screwdriver is now un-hidey and the scar is healing nicely. The missues found it - she claims that she knew all along where it was, but has no explanation as to why it took two days for her to tell me :?

I am sure I won't get any sympathy from my UK brethern, but it was almost too hot to work outside yesterday. I didn't get a temperature reading, but the driveway was too hot to kneel on and there wasn't much of a breeze. It's been the first run of hot weather that we have had this year, which usually catches me out - luckily this time I remembered sun block and there was plenty of cold water in the garage fridge. The day ended well enough, heater-a/c box out, a beer and a swim, followed by a trip to our local Sushi joint for more beer and Sake - still got two more days to relax as it's a three day weekend here - I suppose I will have to bust out Ol' Glory ready for the fourth.
 

Attachments

  • 04. Heater A-C  Box 1.jpg
    04. Heater A-C Box 1.jpg
    45.2 KB · Views: 1,108
  • 05. Heater A-C Box 2.jpg
    05. Heater A-C Box 2.jpg
    57.6 KB · Views: 1,108
  • 06. Heater A-C Box 3.jpg
    06. Heater A-C Box 3.jpg
    56.2 KB · Views: 1,108
  • 07. heater A-C Box 4.jpg
    07. heater A-C Box 4.jpg
    50.8 KB · Views: 1,108
  • 09. Engine Bay.jpg
    09. Engine Bay.jpg
    49.6 KB · Views: 1,106
dont think that heater box looks too bad by uk standards. The main thing is to change the rubbers, not sure about the air con side though...

I was trying to weld my car in january when the max temperature was less than -5 max and i guess thats no different to 40 degrees (c)...

Rich
 
That heater box looks very good. Look after the Ranco valve & try not to break the capillary, it will unscrew from the back of the valve. You may not need to completeley strip the whole thing. The motor may be a bit reluctant to turn, but if you give the fan a turn by hand 1st, then apply a healthy 12v supply to the brown/red & black wires & it should run. It will probably pick up speed as it loosens up. If all is well with that, then apart from cleaning it up & painting it, you will want some new foam seals on the flaps & that will probably be about it. The vacuum motors seem to be as tough as old boots & if you can lay your hands on a hand operated vacuum pump, that really helps to work out if everything is operating in the right order.
Roly.
 
hi alan,
i second what roly has said, that is in good shape. if you need to know which rubbers for the vacuum have what letters on them either roly or myself can let you know. you will need to make sure they are air tight to get them to work and open the flaps correctly. i have them here, so here goes. the letters are on the back of the switches and two on the electric switch L & K. G bottom flap, E fresh air middle flap, L top flap, B & A go to the ( tee ) piece, F goes to the ranco valve, J thermostatic switch, H loops to K and finally D loops to C. the electric switch looking at it from behind with the letter L on top you have one electric wire on the top, then going clockwise two down the right and finally two on the bottom. starting at the top and going clockwise GN/BN, BN/R, BN/W, BL/BN then BN/BK any problems let me or roly know and we can sort it out for you.

ian
 
Ian - thanks as ever for the input and advice. Now that the heater / air-con box is out it all makes a little more sense - I am not saying it looks easy, but it seems less daunting than when I was looking at all the vacuum hoses in the dash.

I haven't done much on the WR this last week or so, too much other stuff going on, but I do hope to get back to him soon - I think I am almost ready to pull out the engine and trans - Ian, we need more posts on your 4-speed conversion...

I have indulged myself with some shiny bits recently - I know it's early days, but sometimes you need a glimpse of the finishing line.

I know that Graham expressed some concerns about polishing the valve covers after them being sand blasted - still after a chat with some locals I decided to take a chance - they look lovely and shiny but if they really don't hold the shine I can always get them powder coated. I also had the stainless trim from the front of the bonnet polished just to see how it would come up - all in all I am quite pleased... it's the little things...

I am eagerly awaiting delivery of all the bits I ordered from Ian so that we can put the brakes back together. I will post an update when they arrive and the work is done.
 

Attachments

  • 02. Shiny 2.jpg
    02. Shiny 2.jpg
    52.6 KB · Views: 1,019
  • 01. Shiny 1.jpg
    01. Shiny 1.jpg
    38.2 KB · Views: 1,019
I know that Graham expressed some concerns about polishing the valve covers after them being sand blasted - still after a chat with some locals I decided to take a chance - they look lovely and shiny but if they really don't hold the shine I can always get them powder coated

Eastwood also make a product: 10200Z "Diamond Gloss Clear" finish, after you buff the alloy , clean it with wax-and-grease remover, spray on the finish + you then have like a glass finish on the shine which is impervious to heat + gasoline + will keep the look without having to buff these again ( polished carbs/intake manifolds/rocker covers, etc. )

http://www.jegs.com/i/Eastwood/352/10200Z/10002/-1

Keep up the good work!

GW
 
They do look really nice polished, I've got some that I've had for about 20 years, but they've been in a damp uk garage most of the time and have suffered badly. I dare say in California you won't see anything like the same problem, maybe just give them coat of wax or something. You guys often have un-laquered polished alloy wheels, basically the same thing.
 
It's been a terribly long time since I have posted any updates on the Wild Rover - unfortunately, there isn't really much to update :oops:

When I have had the time, I haven't had the inclination, when I had the inclanation, I didn't have the time, and when I had both the time and inclanation I didn't have the money...

I have done a few little bits, mainly fafing around so I can tell myself I am still "working" on the car. The engine is ready to come out now; all that remains to do is undo the gearbox mounts and then crane it out - I have been promised a crane and an engine stand, so I am waiting for the word to go and pick those up and then the engine and gearbox are out.

I have spent some time trolling around trying to locate bits that I will be needing - again it often comes down to money, or lack thereof. I was lurking on eBay UK and came across a pair of NOS rear lights for 80 quid - seemed like a bit of a steal, so I went for it. They arrived the other day, and while they are a whole lot better than mine, they still have some pitting evident - am I just expecting too much for 30+ year old parts?

Also on eBay UK I came across a fella selling some old bits from a long departed Rover - what got me interested was the fact that he was up the street from me in Long Beach. I read his profile and it sounded very familiar. Long story short - it is a guy I already knew, I didn't know he once had a P6, and he didn't know that I was now restoring one - small world! He had a box of odds and ends that he was looking to get rid of, so I stopped round to see what he had.

My mate had just sold his icelert to someone in the UK - unfortunately, the eBay shipping calculator was totally wrong and it end up costing him more money than he made to send the part to the UK; he said a deal is a deal, so he didn't want to back out on the seller, but he didn't want to deal with selling anything else on eBay.

I gave him a $100 for the box of bits, which included a Series 1 grill, front and rear brake pads, 5 new UJs, a bunch of lenses including red rear turn signals, and a bunch of other stuff that I will probably end up tossing.

As I now have a supply of UJs I thought I would replace the ones on the propshaft - it's already out of the car, I have UJs on hand, why not? Both UJs are frozen solid in their mounts - they were fine, but with all the effort I have put into removing them, now they really need to be changed. I nearly broke my heavy duty, guaranteed for life C-clamp, so now I have ordered the proper tool for the job and that will have to wait.

I also got my rebuilt front calipers back the other day, all nice and powder coated with all new bits courtesy of Ian at Classic Rovers.
I hope to get the engine out in the next couple of weeks - once I do that I will feel like I have made a real step forward and hopefully everything will start to gain momentum again.
 

Attachments

  • 08. NOS rear light.jpg
    08. NOS rear light.jpg
    110.8 KB · Views: 681
  • 09. NOS rear light.jpg
    09. NOS rear light.jpg
    103.9 KB · Views: 681
  • 01. Parts.jpg
    01. Parts.jpg
    124.8 KB · Views: 681
  • 04. Caliper.jpg
    04. Caliper.jpg
    105.9 KB · Views: 681
  • Frnt rhs caliper detail 3.jpg
    Frnt rhs caliper detail 3.jpg
    54 KB · Views: 681
That's a useful stash of parts you've found there. I bet you can't wait for the engine to come out so you can get the engine bay cleaned up?
 
Okie dokie - a little clarification is in order.

I will not be tossing any parts until I have let y'all know what's going in the bin. Knowing how hard it is to source some bits for the old girl I would never do that to the rest of all ya'll. :D

Fraser and Roy have put themselves first in line and I will let the rest of you know. if I have stuff that's of use to anyone else all I ask is to cover postage...

Paul, I am dying to get the engine out - I will really feel like I have turned a corner when that happens - hopefully not a dead end though :)

Thanks agian to all of you - I really take heart when I see what great work some of you have done.
 
Hello Chris,

I had not seen your threads on the forum until recently. I was sorry to see what the fire had done to the 3500. Unfortunately the way the gas line is set up and delivered to the carbs they are very susceptible to leaking and a potential fire when they get old. I live in Massachusetts and host RoveAmerica each year. This year the event will be held the first weekend in June and you should think about coming out and meeting other like minded souls including Ian who plans to be here with his family.

I have rewired a number of cars and I have found that Autosparks is a great source for Rover harnesses. However if you decide to come out to the event in June I have a number of 3500 parts cars and you are welcome to the parts you need including a wiring harness that I think could be removed and reused with a minimum of clean up.

With respect to the engine I guess I would pull it but I would consider not changing the transmission. It is a fair amount of work and with a rebuilt valve body in the BW35 trans it is not bad at all. Your heater box looks good on the outside but all the seals will be bone dry and need to be replaced. As far as the front end is concerned you should plan on removing everything including the springs and steering box. I would replace top and bottom ball joints and wheel bearings and of course the rubber bushings. Ian should have most of these parts.

If I can help in any way feel free to call me 978-502-2289

I look forward to seeing and hearing about your progress

All the best
Dirk
www.roveramerica.com
 
I have been focusing on a few of the little jobs on the car - stuff that probably won't need doing for a very long time to come, but as no other progress is being made I might as well do them now - right?

I have been trolling through eBay Uk looking for odds and sods that I know I will eventually need. I recently found a listing for the side marker lenses. Mine have had forty years or so in the California sunshine and the front ones have had a fire to contend with, so they were on the list for replacing.

I was more than a little surprised to see that ONE rear marker lens sold for twenty-nine quid - about $45 US :shock: . That would mean $90 to replace the back lenses and probably another $90 for the front and they're not very big either!

I decided that I would try and make my own. A pretty thorough Google search turned up a company called Alumilite that manufactured a resin product suitable for making lenses. They even have a helpful how to section on their website, including all kinds of videos - http://www.alumilite.com.

I bought silicone rubber mix, the two part resin for making lenses, mould release, red dye and orange dye, all of which came to about $75 including shipping - if my plan worked it would be $15 cheaper than two NOS lenses, and I would have the satisfaction of knowing I made them myself. Of cource, this assumes that my idea actually worked out. Still nothing ventured nothing gained.

First, I made a mould of the best lens I had.
I have an uncanny ability to learn things quite well - usually on the second or third try :oops: This mould has some imperfections - especially where the two halves meet, and it results in too much flash and flash that is very hard to clean off neatly. Still, I feel I know what my mistakes were and I could make a better mould next time - I just need to buy more silicone rubber.

My first attempt at making the lens came out quite well. The flash was very hard to clean off and there are some air bubbles trapped in the resin that are not too bad, but are noticeable. To get rid of the air I would need to invest in a de-gasser and I am not sure if I want to spend the money. Getting a colour match is also a little tricky, but I think I came close with my attempt.

The one on the left is an original, the one on the right was my first attempt. You can still see some of the flash attached, and in the third picture you can see the trapped air bubbles.
I actually ended up screwing this one up a little trying to clean off the flash - I have made others, but the flash remains the main problem, along with the air bubbles. I think I will get some more rubber and make a new mould - I am looking for an alternative to purchasing a de-gasser.

I tired to make some amber ones for the front - interestingly it was about 10 times harder. The orange is really hard to get a colour match and ends up being way too orangy. The bubbles seem to be way more prevelant, at the very least they are way more obvious. For some reason the orange resin doesn't properly fill the mould either - I know how that sounds, but every amber one I have made has had gaps in the sides where the resin didn't flow - every red one hasn't had that problem... go figure.

I will let you know how the future experiments go.
 

Attachments

  • 01. Mould.jpg
    01. Mould.jpg
    67.3 KB · Views: 987
  • 02. Mould.jpg
    02. Mould.jpg
    68.3 KB · Views: 987
  • 04. Compare.jpg
    04. Compare.jpg
    127.1 KB · Views: 987
  • 05. Compare.jpg
    05. Compare.jpg
    138.4 KB · Views: 987
  • 06. Compare.jpg
    06. Compare.jpg
    137.7 KB · Views: 987
I have some good news. The amber ones should be reasonably easy to come by in the UK. The actual lamps are common with the Rover P5B saloon which has orange ones front and back. It's only the chrome surrounds and the red lenses that are special to the P6B NADA. For 2nd hand orange lenses I'd start by talking to David Green:

http://www.davidgreen-p5.co.uk/

In the UK the orange doesn't fade, so 2nd hand should be fine. Likewase the rather iffy lamp "bodies" should be available from David if needed. But you'rre right, new red lenses are a kings ransom!

Chris
 
I was thinking.... If you feel you need a de-gassing machine in order to make the red lenses satisfactorily, then there is an opportunity to at least make it pay for itself and perhaps allow the technique to fund a few more toys... First off, there is definitely a demand out there from NADA owners for more copies of the red side marker lens. You've already seen what prices new originals command, and there are many more NADAs in the UK and Europe than in the US. Next up you may have seen that Testrider,Tor, myself and numbers of others are into changing around our lamp clusters. There's a definite demand out there for red versions of the rear indicator lens. And again they command a kings ransom price as new originals. At the front, new stock clear side lamp lenses are going up in price and getting thin on the ground, and there are an awful lot on cars that look very 2nd hand with crazing and missing the pip on the top. There's also a demand from many for clear versions of the front indicator lens, again, pretty pricey new. There could also be a demand (I'll have two at least!) for red versions of the rear reversing lamp lens - which was never made as OE.

Having seen the quality of your first attempt, I'm confident that subsequent versions are going to be well up to the mark for onward sale, given that de-gasser. This is what I did to Lucky:

http://www.classicroverforum.com/viewtopic.php?f=21&t=8535&p=60017&hilit=Lucky#p60017

http://www.classicroverforum.com/viewtopic.php?f=21&t=8534&p=60015&hilit=Lucky#p60015

Chris
 
That's pretty impressive for a first go i reckon!

Nice to see original thinking - i'd never have thought of trying to make them myself! :)
 
Hi Alan,

Just to say that's a great initiative! Good luck sorting out the bubbles and flash!

Tor
 
Back
Top