

You are using an out of date browser. It may not display this or other websites correctly.
You should upgrade or use an alternative browser.
You should upgrade or use an alternative browser.
Rob's long term Supercharging project
- Thread starter 1396midget
- Start date
1396midget
Well-Known Member
as soon as the wallet refills chaps, it'll be back on track!
1396midget
Well-Known Member
Cor it's been a while since I updated this ")
There's a 5 speed gone in these past 2 weekends. Did most of the stuff myself (with dad's help ); we were slowed down somewhat by me stripping 4 of the 6 manifold down studs and snapping one other one; meaning the manifolds had to come off (they are now back together with stainless studs), and the radiator developing a hole on the first test run...
cheap as chips conversion -
£105 for an LT77 with remote, stick, bellhousing, SD1 gearbox mount, fork and release bearing with carrier
£20 for a set of polybushes for the remote
£16 for Series land rover (2A) master & slave
£80 for an AP clutch kit (for a Discovery 300tdi)
£16 for a dual reservoir
£10 for a 2WD manual flywheel
couple of quid for other bits (gearbox mounts, spigot bush)
total cost of about £250 all in.
2 weekends to put it in (hampered by an ole in the radiator)
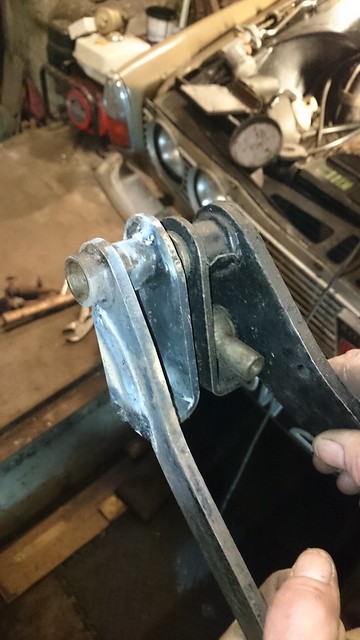
Biggest time sinks were making a clutch pedal:
 DSC_0444 by 1275midget, on Flickr
This is made from a variety of clutch pedals we had lying about. In essence it's a clutch pedal from a classic mini, with the bearing bored out to fit over the P6 rod that the brake works on. The pedal part is from the Rover 200 I got the engine from for the K-onversion on the Midget. The P6 brake pedal can be seen on the right of the above picture. We've copied the same adjuster mechanism as the brake pedal with an extended threaded rod through the bulkhead to the clutch master:
 DSC_0445 by 1275midget, on Flickr
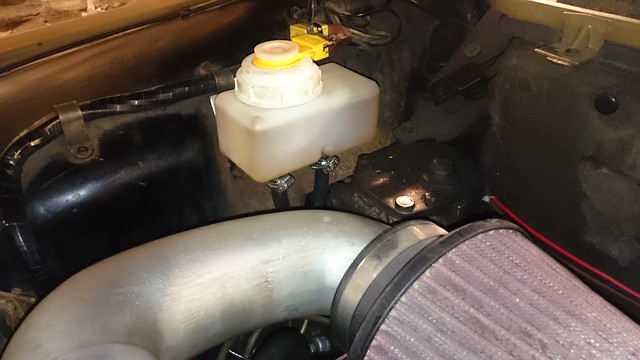
The master is nested in towards the brake master more than other conversions I've seen. This leaves space for a heat shield made of the side of a toaster.
The dual reservoir I got from car builder solutions:
 DSC_0446 by 1275midget, on Flickr
it's got an internal divider so should either system fail the other one still works. It's bolted into the same place as the old one, even down to the low level warning lamp.
The brake pedal was cut down to take the accelerator rubber - this was transferred over and a new one will be fitted when it arrives. The brake actuating arm (the rest of the pedal) remains as it was in the auto; there's just enough space between the tunnel and the brake pedal.
The clutch all bolted up - flywheel, spigot bush, driven plate and the rest all went in as it should. The gearbox is VERY HEAVY and took some effort to bench press into position; we ended up pulling it on the last bit with the bellhousing bolts. The gearstick bolted on afterwards and was right in the middle of the hole, which had to be enlarged a little bit to get reverse and 1st to work.
The auto propshaft bolted in perfectly. The SD1 gearbox mount had the ends flattened out and bolted on to the auto mount locations (about 2 inches further back). The rearmost mount of the three had to be cut off (the only mod bar the enlargement of the gearstick hole to the body) so that movement of the box in its mounts didn't cause a propshaft/body interface.
The speedo drive is made from the original P6 right angle drive and cable, plus the end of a broken SD1 cable that was stuck in the gearbox, and a speedo drive holder from a late MG Midget ribcase box (same thread as P6 right angle drive, made of hard nylon) All of these bits fitted together quite cleverly and work really well.
Reversing light switch was going to work well except I pulled the wires out (oops) - I'll fix that when the box is out next. A small wire was made up to get the inhibitor switch to not inhibit.
Raiding the parts bin provided a rubber undergaiter and leather gaiter to finish it off with. I had to move the centre console over to the passenger side a bit to get reverse to work (I've secured it better than standard with 2 discrete self tappers through the bottom of the front ash tray)
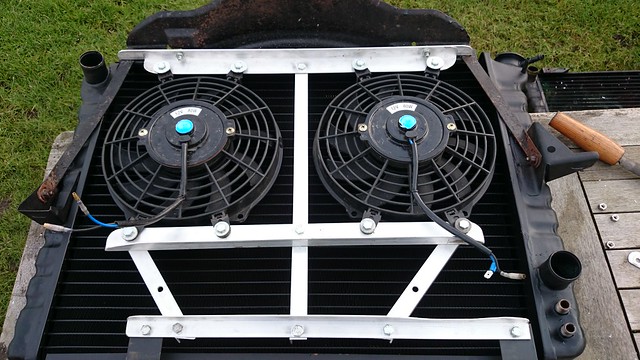
And it all works, with no dramas (I had to make a fair old bracket to mount the twin fans on - they were pinned to the old rad so wanted something better)
 DSC_0522 by 1275midget, on Flickr
Just cam back 100 miles or so - the box is a bit tired (well, what do you expect for that price!) and the speedo is comedically wrong (about 25% under-read!) but everything else is great. By it's fast now...
Here's a video:
https://flic.kr/p/r4Dntf
I'm really surprised at the difference. The whole car feels more taught, more raw, with a quite noticeably different exhaust noise. Stunning, and somewhat devastating in a straight line. It REALLY needs better tyres; watch this space
There's a 5 speed gone in these past 2 weekends. Did most of the stuff myself (with dad's help
); we were slowed down somewhat by me stripping 4 of the 6 manifold down studs and snapping one other one; meaning the manifolds had to come off (they are now back together with stainless studs), and the radiator developing a hole on the first test run...cheap as chips conversion -
£105 for an LT77 with remote, stick, bellhousing, SD1 gearbox mount, fork and release bearing with carrier
£20 for a set of polybushes for the remote
£16 for Series land rover (2A) master & slave
£80 for an AP clutch kit (for a Discovery 300tdi)
£16 for a dual reservoir
£10 for a 2WD manual flywheel
couple of quid for other bits (gearbox mounts, spigot bush)
total cost of about £250 all in.
2 weekends to put it in (hampered by an ole in the radiator)
Biggest time sinks were making a clutch pedal:
DSC_0444 by 1275midget, on FlickrThis is made from a variety of clutch pedals we had lying about. In essence it's a clutch pedal from a classic mini, with the bearing bored out to fit over the P6 rod that the brake works on. The pedal part is from the Rover 200 I got the engine from for the K-onversion on the Midget. The P6 brake pedal can be seen on the right of the above picture. We've copied the same adjuster mechanism as the brake pedal with an extended threaded rod through the bulkhead to the clutch master:
DSC_0445 by 1275midget, on FlickrThe master is nested in towards the brake master more than other conversions I've seen. This leaves space for a heat shield made of the side of a toaster.
The dual reservoir I got from car builder solutions:
DSC_0446 by 1275midget, on Flickrit's got an internal divider so should either system fail the other one still works. It's bolted into the same place as the old one, even down to the low level warning lamp.
The brake pedal was cut down to take the accelerator rubber - this was transferred over and a new one will be fitted when it arrives. The brake actuating arm (the rest of the pedal) remains as it was in the auto; there's just enough space between the tunnel and the brake pedal.
The clutch all bolted up - flywheel, spigot bush, driven plate and the rest all went in as it should. The gearbox is VERY HEAVY and took some effort to bench press into position; we ended up pulling it on the last bit with the bellhousing bolts. The gearstick bolted on afterwards and was right in the middle of the hole, which had to be enlarged a little bit to get reverse and 1st to work.
The auto propshaft bolted in perfectly. The SD1 gearbox mount had the ends flattened out and bolted on to the auto mount locations (about 2 inches further back). The rearmost mount of the three had to be cut off (the only mod bar the enlargement of the gearstick hole to the body) so that movement of the box in its mounts didn't cause a propshaft/body interface.
The speedo drive is made from the original P6 right angle drive and cable, plus the end of a broken SD1 cable that was stuck in the gearbox, and a speedo drive holder from a late MG Midget ribcase box (same thread as P6 right angle drive, made of hard nylon) All of these bits fitted together quite cleverly and work really well.
Reversing light switch was going to work well except I pulled the wires out (oops) - I'll fix that when the box is out next. A small wire was made up to get the inhibitor switch to not inhibit.
Raiding the parts bin provided a rubber undergaiter and leather gaiter to finish it off with. I had to move the centre console over to the passenger side a bit to get reverse to work (I've secured it better than standard with 2 discrete self tappers through the bottom of the front ash tray)
And it all works, with no dramas (I had to make a fair old bracket to mount the twin fans on - they were pinned to the old rad so wanted something better)
DSC_0522 by 1275midget, on FlickrJust cam back 100 miles or so - the box is a bit tired (well, what do you expect for that price!) and the speedo is comedically wrong (about 25% under-read!) but everything else is great. By it's fast now...
Here's a video:
https://flic.kr/p/r4Dntf
I'm really surprised at the difference. The whole car feels more taught, more raw, with a quite noticeably different exhaust noise. Stunning, and somewhat devastating in a straight line. It REALLY needs better tyres; watch this space
corazon
Well-Known Member
1396midget said:Here's a video:
https://flic.kr/p/r4Dntf
I'm really surprised at the difference. The whole car feels more taught, more raw, with a quite noticeably different exhaust noise. Stunning, and somewhat devastating in a straight line. It REALLY needs better tyres; watch this space
Great sounds Rob
Jim
mrtask
Well-Known Member
Great stuff! That little teaser video of the rev counter is a great motivator! I've got all the bits'n'pieces for my manual conversion lying around, just gathering dust, waiting for me to get my arse in gear and get it all put in. Listening to the throaty roar of your car under hard acceleration has reminded me what a slacker I am! Looking forward to your next installment, especially how you get the speedo reading accurately. 8) What tyres are you going to fit?
1396midget
Well-Known Member
the speedo is a slight issue. I reckon I'll send it off to get recalibrated, but I can work it out from the rev counter in the meantime!
Any idea why it sounds completely different? Could the torque converter have been soaking up some of the off beat burble?
Any idea why it sounds completely different? Could the torque converter have been soaking up some of the off beat burble?
1396midget
Well-Known Member
mrtask said:What tyres are you going to fit?
I've fitted Uniroyal Rainsport 3s, in 205 55 R16 size.
Yep, 16.
Just got to upload some pics. Look away if originality is your thing
1396midget
Well-Known Member
Here's some results from today's activity:
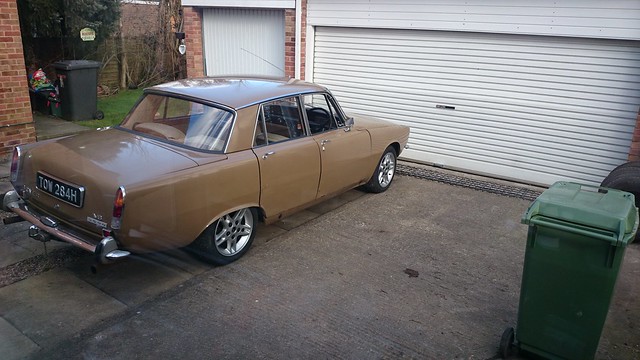
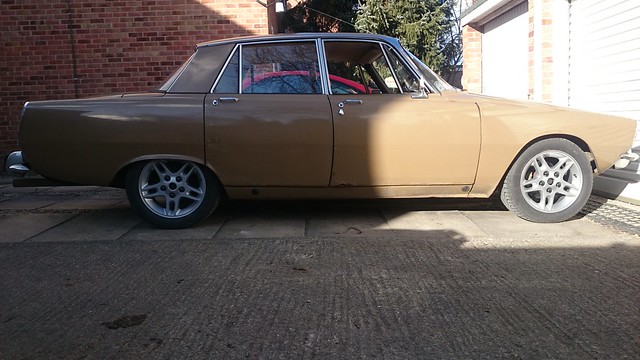
These are the much discussed (in other areas of the forum) Jeep Cherokee wheels.
5 x 127 (or 5 x 5), 16 inches diameter and 7 inches wide.
They fit!
 DSC_0560 by 1275midget, on Flickr
I needed
5 M12 x 1.5 Ford studs (Grayston, 47mm long) - for the back
5 M12 x 1.5 Ford studs (Grayston, 63mm long - for the front
20 wheel nuts (19mm head, 12 x 1.5)
some wheel spacers - 15mm on the front and 3mm on the back - each side.
A big hammer:
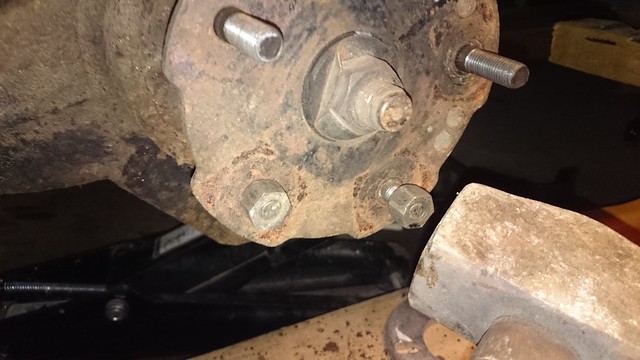 DSC_0548 by 1275midget, on Flickr
the holes are just the right size for the ford studs, after I'd cleaned the rusty out with a bit of rolled up sandpaper
 DSC_0552 by 1275midget, on Flickr
Here's a back one compared with the old one
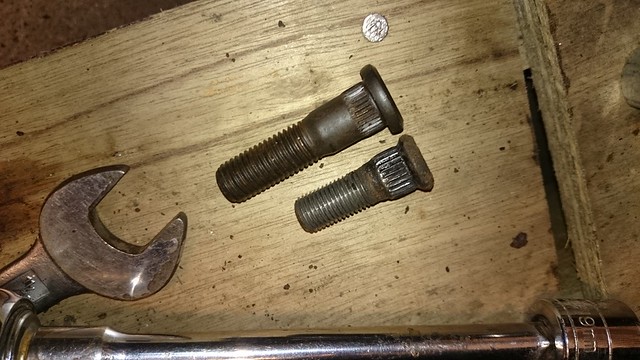 DSC_0549 by 1275midget, on Flickr
Pulled the new ones in with a wheel nut and a specially constructed 'spacer', which is a standard 12mm nut drilled out to 13mm so it goes over the stud, and the 60 degree taper machined in the end so the wheelnut fits in.
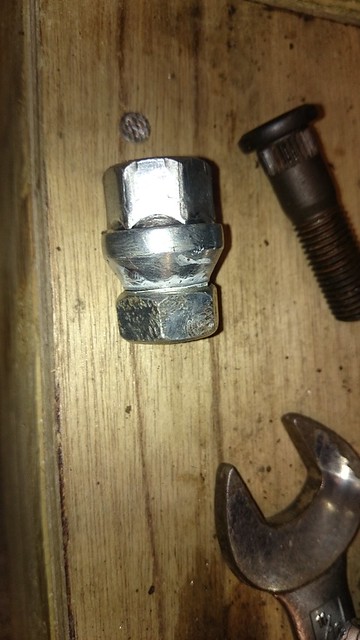 DSC_0550 by 1275midget, on Flickr
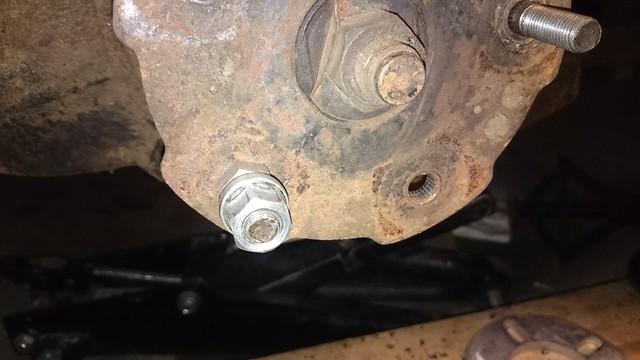
Just right
 DSC_0556 by 1275midget, on Flickr
Front done the same, except I had to take the disc off to get the longer studs in....
 DSC_0559 by 1275midget, on Flickr
 DSC_0561 by 1275midget, on Flickr
(doors are next on the list!)
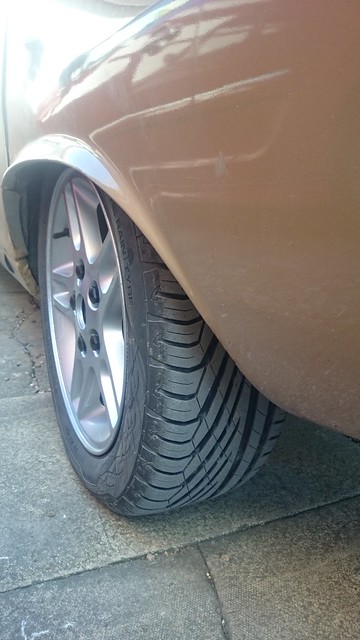
First impressions are pretty good. The tyres only catch in one location, inside the wheel arch in a very specific location at the rear on one side:
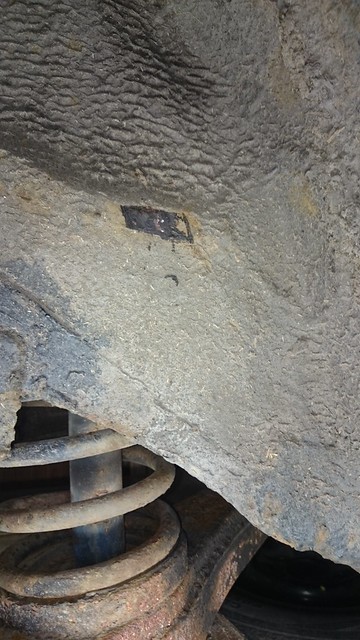 DSC_0564 by 1275midget, on Flickr
The big hammer from earlier has persuaded that to go flat with the rest of the arch, so we're all good again.
Clearance wise everywhere else, there is at least a finger's width between tyre and anything else. Not a middle finger, but the other ones fit fine!
Tyres are 205/55R16, and were only 45 quid each. These are a little bit smaller than the original 185/80R14, 2mph less at 60mph) but the huge 5th gear recently fitted more than negates that. Each wheel and tyre combo is a whole 1kg lighter than the old one.
The car is a LOT more stable, probably due to 30mm wider track at the front. The steering is lighter (eh?) but has a lot more feedback and feels a lot less vague. In fact the whole thing feels a lot less vague, more taught and purposeful. It's slightly crashier over slow speed lumps and bumps (about 25 to 30 mph), not massively so, but it's more than made up for by being smoother at higher speeds. All tyres are at 30psi at the moment, so I can possibly make some changes to that, and I reckon the tracking needs a check as well.
It's not going to be everyone's cup of tea, but I reckon it looks pretty good. In fact, I'd recommend everyone fits some spacers on the front wheels! There was a bit of space left on my original studs....
These are the much discussed (in other areas of the forum) Jeep Cherokee wheels.
5 x 127 (or 5 x 5), 16 inches diameter and 7 inches wide.
They fit!
DSC_0560 by 1275midget, on FlickrI needed
5 M12 x 1.5 Ford studs (Grayston, 47mm long) - for the back
5 M12 x 1.5 Ford studs (Grayston, 63mm long - for the front
20 wheel nuts (19mm head, 12 x 1.5)
some wheel spacers - 15mm on the front and 3mm on the back - each side.
A big hammer:
DSC_0548 by 1275midget, on Flickrthe holes are just the right size for the ford studs, after I'd cleaned the rusty out with a bit of rolled up sandpaper
DSC_0552 by 1275midget, on FlickrHere's a back one compared with the old one
DSC_0549 by 1275midget, on FlickrPulled the new ones in with a wheel nut and a specially constructed 'spacer', which is a standard 12mm nut drilled out to 13mm so it goes over the stud, and the 60 degree taper machined in the end so the wheelnut fits in.
DSC_0550 by 1275midget, on FlickrJust right
DSC_0556 by 1275midget, on FlickrFront done the same, except I had to take the disc off to get the longer studs in....
DSC_0559 by 1275midget, on FlickrDSC_0561 by 1275midget, on Flickr(doors are next on the list!)
First impressions are pretty good. The tyres only catch in one location, inside the wheel arch in a very specific location at the rear on one side:
DSC_0564 by 1275midget, on FlickrThe big hammer from earlier has persuaded that to go flat with the rest of the arch, so we're all good again.
Clearance wise everywhere else, there is at least a finger's width between tyre and anything else. Not a middle finger, but the other ones fit fine!
Tyres are 205/55R16, and were only 45 quid each. These are a little bit smaller than the original 185/80R14, 2mph less at 60mph) but the huge 5th gear recently fitted more than negates that. Each wheel and tyre combo is a whole 1kg lighter than the old one.
The car is a LOT more stable, probably due to 30mm wider track at the front. The steering is lighter (eh?) but has a lot more feedback and feels a lot less vague. In fact the whole thing feels a lot less vague, more taught and purposeful. It's slightly crashier over slow speed lumps and bumps (about 25 to 30 mph), not massively so, but it's more than made up for by being smoother at higher speeds. All tyres are at 30psi at the moment, so I can possibly make some changes to that, and I reckon the tracking needs a check as well.
It's not going to be everyone's cup of tea, but I reckon it looks pretty good. In fact, I'd recommend everyone fits some spacers on the front wheels! There was a bit of space left on my original studs....
GRTV8
Well-Known Member
Those jeep alloys look great on the P6 .
Very pimped and impressive .
Im not an engineer . But wouldn't it be wiser to use a whole billet of alloy as a spacer , instead of drilled out nuts . Im just thinking of the contact surface area behind the wheel/hub , and the stress around those wheel holes under load . Like I said - not an engineer , just a farmer ! Happy to learn new tricks
Gerald
1396midget
Well-Known Member
You're right, it would be pretty disastrous to use nuts as spacers. The spacers I used between wheel and hub can just be seen in pic 552, and are made of machined solid aluminium alloy. The nut based spacers were just to pull the studs through the hubs, as the thread doesn't go all the way down the stud.
corazon
Well-Known Member
Rob that looks excellent, good job. They really suit the tobacco leaf, in fact I'm seeing the colour in a whole new light!1396midget said:
16s might just be the ideal aesthetic for the P6, although I'm still half tempted to go to 17s :wink:
Jim
roverp5Bcoupe
Active Member
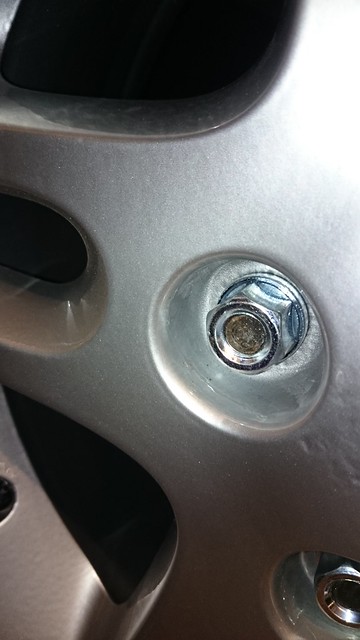
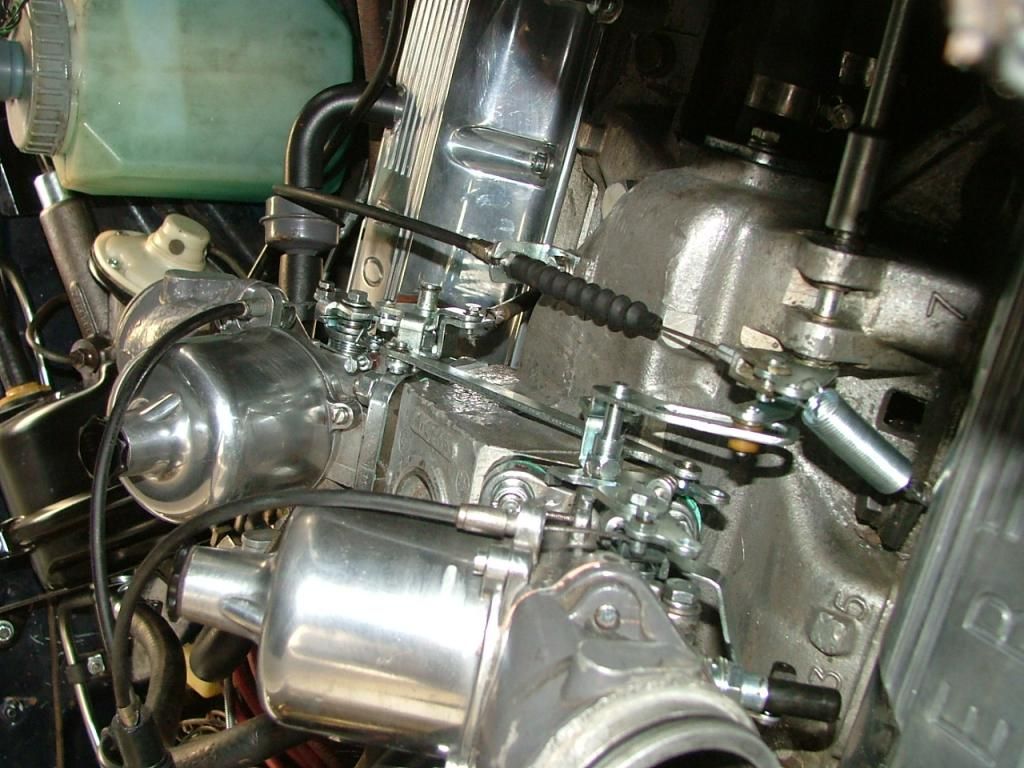
Nice work on the conversion. I have a MGB V8 conversion with SD1 5 speed and a Rover P5B Coupe with automatic gearbox. The MGB reacts better on the throttle and when i was rebuilding the carbs on the P5B, i noticed that the mechanism on the manifold is different with both cars. On the P5B there is a roller which runs threw a slotted hole in a bracket which slows down throttle response compared to the more direct connections on the MGB. The slower throttle respons may be wise for a automatic box but not really necessary for a manual box. I am not familiar how the set up is on a P6B with a manual box.
Attached a picture which shows the (orange or light brown ) roller and the bracket
Regards
Peter
Attached a picture which shows the (orange or light brown ) roller and the bracket
Regards
Peter
1396midget
Well-Known Member
we get the rolly thing too - or at least, the auto ones do. Mine's still using it, seems to pick up OK for such a big engine (the manual flywheel and clutch stuff weighs a TON).
It's certainly an "accelerate, look at speedo, oops better back off" car now. Lighter wheels have given it a bit more straight line poke and it'll leave black lines on corner exists in with a bootful of 2nd gear in the dry....
wonder what's going to break next....
It's certainly an "accelerate, look at speedo, oops better back off" car now. Lighter wheels have given it a bit more straight line poke and it'll leave black lines on corner exists in with a bootful of 2nd gear in the dry....
wonder what's going to break next....
1396midget said:we get the rolly thing too - or at least, the auto ones do.
The roller is nothing to do with whether it's auto or manual, it's only fitted to HS6 carbs.
1396midget
Well-Known Member
I learn new things all the time
1396midget
Well-Known Member
well time for an update on the wheels n tyres after a 250 mile drive up and down the country.
They're a lot better, but perhaps not at everything.
bear in mind that previously I had 205 tyres on the original V8 rims. These were arguably a bit wide for the rims.
The new tyres are also 205, but on much wider rims. This means the sidewalls are almost vertical, and a bit smaller (about an inch less sidewall). This has manifested itself in a slightly choppier ride over low speed bumps. Over bigger bumps, the ride is a lot better, possibly due to the fact that the wheel/tyre combo is about 1kg lighter. Generally it feels a lot more connected to the road, with a reduction in the squashy waver-y feel that it had before.
Cornering is massively improved, as is straight line stability. In fact, it's now massively more capable in cornering terms, well worth the trade off of low speed ride quality. Another thing that's different is the stability at motorway speeds.
With the previous tyres I think I had 2 issues, one was the standard (at least, as reported in other areas of the forum) front end lift at speed, and one was the fact that as it went faster and lifted, the car would lighten the front end and be a bit wobbly. Again, this might be due to the tyres being too wide for the rims.
The new ones just don't bother with any of that nonsense. The car is rock steady up to (ahem) motorway speeds and refuses to lift at the front at all. This might be due to the tyres being 'wider' (squarer shouldered), further apart, more see through to airflow, or any or none of those! Whatever it is, it's made it much more relaxing to drive.
I drove it back on Sunday night down the A1 broadside on to the most horrendous weather, and it was completely unfazed. Not bothered by damp (or wet), or passing lorries, or anything. spent most of the way down steering in a relaxed fashion with only a few fingers. Previous attempts at travel in these conditions have resulted in white knuckle bottom clenching wind-operated lane changes, but no more!
It really is much better to drive now. I know the looks won't be for everyone, and that's fine.
I'll be keeping my eye on the wear. I'm expecting to lose the outside edges first due to the body roll, and associated camber changes, which although reduced is still present. I'll make sure the tracking is OK too, but from driving it it feels fine. I'm running 30psi all round at the moment, which looks like the right kind of sidewall deflection, so I'll keep with that for now unless anyone else has any other ideas? Again, I'll be keeping an eye out for strange wear.
Oh, and I've tweaked the bite point of the clutch so it's less high up. And I've made my own gear knob topper out of a section of ash shovel handle I found (not the T bit though!)
ghce
Well-Known Member
It always comes as a bit of a surprise to me that the design team at Rover got it so wrong with the V8 with regards to the tires and rims, perhaps budgetary restraints or just plain old fashioned thinking?
Changing mine to 205's and SD1 rims was revelation and transformed all aspects of ride, handling and safety (my main concern at that time) from a 1960 standard of ride to contemporary modern.
The other minor tweaks they could have done were also cheap to and trans formative to the handling.
Given all the lauded and well thought out design of the P6 it does cast somewhat of a shadow on the competences of the design team....how much better could it have been if they had been up to the task.
If it appears as if I am knocking the design team, yes I am, however bad as that sounds it is done in the reflection of a rear view mirror and is a little unfair as at that time the standards of design / performance were a lot lower than now but Rover at that time was better than most.
Graeme