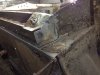
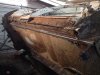
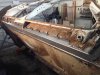
My 3500S Restoration Project

unstable load said:
I have read dozens of posts and still cant make my mind up which way to go about cutting and fitting new panels. What to cut out and what to treat? :?

That first cut would be daunting in the extreme for me.
I know I can weld, I know I can do all the mechanical stuff, I know I can paint, but actually taking the step of that first cut would be terrifying in the extreme along the lines of "What if...?"

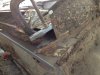
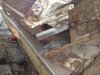
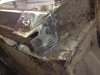
Having said that, I'd suggest replace as much as you can and treat as little as possible, simply because it will always be weaker where you treat anything more than surface rust.

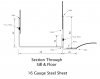
Yes, my thoughts exactly. My dilemma is to cut out and butt joint? or cut out and lap the joints? where not visible.
 
Having done some sheetmetal work, but on aircraft, I'd be inclined to overlap with a joggle to allow a flush surface fit and then plug/spot or seam weld depending on accessibility. This gives less filling requirement when finishing and a nice strong joint.
 
I take my hat off to you iwish, there is a ton of work there. My biggest concern it it were mine, would be maintaining the integrity of the front section of the base unit upon which the top links attach. Mind you, if it were mine, I would send it on a one way trip to Simms (metal recyclers), but I talk from an Australian perspective.

Best of luck with it all, look forward to seeing your progress!

Ron.
 
unstable load said:
Having done some sheetmetal work, but on aircraft, I'd be inclined to overlap with a joggle to allow a flush surface fit and then plug/spot or seam weld depending on accessibility. This gives less filling requirement when finishing and a nice strong joint.


I would agree with the above -its belt an braces but works well
 
unstable load said:
Having done some sheetmetal work, but on aircraft, I'd be inclined to overlap with a joggle to allow a flush surface fit and then plug/spot or seam weld depending on accessibility. This gives less filling requirement when finishing and a nice strong joint.
Yes, this is my thoughts as regards to the strength, especially as my welding may not be to the highest standard.
I find it very interesting to see how far the membership following goes, we tend to forget that the cars were exported. I wonder how many cars survived?
Regards
Dave
 
SydneyRoverP6B said:
I take my hat off to you iwish, there is a ton of work there. My biggest concern it it were mine, would be maintaining the integrity of the front section of the base unit upon which the top links attach. Mind you, if it were mine, I would send it on a one way trip to Simms (metal recyclers), but I talk from an Australian perspective.

Best of luck with it all, look forward to seeing your progress!

Ron.
Thanks Ron. With the price of scrap metal rising its probably worth more than its is in its current state. :p
 
Having giving the task great thought this is what i am planning to do with the Sill repairs.


I cannot see any reason for cutting out and fitting full replacement panels as its only rotted along the bottom 1/2" or so.
 

Attachments

  • Image2.jpg
    Image2.jpg
    45.8 KB · Views: 948
Personally I try to avoid big overlaps like that which could rust from the inside.

Where you've written "52", consider making that turn-up just 5mm or so high. This will leave a gap through which you can continuously weld the inner section above your plug weld (and even paint it). You can then fill the gap with a flat piece tucked in behind the 5mm turn-up. That's how I did mine anyway.
 
I agree with Willy. A big overlap will give you strength but will also create a place for moisture to gather unless you can be sure flooding the area with cavity wax will stop that. Its very difficult to ensure 100% coverage in a blind cavity.

Your rot looks almost as bad as mine and all I've done for the past 18 months is look at it. Well done for getting stuck in.

Dave
 
iwish said:
we tend to forget that the cars were exported. I wonder how many cars survived?
Regards
Dave


Hi Dave here in NZ I think that the majority of the P6 especially the P6B's have survived, thanks to the older and more conservative (pun intended) owners that originally purchased them that and the fact the salt is not used on NZ roads and that the build quality is such that there was little need to scrap cars that did not have too many systemic design faults.

Graeme
 
iwish said:
I cannot see any reason for cutting out and fitting full replacement panels as its only rotted along the bottom 1/2" or so.

I agree and your design looks like a good idea on paper, but I doubt you'll be able to make that U section fit properly because I don't think the cars are that straight and I think you'll struggle to plug weld the inner part as you won't be able to tell if it's fitted flush or not.

If you look at how the sill was originally fitted you'll see a stepped edge which fits under the inner sill and was spot welded to the floor. This allows any variation in the width of the box section to be accounted for very easily. I made a former out of 6mm steel plate to crimp the step on to the sill I made last year, and yes it will take longer to make that your design, but I think it will be easier to fit and weld in. Have a look at the last few pages of the thread about my V8 for more photos. viewtopic.php?f=21&t=8987&start=285#p159980

Good luck though.
 
Willy Eckerslyke said:
Personally I try to avoid big overlaps like that which could rust from the inside.

Where you've written "52", consider making that turn-up just 5mm or so high. This will leave a gap through which you can continuously weld the inner section above your plug weld (and even paint it). You can then fill the gap with a flat piece tucked in behind the 5mm turn-up. That's how I did mine anyway.

Yes, i like your thinking. :) I wish i had read this earlier as i ordered my sections during the week, but at least i can cut them down as required.
 
Dave3066 said:
I agree with Willy. A big overlap will give you strength but will also create a place for moisture to gather unless you can be sure flooding the area with cavity wax will stop that. Its very difficult to ensure 100% coverage in a blind cavity.

Your rot looks almost as bad as mine and all I've done for the past 18 months is look at it. Well done for getting stuck in.

Dave

Yes, the overlaps were concerning me, at least i can cut more out or reduce my sections as necessary.

It feels good to get stuck in, you really must give it a go. :D (How long my enthusiasm will last is another question?) :?:
 
ghce said:
iwish said:
we tend to forget that the cars were exported. I wonder how many cars survived?
Regards
Dave


Hi Dave here in NZ I think that the majority of the P6 especially the P6B's have survived, thanks to the older and more conservative (pun intended) owners that originally purchased them that and the fact the salt is not used on NZ roads and that the build quality is such that there was little need to scrap cars that did not have too many systemic design faults.

Graeme

HI Graeme, its interesting to hear from you. Its a shame they don't fetch more money as you could start re-importing them. :?:
 
testrider said:
iwish said:
I cannot see any reason for cutting out and fitting full replacement panels as its only rotted along the bottom 1/2" or so.

I agree and your design looks like a good idea on paper, but I doubt you'll be able to make that U section fit properly because I don't think the cars are that straight and I think you'll struggle to plug weld the inner part as you won't be able to tell if it's fitted flush or not.

If you look at how the sill was originally fitted you'll see a stepped edge which fits under the inner sill and was spot welded to the floor. This allows any variation in the width of the box section to be accounted for very easily. I made a former out of 6mm steel plate to crimp the step on to the sill I made last year, and yes it will take longer to make that your design, but I think it will be easier to fit and weld in. Have a look at the last few pages of the thread about my V8 for more photos. viewtopic.php?f=21&t=8987&start=285#p159980

Good luck though.

HI testrider, some really helpful comments. I love the link to your project and you have taken some really good photos showing how you tackled the job which are very helpful. I admire your ingenuity. :)
 
Its been a couple of weeks since i last gave an update, so here's how things are progressing.


I'm happy with the progress so far and looking at some of the other projects i think i have got off lightly up to now, only time and a lot more scraping will tell. :!:
 

Attachments

  • IMG_2983.jpg
    IMG_2983.jpg
    141.2 KB · Views: 847
  • IMG_2984.jpg
    IMG_2984.jpg
    135.9 KB · Views: 845
  • IMG_2985.jpg
    IMG_2985.jpg
    147.2 KB · Views: 845
  • IMG_2986.jpg
    IMG_2986.jpg
    133.3 KB · Views: 846
  • IMG_3016.jpg
    IMG_3016.jpg
    134.8 KB · Views: 846
  • IMG_3017.jpg
    IMG_3017.jpg
    142.9 KB · Views: 848
billoddie said:
Brilliant work and tenacity. :)

Yes i must keep at it as once the weather picks up, my wife has a list of things to do as long as her arm, so i expect progress will soon grind to a halt. :|
 
Back
Top