My 3500S Restoration Project

Its been around a month since my last update.
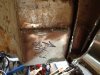
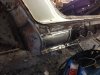
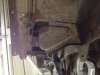
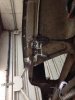
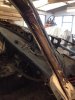
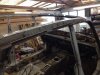
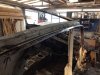
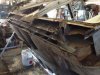
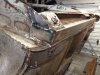
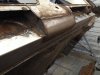
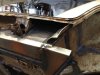
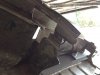
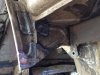
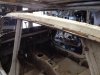
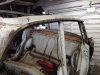
I've been busy scraping off all of the under seal together with the internal seam sealant and sound deadening. What a bitch of a job, a few hours a day at most is all my hands could take and it took around 3 weeks to do.
There are a couple of major benefits to doing this, i no longer fear the Roth of my wife every time i go back into the house treading in bits of old Tar.
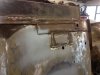
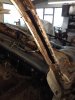
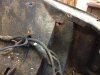
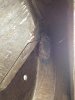
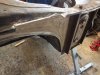
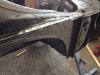
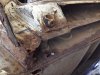
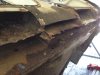
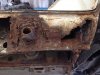
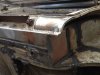
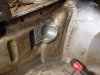
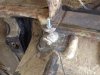
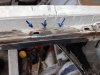
More importantly i have learnt that whilst the under seal looks good with no obvious signs cracking or damage it had clearly failed with signs of rust everywhere beneath. Fortunately, the majority was very light, had the car remained in service rather than being in a barn for nearly 30 years i'm sure it would have rotted severely, as it is i have 17 fairly small pin-holes to repair which you would never find before they become a bigger problem.
I found the old under seal had gone very brittle in most areas and had lost its flexibility, "don't be fooled" I would advise that fresh coat be applied to your cherished one's.
Pics to follow when i get time.
 
iwish said:
i no longer fear the Roth of my wife every time i go back into the house treading in bits of old Tar.

Yeah, don't worry about that, it comes off with white spirits anyway.
 
testrider said:
iwish said:
i no longer fear the Roth of my wife every time i go back into the house treading in bits of old Tar.

Yeah, don't worry about that, it comes off with white spirits anyway.

Yes exactly, i don't know what all the fuss is about? besides shes been getting plenty of practice lately :oops: .
 
People seem to forget that underseal comes with a duty of annual inspection and repair. I wouldn't use it at all today. I've gone epoxy topped with dinitrol on all my repairs and am not coming back. Tougher, more durable, easier to inspect and it doesn't lift and get water behind it.

I seriously think the classic movement should leave underseal behind now.
 
As expected any progress ground to a halt during summer, yes i can hear you saying what summer?

Well I've been able to grab a few hours here and there so i though i would give you a quick update with my progress.


It feels good to get out and finally start making some progress, but I'm beginning to worry about how long its taken to get this far, it will be 2 year in January. :oops: :cry:

06/10/15
 

Attachments

  • IMG_3030.jpg
    IMG_3030.jpg
    131.5 KB · Views: 479
  • IMG_3031.jpg
    IMG_3031.jpg
    118.7 KB · Views: 479
  • IMG_3125.jpg
    IMG_3125.jpg
    135.1 KB · Views: 477
  • IMG_3128.jpg
    IMG_3128.jpg
    112.3 KB · Views: 478
  • IMG_3129.jpg
    IMG_3129.jpg
    120.8 KB · Views: 479
  • IMG_3151.jpg
    IMG_3151.jpg
    117.8 KB · Views: 478
Gradually beginning to make some progress;


Well that's the O/S of the body shell repaired :D
Only another 50% to go. :cry: :cry: :cry:
 

Attachments

  • IMG_3136.jpg
    IMG_3136.jpg
    112.1 KB · Views: 352
  • IMG_3144.jpg
    IMG_3144.jpg
    114.5 KB · Views: 357
  • IMG_3141.jpg
    IMG_3141.jpg
    116.5 KB · Views: 355
  • IMG_3147.jpg
    IMG_3147.jpg
    122.5 KB · Views: 355
  • IMG_1825.jpg
    IMG_1825.jpg
    159.1 KB · Views: 353
  • IMG_3133.jpg
    IMG_3133.jpg
    115.3 KB · Views: 352
  • IMG_3303.jpg
    IMG_3303.jpg
    157.2 KB · Views: 353
  • IMG_3305.jpg
    IMG_3305.jpg
    128.3 KB · Views: 357
rockdemon said:
great to see progress especially when the quality is great like this :)

Being an amateur metalworker, i hope the welds are up to it, i have nightmares of the metal pinging off when i get it back on the road leaving a trail behind me. :!:
 
Able to make the most of a couple of wet weekends.


A few more wet weekends and i might be able to get the body shell repairs finished.
Praying for Rain.
 

Attachments

  • IMG_3153.jpg
    IMG_3153.jpg
    133.9 KB · Views: 277
  • IMG_3154.jpg
    IMG_3154.jpg
    109.6 KB · Views: 275
  • IMG_3156.jpg
    IMG_3156.jpg
    138.9 KB · Views: 275
  • IMG_3162.jpg
    IMG_3162.jpg
    157.2 KB · Views: 275
  • IMG_3257.jpg
    IMG_3257.jpg
    148.9 KB · Views: 280
  • IMG_3260.jpg
    IMG_3260.jpg
    112 KB · Views: 275
  • IMG_3264.jpg
    IMG_3264.jpg
    125 KB · Views: 273
  • IMG_3272.jpg
    IMG_3272.jpg
    121.8 KB · Views: 276
Very thorough work - well done.
Quality of welding is excellent - when it's that neat I wouldn't grind it.

Mark.
 
Great dedication! Time will pass just the same whether you were to repair or not, so keep going!!

Fantastic effort :D

Ron.
 
drabbers said:
Quality of welding is excellent - when it's that neat I wouldn't grind it.

+1 You should be proud of your welding appearence, and i actually prefer the look of it instead of flush grinded ones.
 
Demetris said:
drabbers said:
Quality of welding is excellent - when it's that neat I wouldn't grind it.

+1 You should be proud of your welding appearence, and i actually prefer the look of it instead of flush grinded ones.

Glad you think so. 8)
 
Things are starting to come together;


That it, repairs to the body shell are now complete. :D only taken around 2 years :oops:
 

Attachments

  • IMG_3283.jpg
    IMG_3283.jpg
    149.1 KB · Views: 224
  • IMG_3289.jpg
    IMG_3289.jpg
    160.9 KB · Views: 221
  • IMG_3287.jpg
    IMG_3287.jpg
    102.1 KB · Views: 221
  • IMG_3292.jpg
    IMG_3292.jpg
    129.8 KB · Views: 223
  • IMG_3293.jpg
    IMG_3293.jpg
    115.5 KB · Views: 218
  • IMG_3302.jpg
    IMG_3302.jpg
    134.7 KB · Views: 217
  • IMG_3298.jpg
    IMG_3298.jpg
    115.8 KB · Views: 217
  • IMG_3300.jpg
    IMG_3300.jpg
    110 KB · Views: 218
Congratulation! That's a big milestone in your restoration. Looking forward to see the rest of it.
Regards, Barten
 
Back
Top