

You are using an out of date browser. It may not display this or other websites correctly.
You should upgrade or use an alternative browser.
You should upgrade or use an alternative browser.
1965 2000 SC rolling resto (or not so rolling)
- Thread starter darashen
- Start date
More progress and a few steps back today.
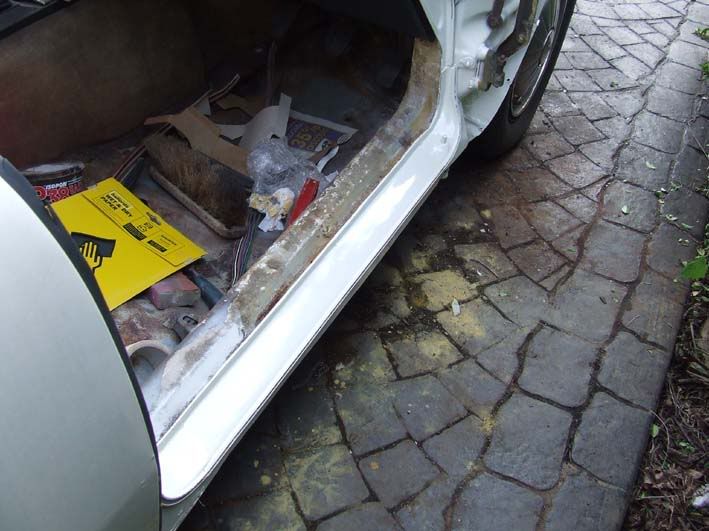
Striped out the rest of the interior ready to finnish welding the nearside jacking point and to paint the floor pans only to find the boat loving previous restorer had been at it again with the boat fibreglass. The nearside inner sill is not welded to the floor it is held together by about quarter inch thick layer of fibreglass. Guess that means more welding to the floor pans. It's actually quite frightening that I was driving this car for a year whilst the front floor pans were not attached to the sills but this will soon be put right. It's also a bit of a mystery as the floor pans and inner sills look to be original panels so it's odd that they are not joined together at exactly the same point on both sides but no signs of corrosion to floor or sill.
I have also started to tidy up the bottom edge of the sill covers as these are original items so of very good quality and worth saving. They just needed about 8 inchs of new steel where they bolt to the underside of the car. I am taking it very slow to avoid distortion of the original panel shape but at least it gives me a job i can get on with whilst it rains.
managed to get a lot more done the last two days.
Front nearside sill and jacking point repaired, I was realy please I was able to save this section rather than replace it completely given the amount of work i had to do on the other side. Once I started cutting out the rust i only had to remove the bottom inch of the jacking point cover and a small repair at the top.
Not so good was the rot I found around the front wing mounting point although I have almost finnished repairing this and just need to weld in the last repair section next weekend.
I have also chipped out the fibreglass from where the floor meets the inner sill and need to weld in a 3 inch plate to repair this again will aim to do this next weekend.
Jobs left to do.
Repair floor to sill join (see above)
paint floor pans
Repair nearside sill cover which has rotted in a few places along it's lower edge, or alternative locate a cheap replacement (wishfull thinking).
remove roof to fit replacement and whilst I am doing this I intend to weld up the hole in the rear offside gutter above the rear door. Hopefully this will not prove to need too much metal letting in as it looks to be a pig of any area to fabricate.
Get an MOT
fit replacement wings and get it painted.
Retrim seats and make up carpets
It's been a while since the last post but things are still progressing slowly.
Virtually all weldng other than the gutters (cant rail) is completely finished and I am now on to the paint stage on most areas. I suspect this (painting) and my 4-year-olds social life are the main things responsible for the slow down. I had found some rattle can paint that was a perfect match for the car off the shelf at Halfords to repair the rear wings but I had used up their limited stock. They ordered more in which is listed as the same colour but having welded up the lamp panel on the front wing and sprayed it this turns out to be a completely different shade so I will have to find other paint and repaint this section.
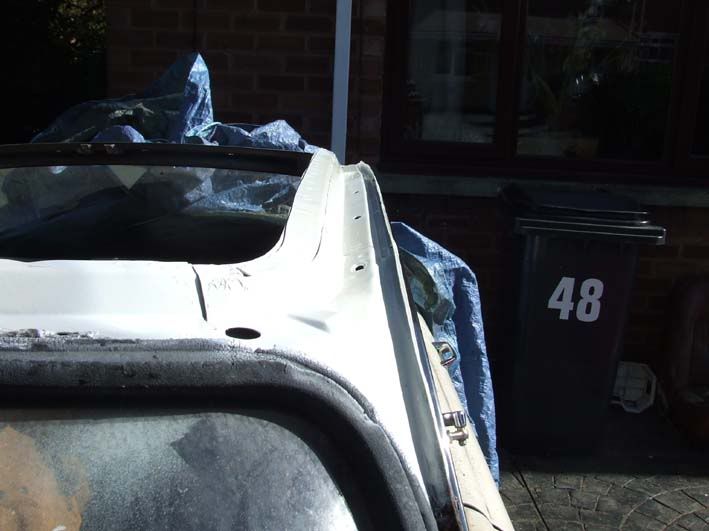
I have just been out and removed the headlining and gutter trim on the offside ready to attempt a repair in the gutter next weekend. Now wishing I had not looked at this, as there is only 3 inches of gutter left at either end of the roof. Does anyone know where I could source a repair panel for the cant rail or know of a friendly scrap yard in the Wolverhampton area that has a P6 in I could remove the required section from. On this point I presume the cant rail is spot welded to the base unit perimeter and can be removed intact by drilling out the spot welds without risk of distortion to the base unit.
On a plus point the rest roof perimeter including the A, B and C posts was completely free of any corrosion despite the windscreen seal being completely shot. I have a new seal which I* picked up shortly after buying the car but have not got as far as fitting so will do this whilst the stainless trims are already off.
Jobs completed since last post.
Welded repair section into front nearside tread plate, Painted nearside A post and tread plate, painted offside A post and tread plate, repaired rear nearside jacking point and D post, Front falls are now attached to the inner sill with metal not fibreglass.
What’s left.
Paint both rear tread plates and d posts. Repair gutters, fit replacement roof, paint floor pans, and reinstall interior, MOT.
Virtually all weldng other than the gutters (cant rail) is completely finished and I am now on to the paint stage on most areas. I suspect this (painting) and my 4-year-olds social life are the main things responsible for the slow down. I had found some rattle can paint that was a perfect match for the car off the shelf at Halfords to repair the rear wings but I had used up their limited stock. They ordered more in which is listed as the same colour but having welded up the lamp panel on the front wing and sprayed it this turns out to be a completely different shade so I will have to find other paint and repaint this section.
I have just been out and removed the headlining and gutter trim on the offside ready to attempt a repair in the gutter next weekend. Now wishing I had not looked at this, as there is only 3 inches of gutter left at either end of the roof. Does anyone know where I could source a repair panel for the cant rail or know of a friendly scrap yard in the Wolverhampton area that has a P6 in I could remove the required section from. On this point I presume the cant rail is spot welded to the base unit perimeter and can be removed intact by drilling out the spot welds without risk of distortion to the base unit.
On a plus point the rest roof perimeter including the A, B and C posts was completely free of any corrosion despite the windscreen seal being completely shot. I have a new seal which I* picked up shortly after buying the car but have not got as far as fitting so will do this whilst the stainless trims are already off.
Jobs completed since last post.
Welded repair section into front nearside tread plate, Painted nearside A post and tread plate, painted offside A post and tread plate, repaired rear nearside jacking point and D post, Front falls are now attached to the inner sill with metal not fibreglass.
What’s left.
Paint both rear tread plates and d posts. Repair gutters, fit replacement roof, paint floor pans, and reinstall interior, MOT.
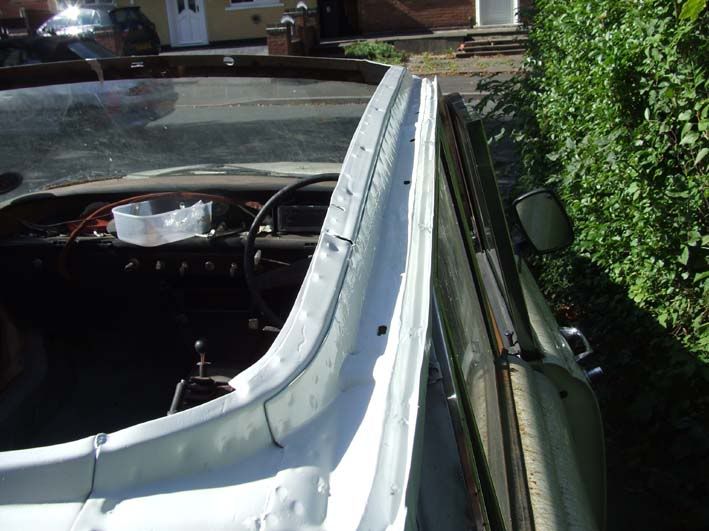
I have now taken the plunge and removed the roof to assess how bad the gutters had rotted as they were allowing water to seep into the rear foot wells. Having now discovered that there are no repair panels for the gutters I started to wish I had not prodded at this suspect area of the car. With the roof and crome removed it became clear the offside gutter was in an appalling state requiring almost it's entire length to be replaced.
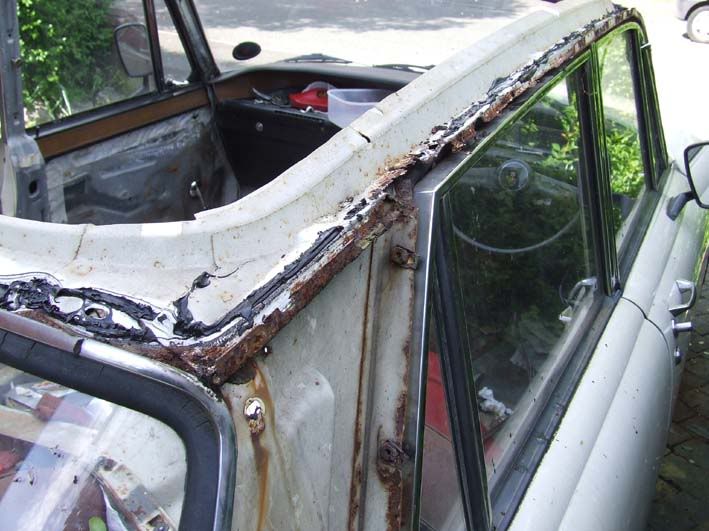

I tried unsuccessfully to hand form repair sections but found this to be impossible as the folds were too close together and the panel needed the grove in the bottom for the crome trim to clip over. I then tried making a simple stamp and die type tool to form small sections at a time.
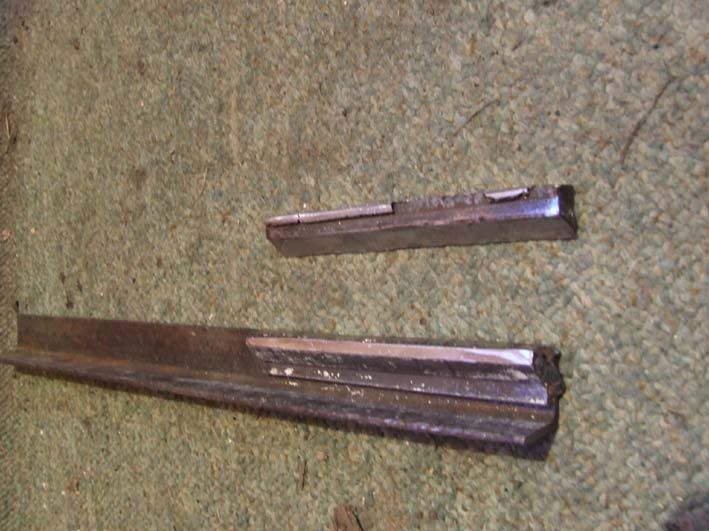
This works well although it does have a weak point in that the flange at the bottom of the stamp that takes most of the impact tend to break up and require re-welding although it held together long enough to stamp out enough metal to repair my gutters.
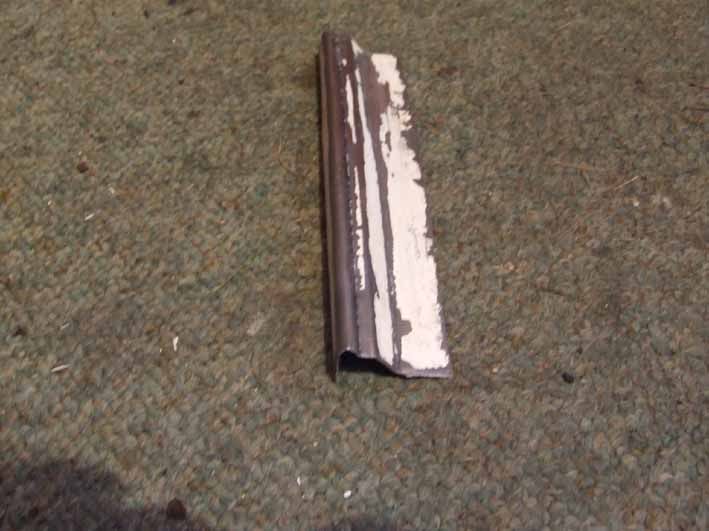
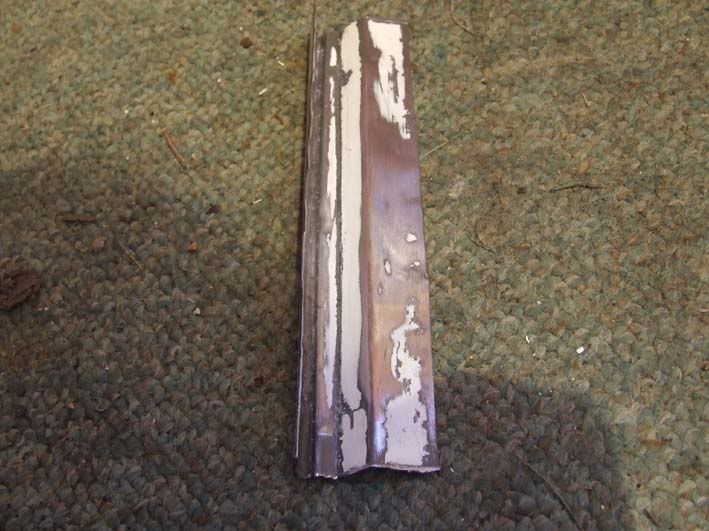
Now i just have the delightful task of welding the repair sections into the remains of the cant rail and more painting once welded.
What is the best way to remove the crome trim around the rear windscreen as I guess this needs to come off to reseat the new roof when I am ready to fit it.
I tried unsuccessfully to hand form repair sections but found this to be impossible as the folds were too close together and the panel needed the grove in the bottom for the crome trim to clip over. I then tried making a simple stamp and die type tool to form small sections at a time.
This works well although it does have a weak point in that the flange at the bottom of the stamp that takes most of the impact tend to break up and require re-welding although it held together long enough to stamp out enough metal to repair my gutters.
Now i just have the delightful task of welding the repair sections into the remains of the cant rail and more painting once welded.
What is the best way to remove the crome trim around the rear windscreen as I guess this needs to come off to reseat the new roof when I am ready to fit it.
keanej
New Member
It is probably just as well you took the roof off, a while longer and the trim would have started to drop off, although it does look like a tricky job to do.
You can't get the chrome trim off the rear window, it has a U shape that sits around the body ridge, so the window needs to come out.
Looking at the state of your rubber seal it looks like you need to take the rear screen out to replace that anyway.
You can't get the chrome trim off the rear window, it has a U shape that sits around the body ridge, so the window needs to come out.
Looking at the state of your rubber seal it looks like you need to take the rear screen out to replace that anyway.
I have spent the last couple of days welding in the new gutters on the one side of the car and am very pleased that with slight alteration to the original stamping tools the new gutter sections fit perfectly and retain the original look although you have to be put them in in short sections as the roof gutters curve slightly along their length. The only difficult part of putting in the repair sections is grinding down the welds afterwards as the gap is very tight between the gutter and roof edge. I will post photos of the repaired sections once I have time.
Now I need to have a look at the other side and see how bad that is and paint the side I have done.
Now I need to have a look at the other side and see how bad that is and paint the side I have done.
After a long period of being too busy to get any work done due to family events and my other car getting written off I finally managed to get some more work done this week.
Offside gutter is now completely replaced and primered ready for the top coat. The nearside was no where near as bad, the front half only requiring patch repairs and I have replaced the rear section of guttering completely. Just need to paint it now.
The next job is to change the windscreen seal and make a small 50p sized repair to the rear edge of the roof and then I can refit the roof and enjoy a water tight car for the first time since taking ownership of it.
EccentricRichard
New Member
Dave3066 said:It never ceases to surprise me what people think good old fashioned steel can be replaced with
Yeah, next thing people will be building cars from aluminium =)
Yes, strictly speaking, I know that's irrelevant.
Why do I hear my dad saying "It's not irrelevant, it's a hippopotamus!" in my mind's ear?
Back to the topic... that's a stunning restoration. Most people would have given up on a car like that! The repair of the roof looks particularly ingenious...
We already saved the car from going to the scrap yard once and I've put too much hard work into it to give up now although there have been moments when I threatened to have it towed away. Still lots to do but I can put the welder away for now. The car is unlikely to be back on the road before March next year as I have decided to sign up to the local body work course in Jan 2011 so I can take the panels in 1 a week and spray them in the spray booth to get a almost profesional standard finish on the cheap. I just need to find a modern 2 pack paint that is close to the original white as I think 2 pack will last better than home spray celulsoe paint and takes less work to get right. I may well try to get the car moted first so that I know it is worth spending money on paint.
Dave3066
Well-Known Member
EccentricRichard said:Yeah, next thing people will be building cars from aluminium =)
Heaven forbid! :wink:
They'll be building aeroplanes out of that stuff next :wink:
Dave
 Always wondered what it looked like under there
 I have managed to get some more work done now the weather is improving. With the base unit now almost finished I have moved onto the doors. Sorry forgot to take photos before starting the rear nearside door but I found rust in the frame at the leading and trailing edges where the reinforcement panels are. All rust cut out and replaced with new metal. I will take photos when I do the others. Only rust in the door skin was next to the lock so again cut this out and let in new metal and managed to get a realy nice finish. As this was the worst of the four doors i am hopefull the other 3 will be much easier.
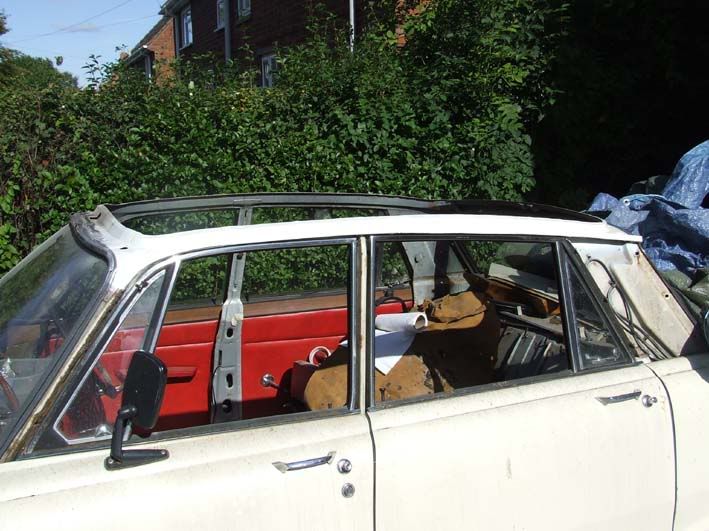
I have just aquired a compressor so will soon be able to start spraying the panels with cellulose. Does anyone know the paint code for the white used on these rovers in 1965 as I need to order some white cellulose. Iam am also after the paint code used on the rovers sprayed in the dark red as seen on Vaultsman's Red V8 as my wife wants the car 2 tone with the roof and rear quarter panels in this dark red. I was very dubious that this would woork but the replacement roof I obtained was in this dark red colour and currently sat on the car and I was surprised at how good it looks 2 tone. Whilst not an original colour scheme it's Abi's car so she gets full say in how it gets repainted. It also seems to fit with the history of the car as the engine bay is sprayed this colour which has been sprayed on bare metal so was either a factory job or somebody went to an awfull lot of trouble to spray the engine bay red.
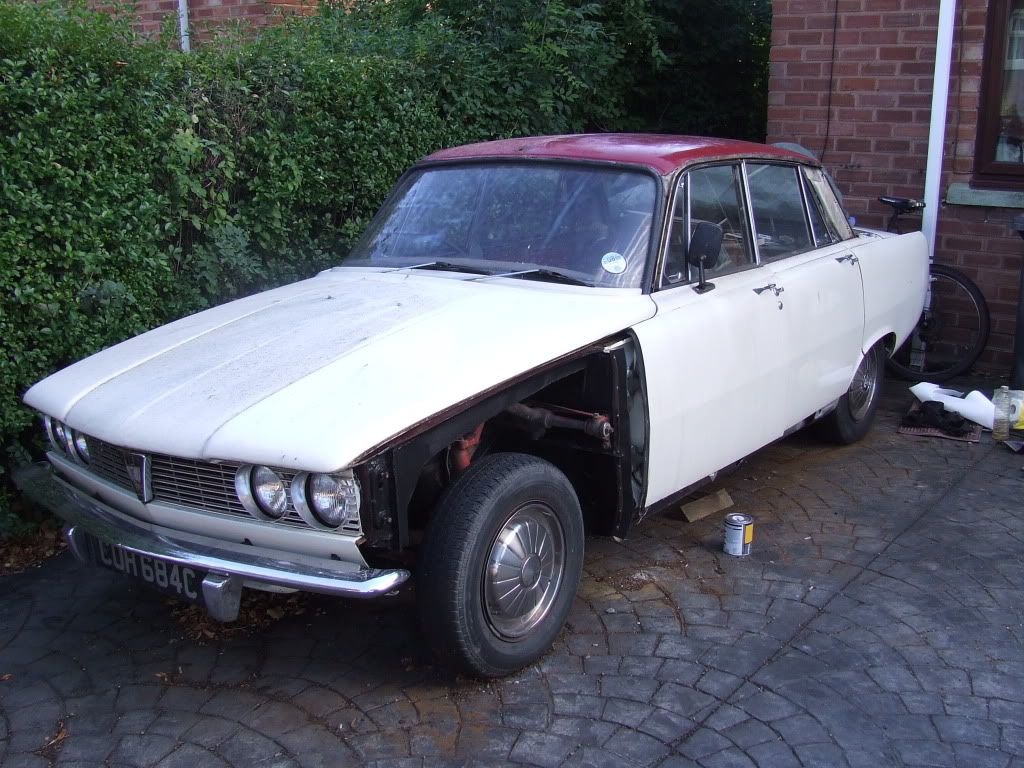
I have just aquired a compressor so will soon be able to start spraying the panels with cellulose. Does anyone know the paint code for the white used on these rovers in 1965 as I need to order some white cellulose. Iam am also after the paint code used on the rovers sprayed in the dark red as seen on Vaultsman's Red V8 as my wife wants the car 2 tone with the roof and rear quarter panels in this dark red. I was very dubious that this would woork but the replacement roof I obtained was in this dark red colour and currently sat on the car and I was surprised at how good it looks 2 tone. Whilst not an original colour scheme it's Abi's car so she gets full say in how it gets repainted. It also seems to fit with the history of the car as the engine bay is sprayed this colour which has been sprayed on bare metal so was either a factory job or somebody went to an awfull lot of trouble to spray the engine bay red.