
I think there are only two options, P6B, and SD1 (also found on Land Rovers) and the main differences are the positioning of the mounting flange (hence the need for the spacer when using a P6B cylinder with an LT77), and the thread for the pipe and bleed nipple, Imperial on the P6B, and Metric on the SD1, which is why the P6B needs a metric end fitting flared on to the flexible pipe to use the SD1 cylinder. I can't remember the differences to the piston and seal though, but it wouldn't surprise me if they weren't the same.

You are using an out of date browser. It may not display this or other websites correctly.
You should upgrade or use an alternative browser.
You should upgrade or use an alternative browser.
Sparky's winter/spring/summer/autumn work
- Thread starter quattro
- Start date
Thanks Dave, yes I could do that but it still needs a new seal and I don't have one to fit and don't know where to get one.
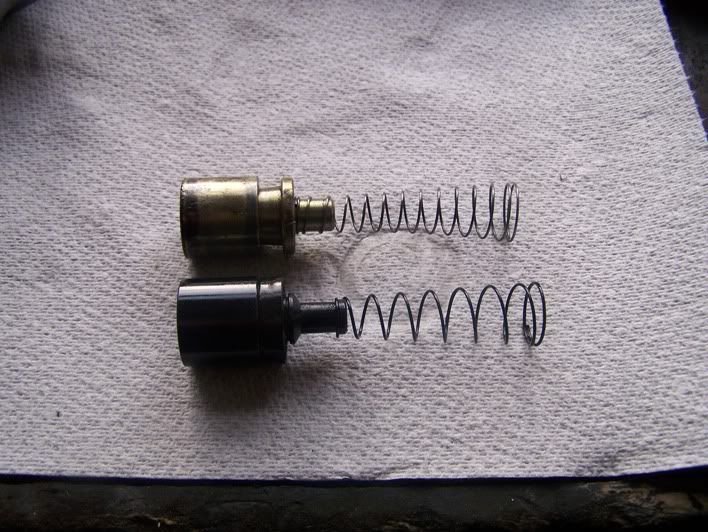
Hi Harvey, the piston is a different shape to the drawing in the Haynes BOL, and also different to the piston in other pics I have found whilst surfing.
Reply from Rimmers
I have found the original receipt for it now, from Unipart. It is a UGCGSY188.
There is a new one on ebay which looks the business at £33.00 inc vat and delivery.
Decisions decisions :?
Hi Harvey, the piston is a different shape to the drawing in the Haynes BOL, and also different to the piston in other pics I have found whilst surfing.
Reply from Rimmers
Hello Richard,
Thank you for your e-mail and picture.
The kit supplied, AEU1018, should repair all slave cylinders fitted to SD1 and TR7.
From your picture, I wonder if a previous owner has fitted either a Land Rover slave cylinder, or an aftermarket cylinder with a different piston type.
We have a repair kit for a Land Rover slave cylinder which includes a seal with an internal diameter of 13.5mm, and an external maximum diameter of 23mm. Would this fit your cylinder ? The part number of the kit is STC2818, priced at £4.98 + vat.
The other option would be to consider a replacement cylinder. These are available from stock priced at £41.35 + vat.
I hope this information helps.
Kind regards
I have found the original receipt for it now, from Unipart. It is a UGCGSY188.
There is a new one on ebay which looks the business at £33.00 inc vat and delivery.
Decisions decisions :?
vaultsman
Well-Known Member
quattro said:I have found the original receipt for it now, from Unipart. It is a UGCGSY188.
There is a new one on ebay which looks the business at £33.00 inc vat and delivery.
Decisions decisions :?
Hi Richard,
As you'll know, the Rover listed number is GSY101.
GSY188 is listed by Unipart as equivalent to GSY101...
>See page 22<
...but obviously not exactly the same.
Had a word with a mate who works at Unipart Leicester, and the GSY188 is listed as NLA. They don't do seal kits either.
Just spoke to a chap (John) I had my clutch and slave from when I did the conversion:
JCL Spares
Leicester
0116 235 5348
or
07831 720023
He can do you the SD1 V8 slave cylinder (metric inlet port) for £25 + about £4 postage if you're still after one. I said you might ring if you were.
Cheers,
Cheers Stan
I had a brief conversation with Unipart and Rimmers yesterday and as you have said, mine is a replacement part and no longer has the rebuild kit available, so is ronnied.
Rimmers have a price match thingy and they beat the price on ebay so a new one (GSY101) will be here today, if the Royal Mail can find my house that is.
Thanks for your help though. much appreciated.
Richard
The box was a bit of pig to get back in – it’s heavy!! :shock:
I managed to drag it under the car, then fed a rope through the gearstick hole and tied it around a block of wood. By threading the rope under the extension housing and lifting it as high as possible, it stopped the gearbox falling over when jacking the front end. Then crawled back under and lifted the front end onto the trolley jack and up it went. I managed to get it up into place, all bolted up to the engine and the back end on the jack, in the correct position, but had to have a week off to let my back heal – it’s not really a one man job when you're old and fa... ermm unfit.
The new slave cylinder arrived as promised but was bare metal, covered in an oily waxy substance, such as they are these days. I cleaned it off and slapped on a bit of paint. This is the old and new one together, not a lot of difference from the outside.
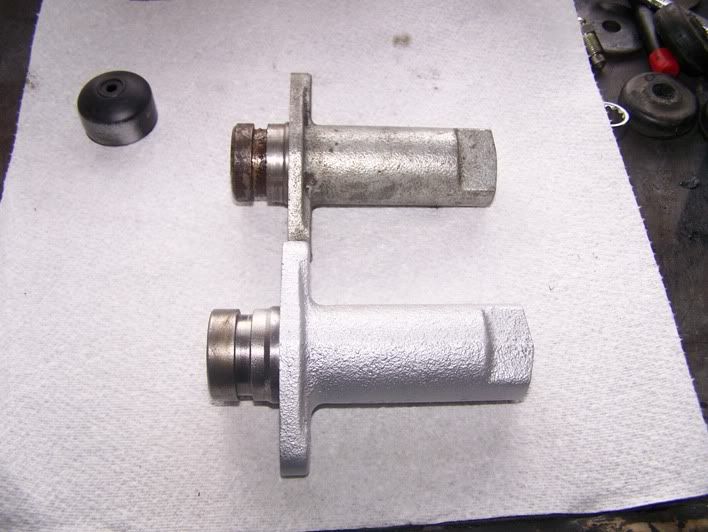
The pistons are however, very different at the back. The lower one is the GSY101 as in the original cylinders, and the higher one is the GSY188.
I put the new clip (which was originally missing altogether) holding the push rod in before the new slave cylinder arrived, which was a shame as the new cylinder had a new push rod with it. Never mind I now have a spare and a spare rebuild kit.
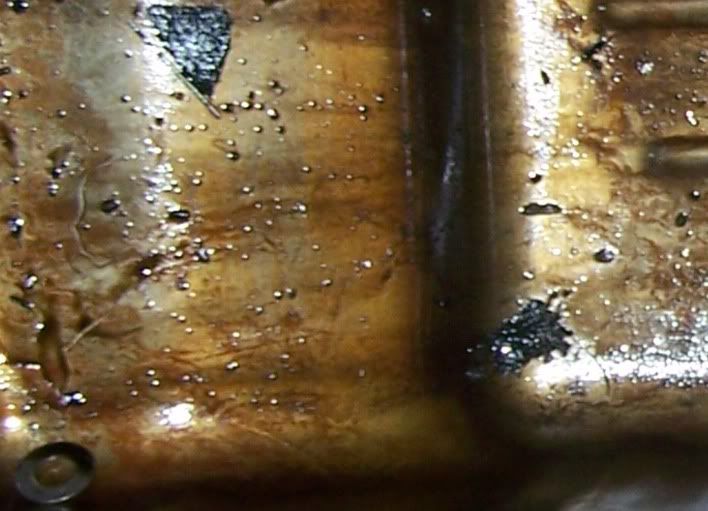
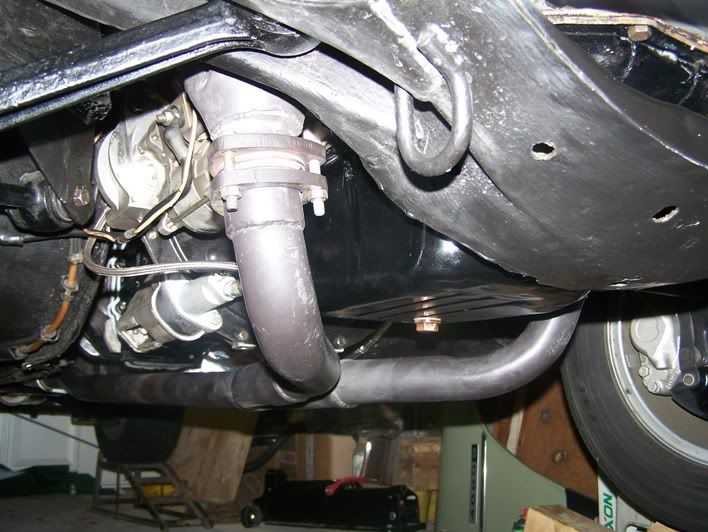
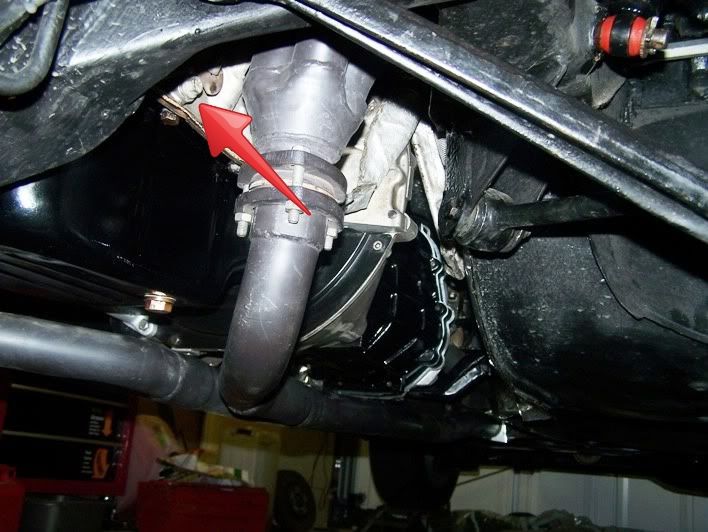
The sump was rather rusty and had a huge dent across the front of it (I wonder how that got there ) so when Sparky was up on ramps I decided to take it off and clean it up a bit. I found a few wonders inside, including some large chunks of what appeared to be old cork gasket, a washer and (just under the triangular gasket piece) a small spring, about 1mm across and 25mm long. It’s certainly not an engine part and I have to wonder how it got there?
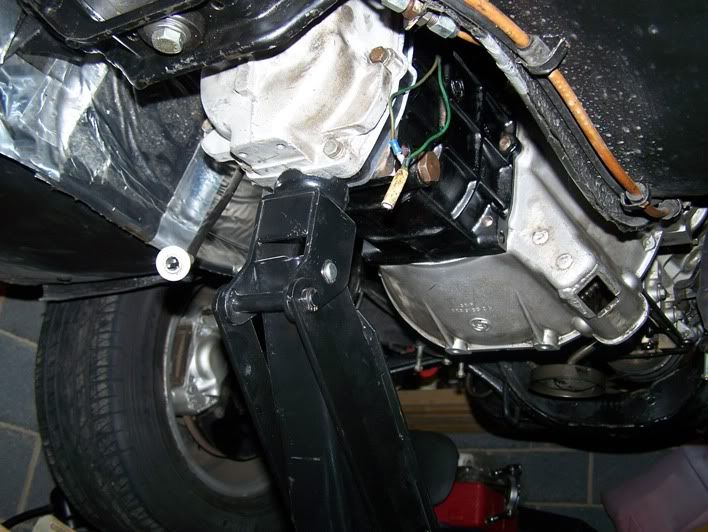
How on earth are you supposed to get to the bolts on the front corner :? :shock: I had to undo the engine mountings and jack the engine up on my newly painted sump to get clearance, and it was still fiddly after that!
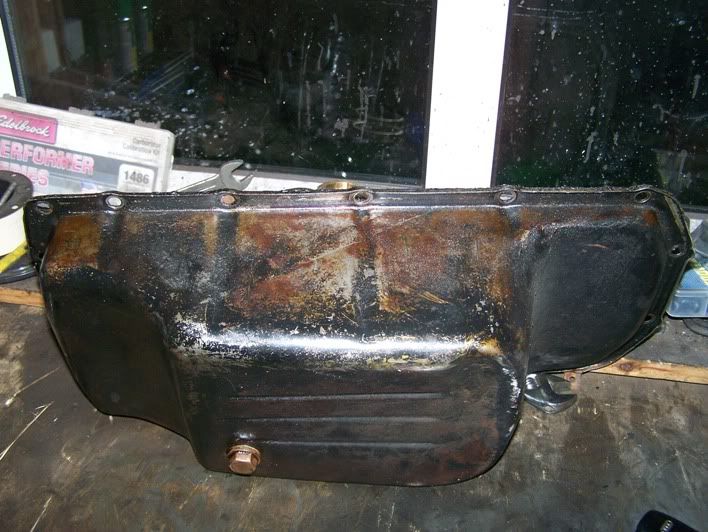
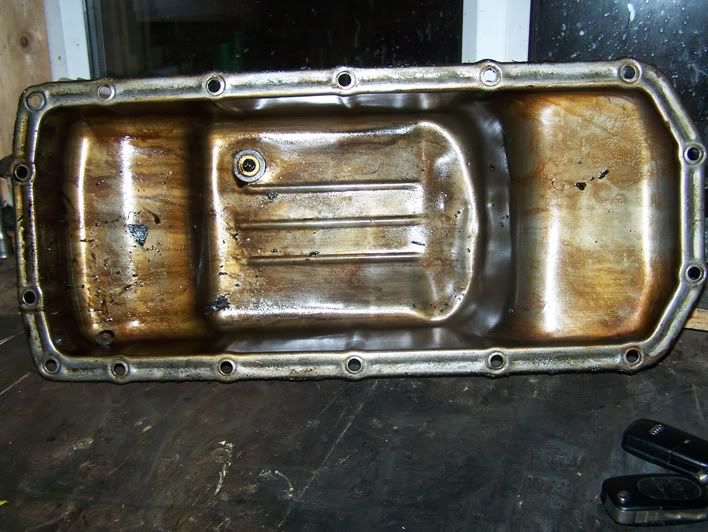
After a good hammering with a panel beating hammer, and a good painting, it looks much better. It’s not perfect, but it will do.

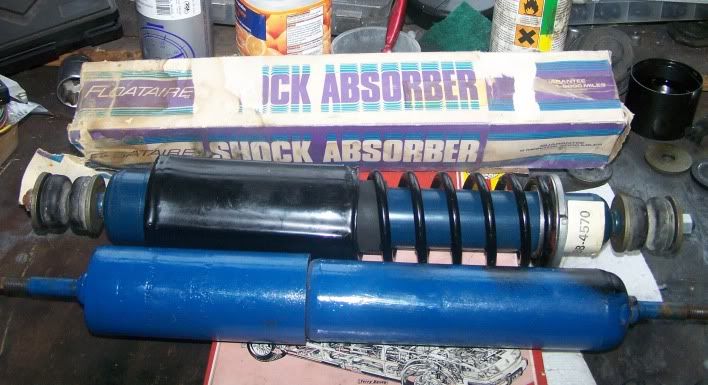
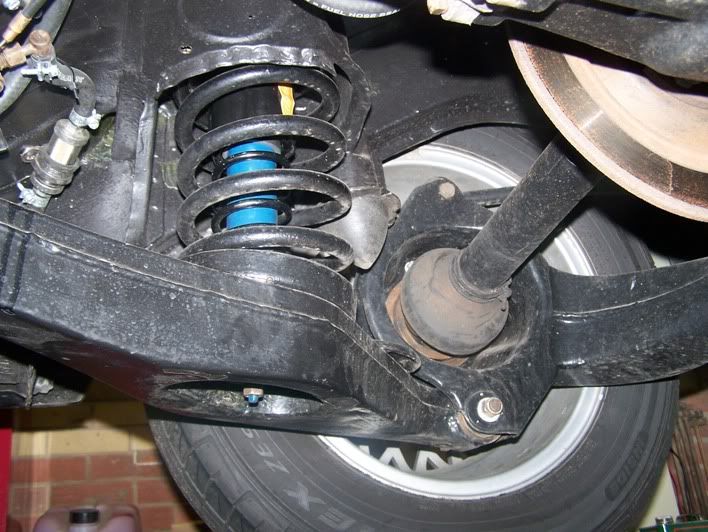
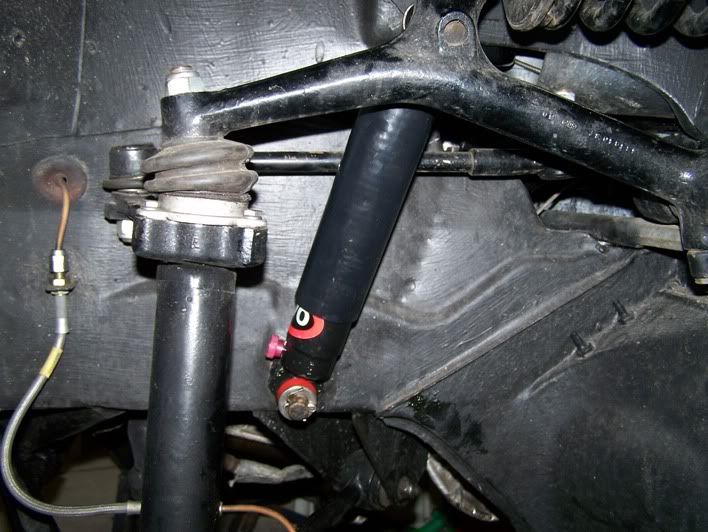
I managed to get a pair of uprated shocks for the rear a little while ago, the same as on my old Monza 3500S. I haven't been able to find any uprated original front shocks so I had to get a pair of the AVO ones I had trouble fitting. All four now fitted, I can’t wait to drive it now!
So, the underside is all finished, exhaust is back on, clutch bled and no longer leaking, gearbox rebuilt and not leaking either, sump all clean and shiny, four new shocks, new oil filter, etc
Now for the heater, wiper motor, vinyl roof and quarter panels.
Richard
I managed to drag it under the car, then fed a rope through the gearstick hole and tied it around a block of wood. By threading the rope under the extension housing and lifting it as high as possible, it stopped the gearbox falling over when jacking the front end. Then crawled back under and lifted the front end onto the trolley jack and up it went. I managed to get it up into place, all bolted up to the engine and the back end on the jack, in the correct position, but had to have a week off to let my back heal – it’s not really a one man job when you're old and fa... ermm unfit.
The new slave cylinder arrived as promised but was bare metal, covered in an oily waxy substance, such as they are these days. I cleaned it off and slapped on a bit of paint. This is the old and new one together, not a lot of difference from the outside.
The pistons are however, very different at the back. The lower one is the GSY101 as in the original cylinders, and the higher one is the GSY188.
I put the new clip (which was originally missing altogether) holding the push rod in before the new slave cylinder arrived, which was a shame as the new cylinder had a new push rod with it. Never mind I now have a spare and a spare rebuild kit.
The sump was rather rusty and had a huge dent across the front of it (I wonder how that got there
) so when Sparky was up on ramps I decided to take it off and clean it up a bit. I found a few wonders inside, including some large chunks of what appeared to be old cork gasket, a washer and (just under the triangular gasket piece) a small spring, about 1mm across and 25mm long. It’s certainly not an engine part and I have to wonder how it got there? How on earth are you supposed to get to the bolts on the front corner :? :shock: I had to undo the engine mountings and jack the engine up on my newly painted sump to get clearance, and it was still fiddly after that!
After a good hammering with a panel beating hammer, and a good painting, it looks much better. It’s not perfect, but it will do.
I managed to get a pair of uprated shocks for the rear a little while ago, the same as on my old Monza 3500S. I haven't been able to find any uprated original front shocks so I had to get a pair of the AVO ones I had trouble fitting. All four now fitted, I can’t wait to drive it now!
So, the underside is all finished, exhaust is back on, clutch bled and no longer leaking, gearbox rebuilt and not leaking either, sump all clean and shiny, four new shocks, new oil filter, etc
Now for the heater, wiper motor, vinyl roof and quarter panels.
Richard
Yeah, sorry but I kinda knew that Harvey 8)
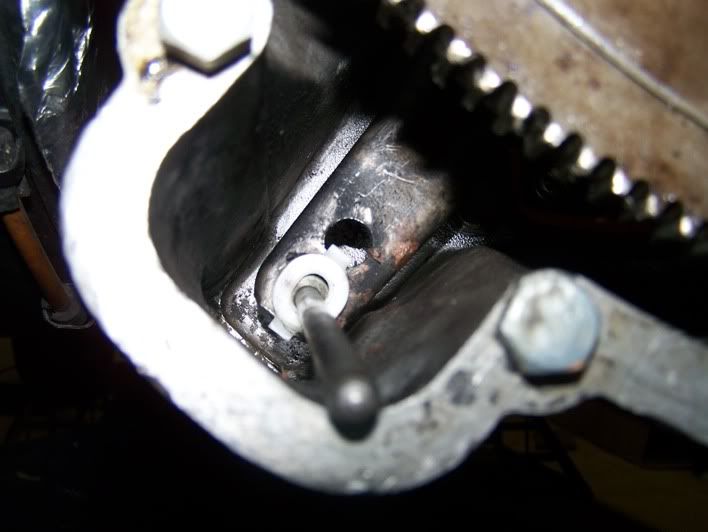
There was no clip on there when I took it apart, the pressure of the slave cylinder must have kept it in place.
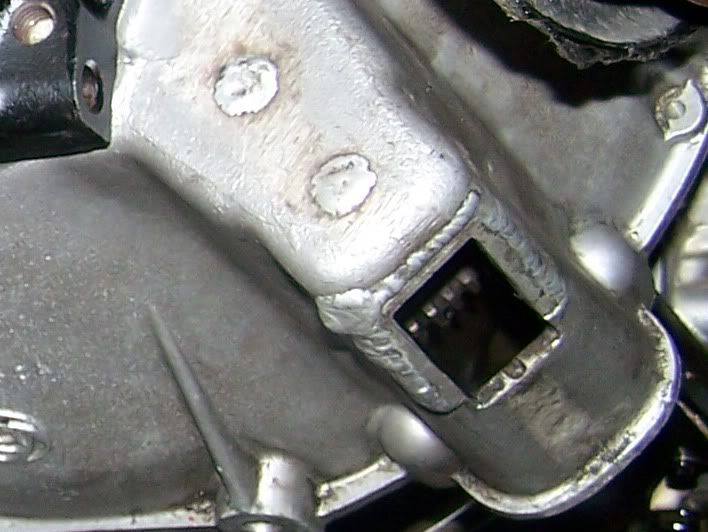
The hole seems to have been welded up then cut again only smaller. I can only presume that it was cut into the bellhousing to put the pushrod back on when it came adrift, although that seems like a lot of work for the cost of a clip. Perhaps the bellhousing was used on a kit car or something else with a mechanical clutch, hence the two welded up holes at the rear? I don't really know what it is doing there, but I am sure that it makes no difference to the structural integrity of the bellhousing so am not worried.
Now the clip is in place, the rubber bung which used to seal it off touches it so I need another way to close the hole.
I may have to make up a piece of steel plate and screw it on. or put a bit of tape over it :shock:
Richard
There was no clip on there when I took it apart, the pressure of the slave cylinder must have kept it in place.
The hole seems to have been welded up then cut again only smaller. I can only presume that it was cut into the bellhousing to put the pushrod back on when it came adrift, although that seems like a lot of work for the cost of a clip. Perhaps the bellhousing was used on a kit car or something else with a mechanical clutch, hence the two welded up holes at the rear? I don't really know what it is doing there, but I am sure that it makes no difference to the structural integrity of the bellhousing so am not worried.
Now the clip is in place, the rubber bung which used to seal it off touches it so I need another way to close the hole.
I may have to make up a piece of steel plate and screw it on. or put a bit of tape over it :shock:
Richard
I think You're right about a past mechanical clutch set up. I'd guess the weld around the hole was once a bracket to support a pivot for a rocking arm? That hole is very handy to have though!
I am deeply impressed with the state of Sparky's undies. You're approaching the condition of a brand new car!
I'm a little suspicious of your rear dampers. The coil over bit is a really good plan. It will stiffen up the rear just enough to counter the additional roll stiffness at the front from the big anti roll bar. That will restore your handling to neutral from mild understeer. But the dampers themselves look perhaps a tad on the soggy side? I think the rear can stand quite firm dampers before the ride suffers, whilst at the front any additional stiffness is instantly felt. So the front is always going to be a compromise between ride quality and control of the turn in lurch.
Chris
chrisyork said:I am deeply impressed with the state of Sparky's undies.
Sparky says can you stop looking at his undies, he was so embarassed he nearly turned Monza :shock:
I had a set of these coil over dampers on my old Monza car and also a pair of 15% uprated fronts, all that was available in those days. It did handle a lot better with those on there, and that was with the standard anti-roll bar and springs so we'll see what they are like in early April - I'll let you know.
webmaster said:Looks fantastic under there Richard, you'll have to take ramps and a big mirror when you go to shows, so everybody can look under it.
LOL, I don't think I'll be going quite that far Richard, I have enough trouble keeping the top bit clean and shiny.
Richard
I was just about to get Sparky off the ramps when I spotted a small drip of something on the bottom of the front brake caliper - :evil: and then realised also that I hadn’t fixed the fuel supply problem, so more under the car stuff to do yet. I really didn't fancy crawling around underneath, so I have started on the carpets, and other stuff. The carpets are designed for a manual car, and Sparky has an auto centre tunnel, so they don’t fit.
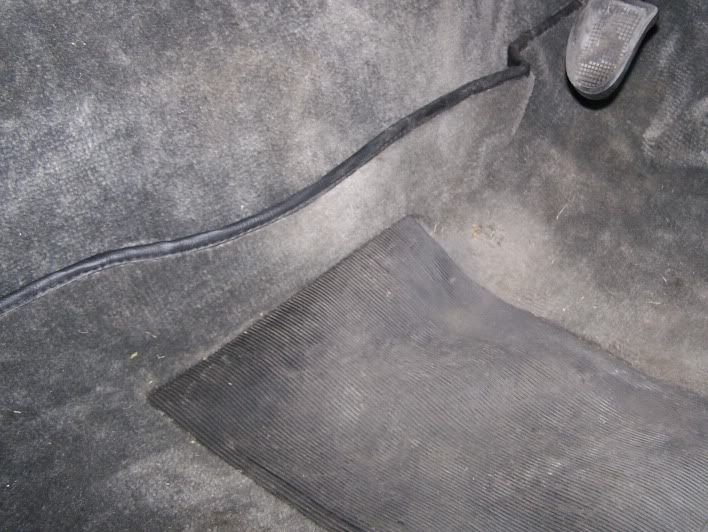
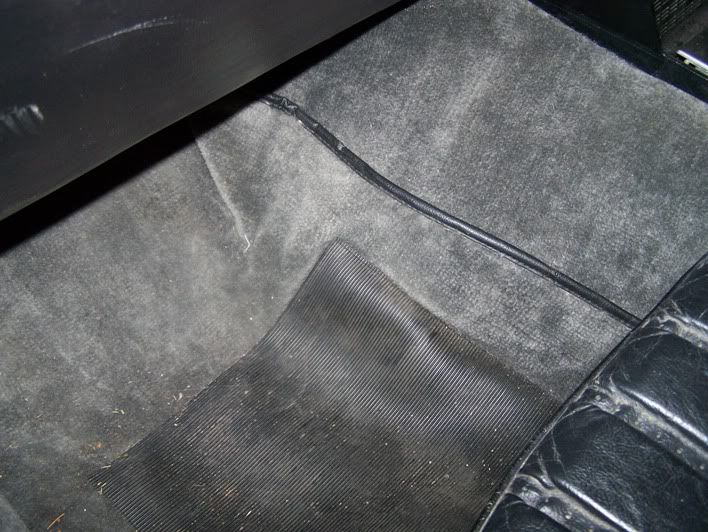
I removed them and cut to size, but the rubber mats were then too wide and I had to cut them down as well. Shame they were glued down as well as stitched.
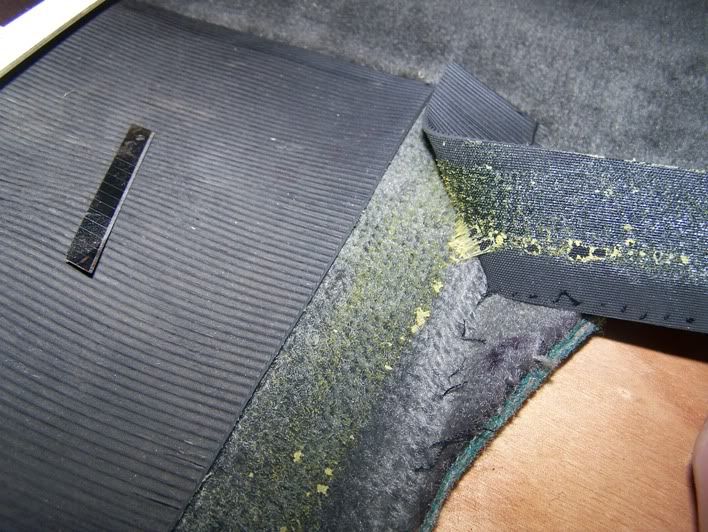
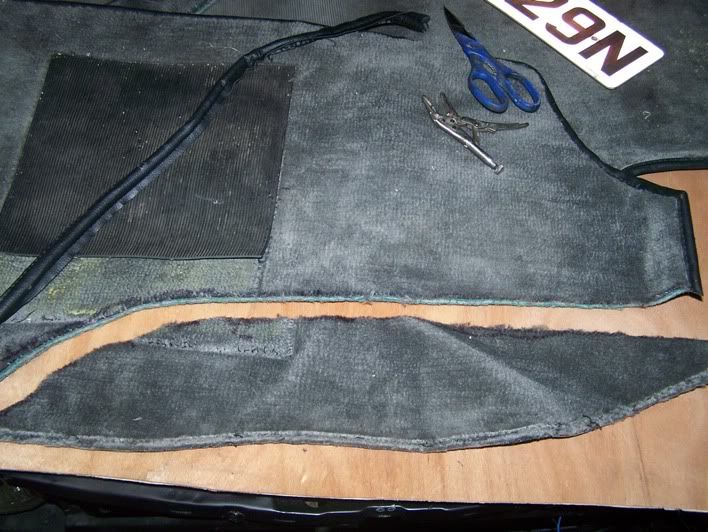
Now I just have to sew the edging back on.
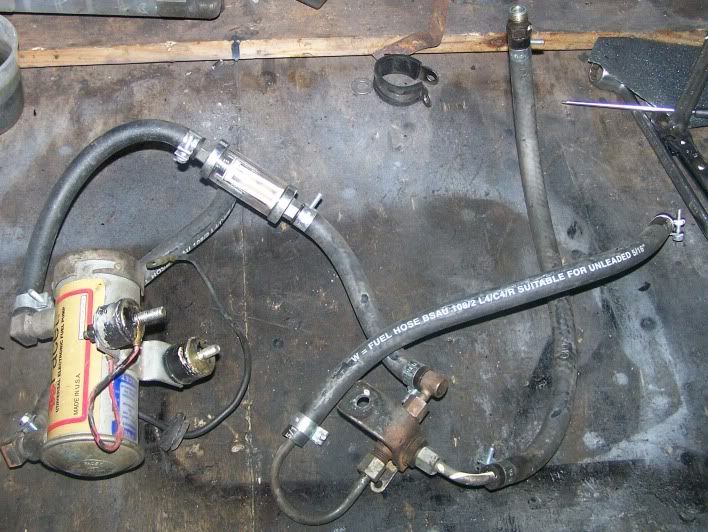
I have however, got underneath and taken the fuel pump off, along with the pipework and filter. The filter had some muck in it, but very little and nothing that would be restricting fuel flow in any way, so I am a little flummoxed by the intermittent fuel pressure drop. That will wait
Then I decided to take the roof off :shock:
Now before doing something like this, I first read up on it. I got the Haynes BOL (omission version) and found nothing at all? The Rover manual wasn’t much help either so I wandered into town and bought a copy of Classics Monthly.
For anyone trying this, it’s not a difficult job, but just be careful not to break stuff. I already had the seats out so didn’t need to remove them. You will need to remove the rear seats to get at the fixings of the rear screen pillars trim.
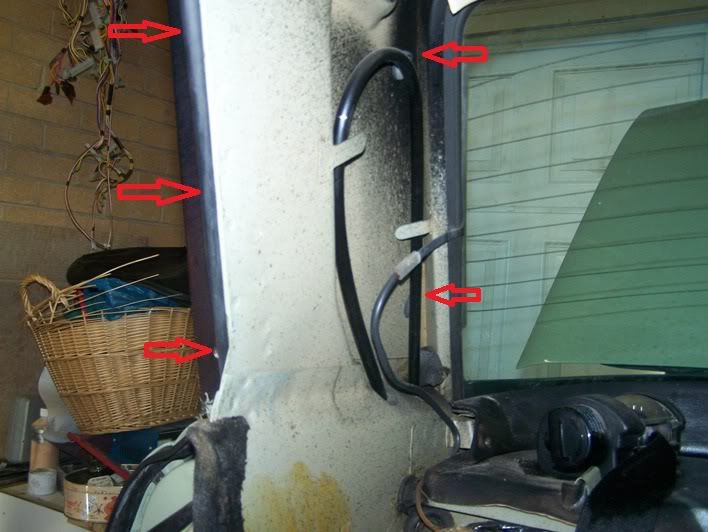
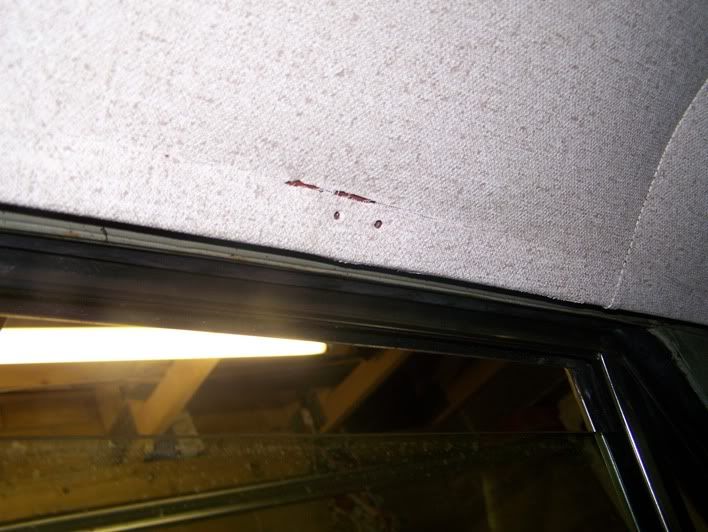
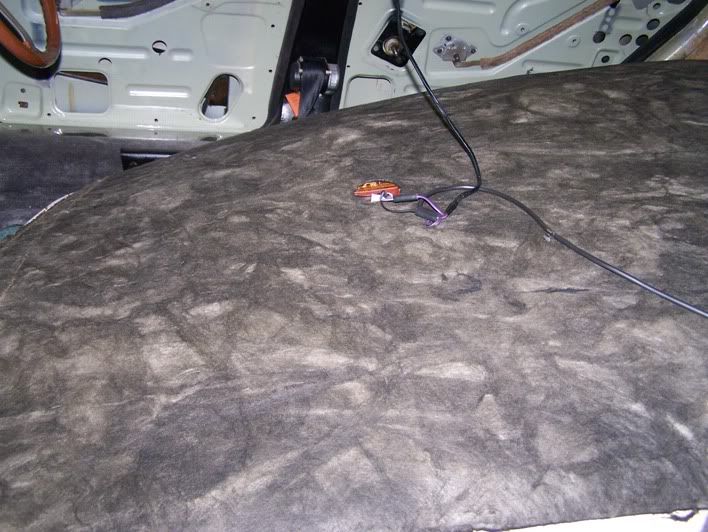
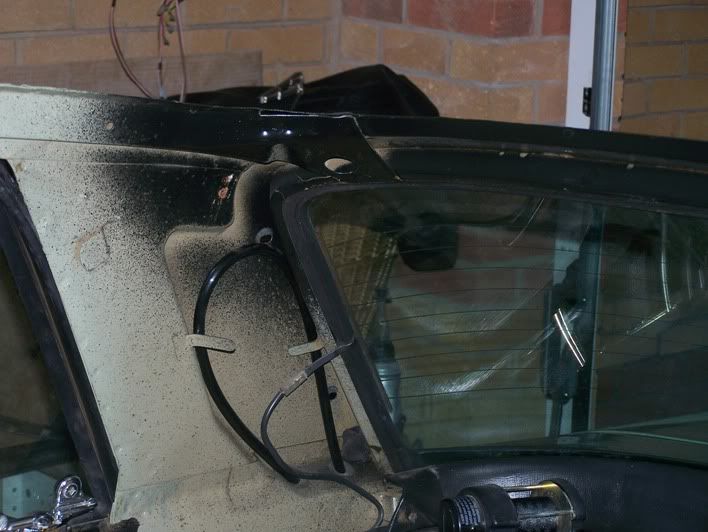
Remove the two screws and then it just pulls forward to reveal the inner fixings to the quarter panels. It may need a bit of a wiggle. There are three at the front within the door jamb and two at the rear inside the car (arrowed). The vinyl on the quarter panels had hardened and the corner of the metal had rusted away.
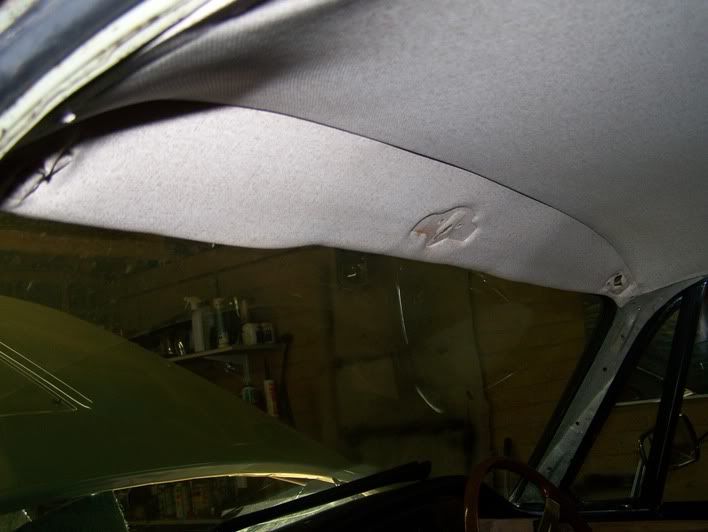
I then removed the two screws in the windscreen pillar cover and the seat belt mounting on the upper B/C post which released the cover. I then removed the screws holding the headlining supports on, one at the front, one centre and one at the back. There are also two screws which hold the coat hanger on the support. The support pulls downwards to release, BUT be very careful here, this is a possible time to break stuff. The support bars are covered in vinyl as is the headlining. They have been pressed together for several decades and can bond themselves together, especially around the coat hanger. I prised them apart gently, but still managed to get a small rip :twisted:
The front section is held in by the rear view mirror, sunblinds, a small screw at each end and four clips which hook onto the roof at the front.
With both of the supports gone the headlining is held in with a screw each side on the B/C post. I have left the front and rear screens in so had to remove the front seats. This is necessary to get the headlining out of the front passenger door. Just remember to let the handbrake off before dropping the headlining down as it will go through the headlining and ruin it. Best to have the car in 1st or 3rd as well for the same reason.
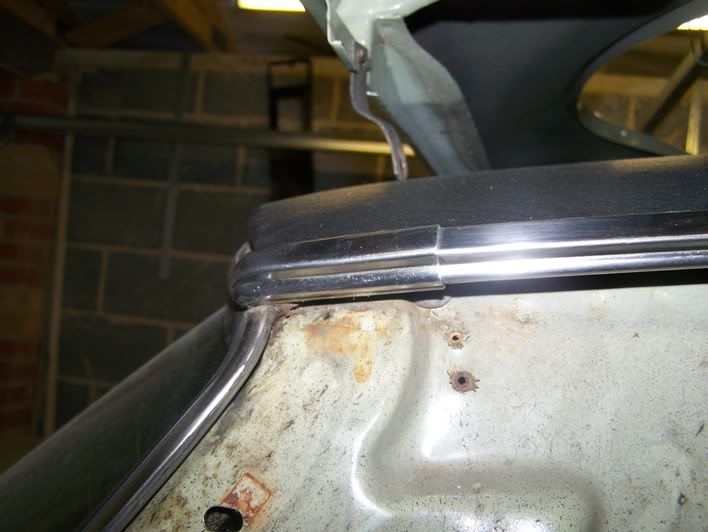
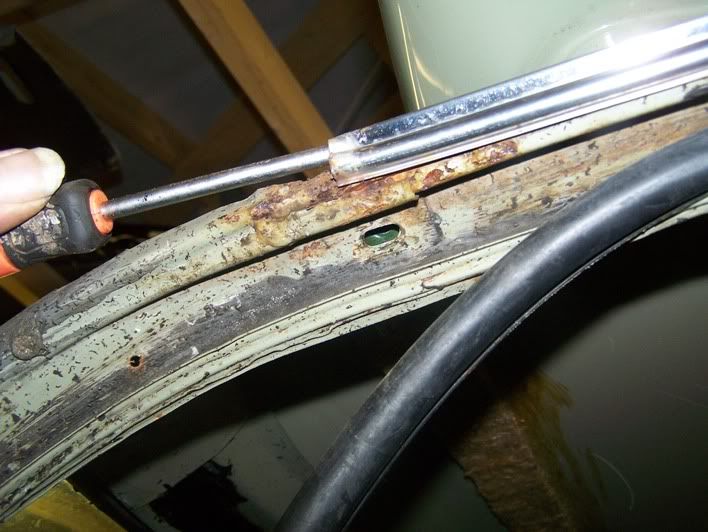
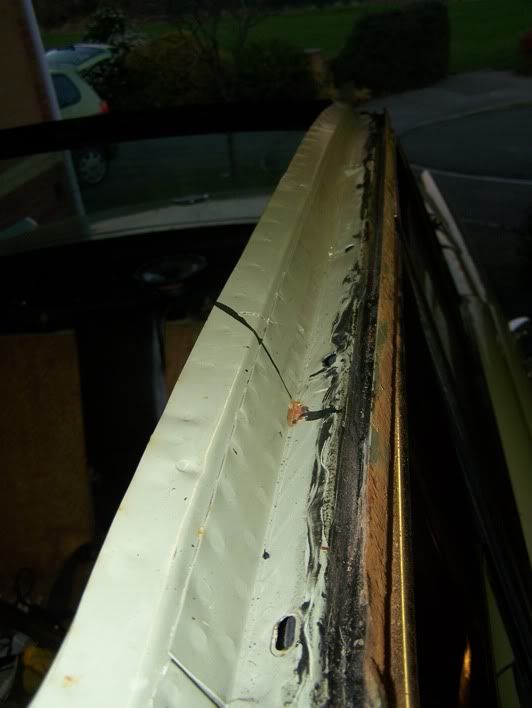
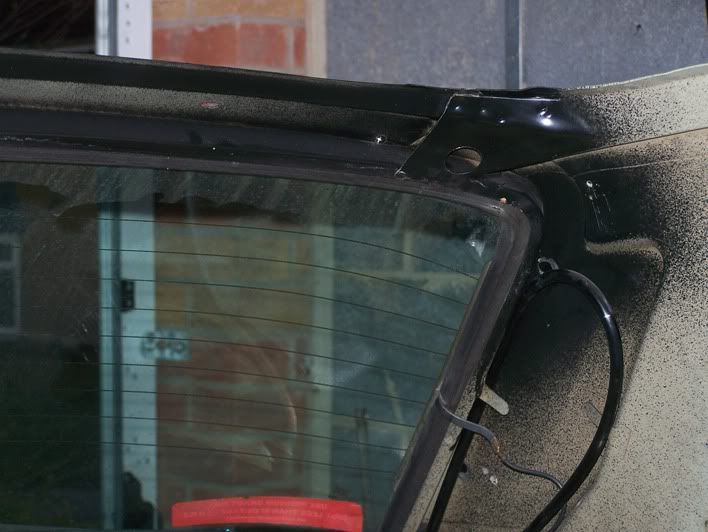
I’m not sure how much of the stainless trim to remove to get the roof off, but I wanted to have a good look at any possible areas of rust, so took it all off. That’s a bit fiddly :shock: The rear finisher on the rain channel can just be twisted sharply outwards from the bottom to release it from the underside of the channel.
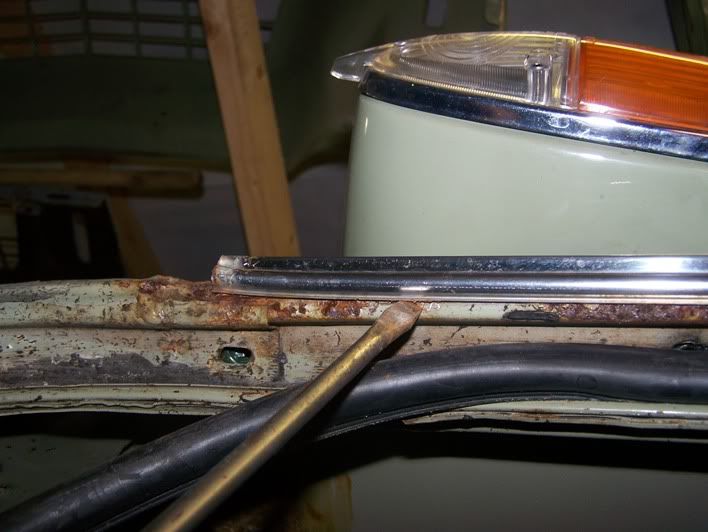
I drilled out the rivets holding the A post cover and corner section, and just pulled these off. The front corner section was a bit of a devil, but with a bit of careful twisting and tugging, I soon had it free. The long bits from front to rear were a lot more difficult as there didn’t seem to be any way of removing them without force. I eventually found that I could get a flat bladed screwdriver between the underside of the trim and a raised profile on the body shell. By twisting the screwdriver at many points along the trim I managed to loosen it. Ignore the front wing which confuses the picture somewhat, it is laid on the roof
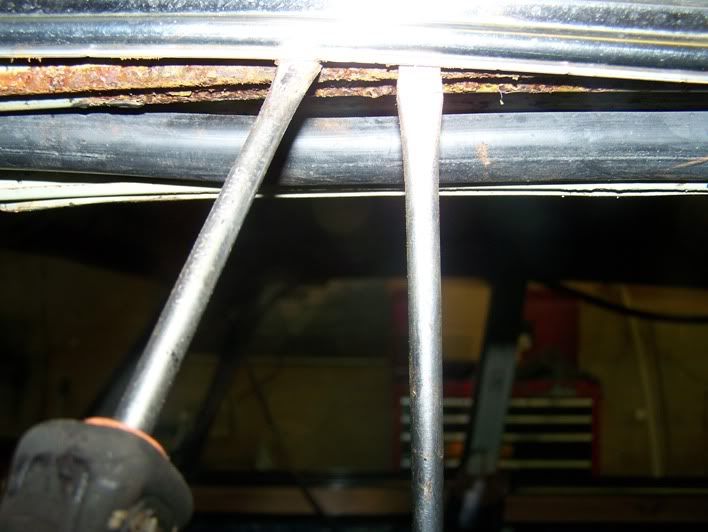
I then slipped a screwdriver into the rear of the trim and carefully prised it away from the car, then with two screwdrivers managed to gently prise the trim all the way along, until with a sudden ping, it sprung off.
The piece across the front was a lot easier, I just pulled the windscreen rubber back and eased it out.
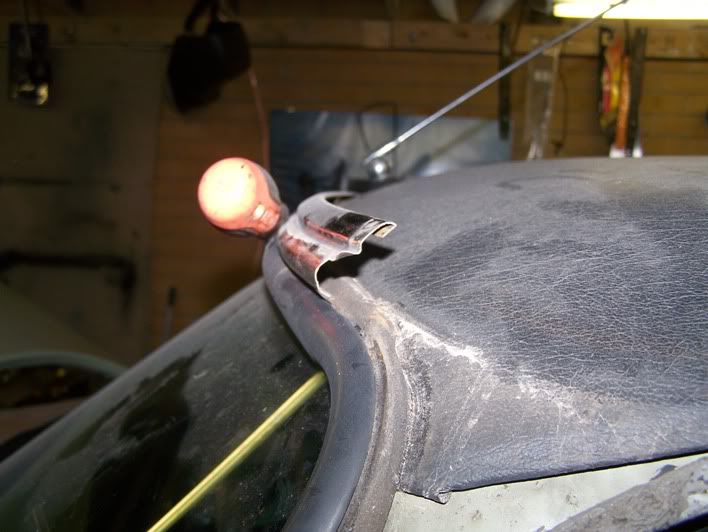
I then removed the nut from under the aerial and took the cable off.
I took out the screws which hold the roof on, there were 27 on Sparky, but there was one missing, so look for 28. The windscreen rubber fits over the roof panel, so I gently levered the roof up from the front and allowed the rubber to drop under the roof panel as it went. Then lifted the roof panel a couple of inches on one side and put a small wooden block under it, then the same on the other side. It was obvious at this point that the rear of the roof panel was well bonded with the sealant along the back so I had to wiggle the panel, run a knife along the back between the roof and the stainless screen finisher, wiggle some more, cut some more etc, until it eventually let go and moved forward.
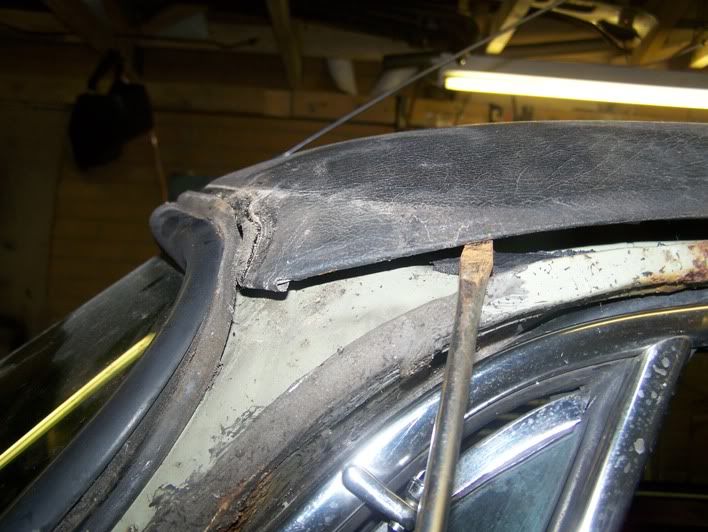
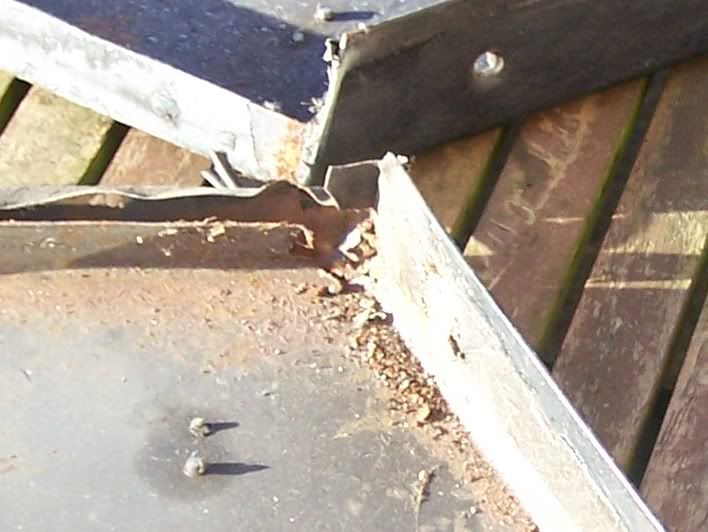
Apart from the outer lip, which has some surface rust, the main structure looks almost new, so very happy with that.
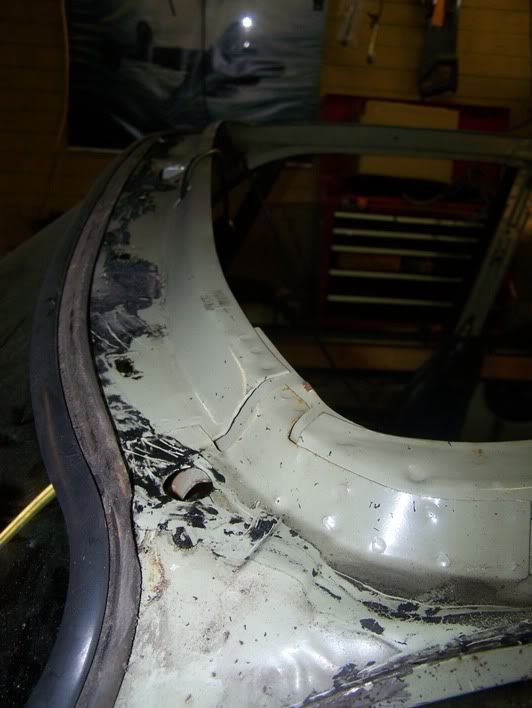
The only weird bit is the rear of the structure has been painted black and there is a screw missing. Looks like a repair has been done sometime in the past ?
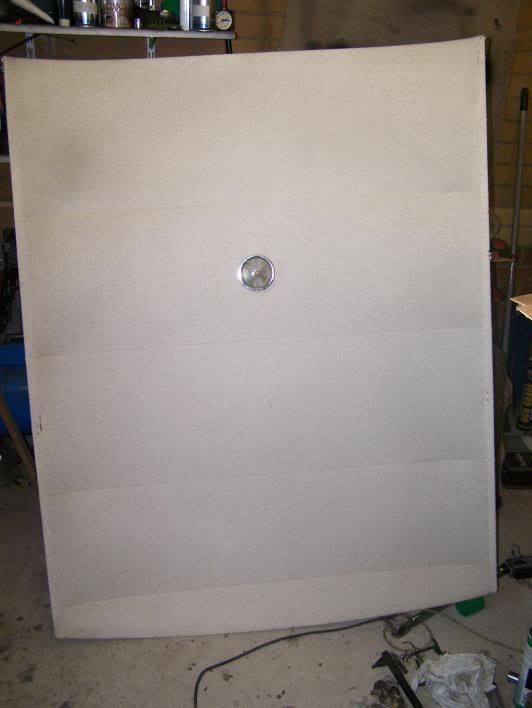
I got Wendy to help me lift the panel off the roof and carry it out to the Audi, spent half an hour sweating and scratching my head, then put the roof panel back in the garage. A P6 roof panel doesn’t fit in a Audi A6 Estate :twisted: Oh well, will have to bring the van home one day to get the panel to work. I need more space than I have at home to re-cover it so will have to do it at work.
I removed them and cut to size, but the rubber mats were then too wide and I had to cut them down as well. Shame they were glued down as well as stitched.
Now I just have to sew the edging back on.
I have however, got underneath and taken the fuel pump off, along with the pipework and filter. The filter had some muck in it, but very little and nothing that would be restricting fuel flow in any way, so I am a little flummoxed by the intermittent fuel pressure drop. That will wait
Then I decided to take the roof off :shock:
Now before doing something like this, I first read up on it. I got the Haynes BOL (omission version) and found nothing at all? The Rover manual wasn’t much help either so I wandered into town and bought a copy of Classics Monthly.
For anyone trying this, it’s not a difficult job, but just be careful not to break stuff. I already had the seats out so didn’t need to remove them. You will need to remove the rear seats to get at the fixings of the rear screen pillars trim.
Remove the two screws and then it just pulls forward to reveal the inner fixings to the quarter panels. It may need a bit of a wiggle. There are three at the front within the door jamb and two at the rear inside the car (arrowed). The vinyl on the quarter panels had hardened and the corner of the metal had rusted away.
I then removed the two screws in the windscreen pillar cover and the seat belt mounting on the upper B/C post which released the cover. I then removed the screws holding the headlining supports on, one at the front, one centre and one at the back. There are also two screws which hold the coat hanger on the support. The support pulls downwards to release, BUT be very careful here, this is a possible time to break stuff. The support bars are covered in vinyl as is the headlining. They have been pressed together for several decades and can bond themselves together, especially around the coat hanger. I prised them apart gently, but still managed to get a small rip :twisted:
The front section is held in by the rear view mirror, sunblinds, a small screw at each end and four clips which hook onto the roof at the front.
With both of the supports gone the headlining is held in with a screw each side on the B/C post. I have left the front and rear screens in so had to remove the front seats. This is necessary to get the headlining out of the front passenger door. Just remember to let the handbrake off before dropping the headlining down as it will go through the headlining and ruin it. Best to have the car in 1st or 3rd as well for the same reason.
I’m not sure how much of the stainless trim to remove to get the roof off, but I wanted to have a good look at any possible areas of rust, so took it all off. That’s a bit fiddly :shock: The rear finisher on the rain channel can just be twisted sharply outwards from the bottom to release it from the underside of the channel.
I drilled out the rivets holding the A post cover and corner section, and just pulled these off. The front corner section was a bit of a devil, but with a bit of careful twisting and tugging, I soon had it free. The long bits from front to rear were a lot more difficult as there didn’t seem to be any way of removing them without force. I eventually found that I could get a flat bladed screwdriver between the underside of the trim and a raised profile on the body shell. By twisting the screwdriver at many points along the trim I managed to loosen it. Ignore the front wing which confuses the picture somewhat, it is laid on the roof
I then slipped a screwdriver into the rear of the trim and carefully prised it away from the car, then with two screwdrivers managed to gently prise the trim all the way along, until with a sudden ping, it sprung off.
The piece across the front was a lot easier, I just pulled the windscreen rubber back and eased it out.
I then removed the nut from under the aerial and took the cable off.
I took out the screws which hold the roof on, there were 27 on Sparky, but there was one missing, so look for 28. The windscreen rubber fits over the roof panel, so I gently levered the roof up from the front and allowed the rubber to drop under the roof panel as it went. Then lifted the roof panel a couple of inches on one side and put a small wooden block under it, then the same on the other side. It was obvious at this point that the rear of the roof panel was well bonded with the sealant along the back so I had to wiggle the panel, run a knife along the back between the roof and the stainless screen finisher, wiggle some more, cut some more etc, until it eventually let go and moved forward.
Apart from the outer lip, which has some surface rust, the main structure looks almost new, so very happy with that.
The only weird bit is the rear of the structure has been painted black and there is a screw missing. Looks like a repair has been done sometime in the past ?
I got Wendy to help me lift the panel off the roof and carry it out to the Audi, spent half an hour sweating and scratching my head, then put the roof panel back in the garage. A P6 roof panel doesn’t fit in a Audi A6 Estate :twisted: Oh well, will have to bring the van home one day to get the panel to work. I need more space than I have at home to re-cover it so will have to do it at work.
arthuy
Well-Known Member
Richard,
It is amazing that you never hear about a roof change for years then everyone seems to be doing them. I have had a roof to swap for about 8 years and 2012 it will get done. When I collect he roof panel it fits snug in the back of an SD1
What do you plan to use when refitting? DumDum or something more modern.
Colin
billoddie said:Good post Richard.
I found myself in a similar situation recently...had those rear outer/inner quarters off, but didn't go the whole hog in case I couldn't retrieve my position.
Hi Brenten, I don't need Sparky on the road for a while (The chrome isn't coming back until late march) so I don't mind getting into a situation which could take me a while to get right again. I don't think there is a situation where you can't retrieve your position with a P6, well not by taking the roof off anyway.
arthuy said:Richard,
It is amazing that you never hear about a roof change for years then everyone seems to be doing them. I have had a roof to swap for about 8 years and 2012 it will get done. When I collect he roof panel it fits snug in the back of an SD1
What do you plan to use when refitting? DumDum or something more modern.
Colin
It'll fit in the back of my Transit van ok Colin 8) I took the rest of the panels to Birmingham in the Audi, all wings, doors, sills, valances, and decker panels to have them dipped. Not the bootlid and bonnet of course.
I will use some Soudal Butyrub for the refit as we sell it at work and I can nick it
It's a non setting butyl rubber based goo which we supply to the caravan trade for sealing all manner of things which may need to be removed at a later date, so it will do the job just right.I have heard that some people (including Classics Monthly) are using aerosol adhesives to fit their new vinyl :shock: I won't be doing that as I cannot see that they are up to the job. It will be interesting to see what happens on the first hot day.
Richard
arthuy said:I meant to say that for removing the glue on the carpet, GooGone on a cloth should do the trick without damaging the carpet or colour.
Colin
Cheers Colin
I run an adhesives company, so I had a bit of something to shift that pretty quick 8)
Richard
webmaster
New Member
Richard, I recently did the interior headlining on the 820 using some high temp spray adhesive from Woolies, looks to me like spray Evostick, comes out of the can like a web, standard impact type adhesive, apply to both surfaces and assemble. Not sure if it's upto the exterior job though as you say, but I'm sure they must do some that is.
http://www.woolies-trim.co.uk/p-1554-high-heat-resistant-aerosol-adhesive.aspx
http://www.woolies-trim.co.uk/p-1554-high-heat-resistant-aerosol-adhesive.aspx
webmaster said:Richard, I recently did the interior headlining on the 820 using some high temp spray adhesive from Woolies, looks to me like spray Evostick, comes out of the can like a web, standard impact type adhesive, apply to both surfaces and assemble. Not sure if it's upto the exterior job though as you say, but I'm sure they must do some that is.
http://www.woolies-trim.co.uk/p-1554-high-heat-resistant-aerosol-adhesive.aspx
Hi Richard
Most of these aerosol adhesives are based on SBR, (Styriene Butadiene Rubber) and they are never very good on heat resistance.
We supply 3 grades, a cheapy which will handle 50C if you're lucky, a mid range similar to the Woolies one which will do 70C ok, and a high grade which will handle 100C in low stress situations 90C in high. SBRs are soft, which makes them good on foam to foam applications as you get a soft bond line, but it means that when they get up to their heat resistance they are already soft and it doesn't take much to make them too soft to hold the bond. Also, with heat they will react with the PVC (vinyl) and steal the plasticiser (Pthalate) which makes the PVC brittle like an unplasticised PVC (uPVC) and the glue line even softer. With more heat (the next summers day) it will continue to get softer until it returns to a liquid state and the whole thing falls apart leaving a sticky mess behind. The vinyl I have been supplied with does have a good scrim backing so possibly will be ok but I won't be risking it. I have have seen some real catastrophes involvong unlined PVC and SBR adhesives :shock:
Evostik 528 or 'impact adhesive' type contact adhesives are based on Polychloroprenes (often referred to as neoprenes) which are harder to start with and therefore better able to resist heat. The original high heat contact adhesive 'Dunlop S1358' is a very high performance product and was specified by Rover and Jaguar for decades for replacing vinyl roofs. The polychloprene rubber is less prone to stealing plasticiser as well. S1358 will take 130C ok and we have a sprayable Polychloroprene which we have had at 160C before it started to peel. That needs to be used in a spray gun though, we cannot get it to work in aerosol.
Polyurethanes are even better but are much more difficult to use and need isocyanate curing systems, for high heat resistance, which are dangerous.
I'll stick (no pun inteded
) with the S1358 (or our equivalent) as it is a well proven product and I know it will work and stay there for good.Richard
josephp6man
New Member
hi richard,
the rear rain channel finisher is easier to just tap off backwards than prise off. same when refitting push it on from the back. the long rail itself i used a hard pice of wood to tap it upwards then off rather than screwdrivers which could distort / twist it.
ian
the rear rain channel finisher is easier to just tap off backwards than prise off. same when refitting push it on from the back. the long rail itself i used a hard pice of wood to tap it upwards then off rather than screwdrivers which could distort / twist it.
ian