Throttle stuff
So, I've swapped to HIF6's. Unfortunately I wasn't able to find the 'seesaw' that converts from linkage to cable control on the throttles. So I decided to design my own.
I took measurements of the linkage travel from the ball jointed rod that connects to the accelerator pedal shaft, Measured the travel of a cable tied to the cam on the throttle shaft of the two carbs and used those to design a seesaw in CAD.
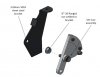
Here's the CAD model exploded and assembled see saw.
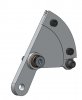
I designed a bracket that I would weld onto the existing throttle bearing bracket. (Remember this is going on a LHD car, I'm not sure if its different to the one on RHD cars). I used a flanged nut welded to the bracket as a mounting point for the shoulder screw. It also gives us a useful offset for the seesaw when rotating. I discovered that I needed a stop for the rest position after I made mine but was able to modify the CAD to have it as part of the main piece of sheet steel.
So, I was able to borrow my old employer's model shop and their CNC mill. I machined the lever and cable guide out of 6061 aluminium. It looks so pretty when done! I was able to find a place that made parts for old Dusenbergs that had the correct ball to fit the rod ball joints and I tapped and screwed that into the lever. Used a vice to press in the oil-lite bearing and tapped and screwed the rest of it together.
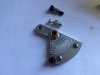
Next I used my CAD model to work out the development of the steel bracket as a flat piece, printed it out and glued it to some 2.00mm 1018 steel sheet, I cut it out, bent it where the lines told me to and welded the flanged nut to it.
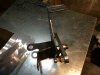
I cut the old bracket short so I had a flat edge to weld to with the newly made bracket. You can see by how much and where in this pic:
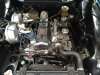
I did have to use a cross pein hammer to bulge out a bit to clear one of the pipes from the brake fluid reservoir, but otherwise it seems to fit pretty well. A coat of gloss black paint and a pressed in ferrule from a bike shop finished this part off.
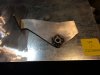
I've found a dirt bike throttle cable that works pretty nicely. It has a screw mount at one end and the other end fits snuggly into the ferrule from the bike shop. I was able to cut down the outer cable length enough for it to fit well in the engine bay. With luck I'll be able to fit this tonight.
If anybody wants a copy of the drawings (I can create 2D drawings from the CAD models fairly easily) or the CAD 3D files I'd be happy to share along with specs for the other items I found. Hopefully this is of some use to others.
Cheers,
Steven


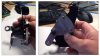
") I do like a bit of brass bling in there.
I do like a bit of brass bling in there.