

You are using an out of date browser. It may not display this or other websites correctly.
You should upgrade or use an alternative browser.
You should upgrade or use an alternative browser.
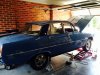
Betty Blue
- Thread starter OZIP6B
- Start date
westOz74P6B
Member
and what pray tell is "Betty Blue's" VIN number? if my '76 parts car is one of the "7" then I might have to restore "Yolinda Yellow" 
OZIP6B
Member
Mine is 45330853E from what I've been told 45330860E was the last one dispatched from NZwestOz74P6B said:and what pray tell is "Betty Blue's" VIN number? if my '76 parts car is one of the "7" then I might have to restore "Yolinda Yellow"
Dave3066
Well-Known Member
sowen said:OZIP6B said:Has anyone done a complete big brake conversion of the P6b ie aftermarket pedal box, booster, calliper's etc, the only thing I found on the net is a company called Fosseway, any info would be much appreciated.
http://www.fossewayperformance.co.uk/ro ... grade-kit/
Those are hardly what could be called 'big brakes', they sit under the standard 14" wheels for a start
The website states they require 15" wheels. No good for standard wheels then :roll:
Dave
westOz74P6B
Member
Phew, that was close, well not even.
Ok, So Betty Blue was the last to be dispatched from NZ for the Australian market?? and so the last seven stayed in NZ?? presumably?
or am I reading that wrong?
Would all the CKD kits from UK all have had continuing consecutive VIN numbers? or would there have been batches sent to NZ and therefore a break in VIN numbering (with the E suffix off the UK production line)?
So would "Yolinda Yellow" (thats gonna stick now ) be 963rd one before "Betty Blue"?
Thanks for your VIN info,
Scott
ps edit; considering info from Mark Webster's book "ASSEMBLY - New Zealand Car Production 1921-98"
there were 1806 3500's for Australia (built between June 72-Oct 76), and 1345 3500's for the NZ market (built between May 71-Apr75)
So a total of 3151 CDK (V8) kits from UK??
and just to add, 2473 Rover P6 2000,s built between April 68-Dec 71
Ok, So Betty Blue was the last to be dispatched from NZ for the Australian market?? and so the last seven stayed in NZ?? presumably?
or am I reading that wrong?
Would all the CKD kits from UK all have had continuing consecutive VIN numbers? or would there have been batches sent to NZ and therefore a break in VIN numbering (with the E suffix off the UK production line)?
So would "Yolinda Yellow" (thats gonna stick now
) be 963rd one before "Betty Blue"?Thanks for your VIN info,
Scott
ps edit; considering info from Mark Webster's book "ASSEMBLY - New Zealand Car Production 1921-98"
there were 1806 3500's for Australia (built between June 72-Oct 76), and 1345 3500's for the NZ market (built between May 71-Apr75)
So a total of 3151 CDK (V8) kits from UK??
and just to add, 2473 Rover P6 2000,s built between April 68-Dec 71
OZIP6B
Member
westOz74P6B said:Phew, that was close, well not even.
Ok, So Betty Blue was the last to be dispatched from NZ for the Australian market?? and so the last seven stayed in NZ?? presumably?
or am I reading that wrong?
Would all the CKD kits from UK all have had continuing consecutive VIN numbers? or would there have been batches sent to NZ and therefore a break in VIN numbering (with the E suffix off the UK production line)?
So would "Yolinda Yellow" (thats gonna stick now
Thanks for your VIN info,
Scott
ps edit; considering info from Mark Webster's book "ASSEMBLY - New Zealand Car Production 1921-98"
there were 1806 3500's for Australia (built between June 72-Oct 76), and 1345 3500's for the NZ market (built between May 71-Apr75)
So a total of 3151 CDK (V8) kits from UK??
and just to add, 2473 Rover P6 2000,s built between April 68-Dec 71
Not sure mate but I've been told that the last batch of CKD cars shipped over to NZ were the 150 with VIN's between 45330711 to 45330860.
OZIP6B
Member
Betty has been up on ramps for the last couple of months now, trial fitting the Toyota 5 speed gearbox. Its been a long and slow process with a few headaches along the way. but we're almost there. Its not an easy conversion but I'm sure it will be fun to drive.
the list of parts and things to do seemed endless but I've managed to get through most of them so far during the mock up stages.
List of parts were:
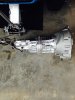
* Toyota Supra 5 speed W58 with the remote shifter housing.
* Dellow Gearbox conversion kit, the kit consisted of bell housing, Spigot bush, Clutch and pressure plate, bearings, slave cylinder, speedo cable, yoke, uni joint and gearbox mount rubbers. Overall the kit is very good with only a small bellhousing modification required to clear the starter motor recess from the bulkhead.
* New one piece tailshaft.
* Manual flywheel
* Fabricated rear gearbox cross member.
* Trans Tunnel modification, strengthening and plating.
* Centre console modification
* Clutch Pedal and Fluid reservoir.
* Ceramic coating of standard exhaust manifolds
* Fabrication of heat shield for the 4 cyl clutch master cylinder.
* New stainless steel exhaust system.
I'm sure I've missed a few things but ill cover them during the final install follow up.
The Supra 5 speed that i found suitable for the conversion was the late model gearbox with the remote shifter housing. The shifter sits approx 1.5 inches further rearward of the original auto shifter thus requiring the top of the trans tunnel to be
slightly modified. In my opinion the shifter position actually feels more comfortable in the new position.
the list of parts and things to do seemed endless but I've managed to get through most of them so far during the mock up stages.
List of parts were:
* Toyota Supra 5 speed W58 with the remote shifter housing.
* Dellow Gearbox conversion kit, the kit consisted of bell housing, Spigot bush, Clutch and pressure plate, bearings, slave cylinder, speedo cable, yoke, uni joint and gearbox mount rubbers. Overall the kit is very good with only a small bellhousing modification required to clear the starter motor recess from the bulkhead.
* New one piece tailshaft.
* Manual flywheel
* Fabricated rear gearbox cross member.
* Trans Tunnel modification, strengthening and plating.
* Centre console modification
* Clutch Pedal and Fluid reservoir.
* Ceramic coating of standard exhaust manifolds
* Fabrication of heat shield for the 4 cyl clutch master cylinder.
* New stainless steel exhaust system.
I'm sure I've missed a few things but ill cover them during the final install follow up.
The Supra 5 speed that i found suitable for the conversion was the late model gearbox with the remote shifter housing. The shifter sits approx 1.5 inches further rearward of the original auto shifter thus requiring the top of the trans tunnel to be
slightly modified. In my opinion the shifter position actually feels more comfortable in the new position.
Attachments
OZIP6B
Member
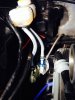
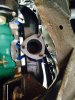
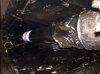
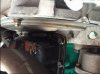
The first job was to source the pedal box. Being an automatic V8 I had to overcome the first hurdle of finding a 3500S pedal box and parts, at the time here in Australia they are virtually non existent. Luckily a fellow forum member had a spare 4cyl pedal box which he kindly sent to me. Reading through old pages on the forum I too went with the 4cyl pedal box, I know it is not ideal but it will do for the time being, hopefully heat shield will heap protect it from the exhaust heat.
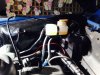
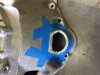
I located the clutch master Cylinder as high as i could to keep it away from the exhaust manifolds.... then the problems began. the rod was fouling everywhere- within the pedal box itself and the it was not pushing in a direct line, it was pushing on the cylinder wall itself. the solution was to make the hole in the pedal box larger to allow the rod to push in a straight line and set the master cylinder at an angle my fabricating an adapter plate.
I used a landrover Series 2 clutch master cylinder, hopefully it will be up to the task.
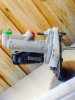
The fluid reservoir is is divided into two sections, one for the brakes and the other for the clutch. The best thing about this one is that the outlets can be rotated and adjusted to your particular requirements.
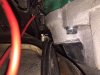
I made a braided clutch line with banjo style fittings to the slave cylinder, far better then the copper alternative.
I located the clutch master Cylinder as high as i could to keep it away from the exhaust manifolds.... then the problems began. the rod was fouling everywhere- within the pedal box itself and the it was not pushing in a direct line, it was pushing on the cylinder wall itself. the solution was to make the hole in the pedal box larger to allow the rod to push in a straight line and set the master cylinder at an angle my fabricating an adapter plate.
I used a landrover Series 2 clutch master cylinder, hopefully it will be up to the task.
The fluid reservoir is is divided into two sections, one for the brakes and the other for the clutch. The best thing about this one is that the outlets can be rotated and adjusted to your particular requirements.
I made a braided clutch line with banjo style fittings to the slave cylinder, far better then the copper alternative.
Attachments
OZIP6B
Member
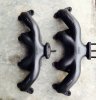
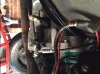
The last of engine bay mods were the exhaust manifolds. Originally I simply heat wrapped the manifolds but ended up ceramic coating the manifolds which seemed fine at idle, hopefully I wont end up having to heat wrap them again if the ceramic coating doesn't work as good as I expect.
Attachments
ewokracing
Active Member
Watching with interest. I have everything aside from the remote shifter for the box and the bellhousing. I've got the W58 box too for the better cruising 5th gear.
OZIP6B
Member
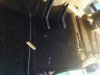
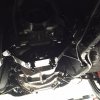
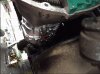
The transmission tunnel required some modification, the driverside auto gearbox mount had to me removed to allow the remote shifter to fit and the passenger side mount had to be trimmed about 10mm.
The gearbox tunnel where the new gearbox mount is situated has had an additional 2mm plate welded to the tunnel and for extra strength an additional 5mm flat bar welded to match the tunnel side of the gearbox mount.
As mentioned earlier, the shifter had to be moved rearward slightly.
The rear crossmenber is made with 6mm flat bar bent and welded.
Attachments
OZIP6B
Member
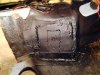
With the Dellow conversion kit, the bellowing needs to be modified. The starter motor recess has to be trimmed to clear the bulkhead, its a simple fix mark, cut and seal.
I sealed the cut out with a small piece of 1.5mm aluminium then glued it to the housing with a product called JB weld.
The flywheel, clutch and pressure plate and geabox went on without to much drama. The flywheel was machined and drilled to accept the new pressure plate, the rover pressure plate bolt holes are different to the required ones for the supra gearbox.
Attachments
OZIP6B
Member
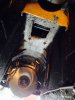
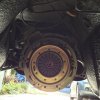
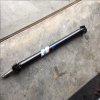
I bit more work competed today, installed the new one piece tailshaft, dustcover, clutch slave cyliner and the front exhaust section.
The flywheel cover is the auto gearbox part just new holes drilled to attach it to the bellhousing.
The slave cylinder sits perfectly, dellow allow for two positions for the slave cylinder, the lower postion must be used so as to clear the trans tunnel.
The flywheel cover is the auto gearbox part just new holes drilled to attach it to the bellhousing.
The slave cylinder sits perfectly, dellow allow for two positions for the slave cylinder, the lower postion must be used so as to clear the trans tunnel.
Attachments
ewokracing
Active Member
Great write up. I'll be watching this thread to see how it drives when it's on the road and running!
OZIP6B
Member
ewokracing said:Great write up. I'll be watching this thread to see how it drives when it's on the road and running!
Thanks mate, it nearly ready for the road, just waiting for a few bits and pieces to complete the the conversion. Its been a long time coming, just hard to find time these days.
OZIP6B
Member
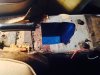
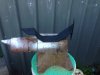
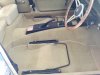
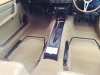
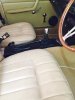
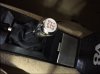
Whislt waiting of more parts to arrive, I decided to install a carpet set I purchased a while ago, the fitment is passable.
If i had to do it again, I would probably have a carpet set sent over form England, our local ones are not the best fit.
Some sections turned out perfert whislst other did not... it was my first ever attempt at carpet installation.
I managed to save the orginal sill panel backing. The trans tunnel and floor have new sound proofing and foam.
The centre console has been modified as well, I cut the mid section near the hand brake to te ashtray out and rotated it 180 deg and plastic weleded it into position so as to keep it looking as orginal as possible.
The console will eventually be wrapped in new leather along with a leather shifter boot.
Attachments
OZIP6B
Member
drabbers said:The new carpet looks really good.
What supplier did you use ?
Mark.
Hi Mark,
Being from Australia, the only place I could source a carpet set was from All Car Capets, excellent service and product but i think their templates are a little out, most sections did not fit properly and it required a fair amount of trimming etc.
Baron von Marlon
Member
That looks great!