

You are using an out of date browser. It may not display this or other websites correctly.
You should upgrade or use an alternative browser.
You should upgrade or use an alternative browser.
Top end rebuild
- Thread starter vaultsman
- Start date
So...manifold to come off. Driver's side too. And that rearmost lower bolt is a right PITA!
How do you get at it on a 3500S ? From below ? I can't see how without dismantling first
vaultsman
Well-Known Member
DaveHerns said:So...manifold to come off. Driver's side too. And that rearmost lower bolt is a right PITA!
How do you get at it on a 3500S ? From below ? I can't see how without dismantling first
When I stripped the top-end down I took the heads off complete with exhaust manifolds...so I missed the delights of wrestling with this bolt.
When I had to wrestle on Sunday, I couldn't get at it from above even with the heatshield off. (yes I know, Harvey!
") ). The only way I could get at it was from below. The front wheels are sitting on pallets so I'd got enough ground clearance to lie on my back with my eyeline directly under the bolt. Even then it was a struggle, using a 9" long, very slim, cranked 1/2" x 9/16" bi-hex ring spanner with very thin wall thickness. (This one's marked Williams Superrench (sic), Forged In USA and is probably 40 years old +. Oh the ignominy! Saved by the Yanks!)
). The only way I could get at it was from below. The front wheels are sitting on pallets so I'd got enough ground clearance to lie on my back with my eyeline directly under the bolt. Even then it was a struggle, using a 9" long, very slim, cranked 1/2" x 9/16" bi-hex ring spanner with very thin wall thickness. (This one's marked Williams Superrench (sic), Forged In USA and is probably 40 years old +. Oh the ignominy! Saved by the Yanks!)Anyway, poking this up by the side of the starter motor I was able to hook it on and turn it about a flat at a time. Once it was slack I could just about get my sausage-fingers on it from above to ease it clear of the thread.
Trying to get the bolt lined up and engaged in its thread was just as thrilling. So in the end I fitted a short length of 3/8" UNC stainless allthread to this one tapped hole, not too long otherwise the manifold flange wont hook over it. Spin the nut up to the spring-washer, then back underneath again.
And all because of an over-hard manifold stud!
vaultsman
Well-Known Member
testrider said:I meant to mail you on Saturday as I'd fired mine up for the first time...
Hi Paul,
Looking through my posts, I forgot to congratulate you, glad it sounded good and drove sweetly. You did well to get it done in that time!
testrider said:I'll need to take some advice on SU needles at that point though. There's always something to do isn't there?
Without AFR readings through the rev range, needles can be a bit of a black art. I took some advice from Gower & Lee, and the V8 forum before settling on BBW as a starting point. This is with bigger-valved heads and K&N's, so I'm after a needle quite a bit richer than standard. You've probably found this tool already, but it shows the different needle profiles graphically.
SU Needle Comparison
Cheers,
testrider
Active Member
Thanks Stan, there are two main reasons I got it done quickly, 1) I haven't really done much cosmetically like you have and 2) my Dad helped out by cleaning a few bits during the day whilst I was at work. My original plan was to just do the head gaskets over a couple of weekends but that idea soon changed to a new cam, followers and timing set. Then it escalated to changing the heads as there wasn't much point in uprating the cam if the heads are restricting it, then the oil pump got uprated too as it was already in pieces. Sump came off as I split water into it as the timing cover was removed and so on.
So 4 weekends in total plus a few evenings and I lost a weekend waiting to the new heads to arrive, so not bad really. I didn't get too many foul ups either apart from the long waterpump bolt snapping. Sounds like you had fun with the exhaust manifold.
I must say again though reading your thread in advance really helped to speed up the job as I knew roughly what to lookout for.
I'd have loved to have my engine bay looking as smart as yours though. I could see areas that need attention, painting etc and would have liked to have got it all nice and neat but I just didn't want it to turn into a full restoration at this time of the year. I might take the inlet manifold and rocker covers off next winter and repaint them.
One thing I did do, like you, whilst the heads were off was rebuild the brake master cylinder as it seemed too good an opportunity to miss with such easy access. I also managed to bleed it on the bench too so the brakes still work as one bleed screw is seized on my front caliper. That's the next job on the list to sort.
I have to say I'm still a bit confused by carburettors in general and I looked at those charts but they don't really mean anything to me. I reckon there must be plenty of engines out there with SD1 heads and a warmed up cam running SU's that I could compare needles with though.
Hello Paul,
The Rover SD1 from 1976 till 1982 was fitted with SU HIF6 carburettors, and the needles fitted were BAK. The UK versions ran a compression ratio of 9.35 : 1 with a CO reading of 4.0% to 4.5% from 725 to 775rpm.
The heads of course had the larger valves, and the air filters within the cannister were of significantly greater surface area than those fitted as standard within the P6B.
Stan,...I am pretty sure that the BBW needles will prove to be far too rich even with K & N filters.
Ron.
DaveHerns said:Has Harvey got a method of getting at this bolt ? I need to get the manifold off to change the studs .Or maybe I could drill and retap it in situ ? I'll have to look
I remove the master cyl heatshield and than have no problem getting at the bolt. (The biggest problem is normally the useless locktabs if they're still fitted.) I always remove the manifolds from the heads when doing head gaskets as it saves all the aggro associated with the downpipe studs snapping. The manifolds just stay sitting on the top of the downpipe.
vaultsman
Well-Known Member
SydneyRoverP6B said:Stan,...I am pretty sure that the BBW needles will prove to be far too rich even with K & N filters.
Ron.
You may well be right Ron, but BBW was the advice from Gower & Lee for the Range Rover heads and K&N's. I'll fit these and be prepared to lean down to BAF if necessary.
Tor
Well-Known Member
Hi all,
Comment for Testrider: this might be common knowledge, but on my HIF6's the needle code was printed on the needle itself, near the base, ie. I was able to see what mine were (not that I still remember, was it BRM..?) when I had the carbs apart. You'd benefit from a magnifying glass and would probably struggle if the carbs have seen a lot of wear.
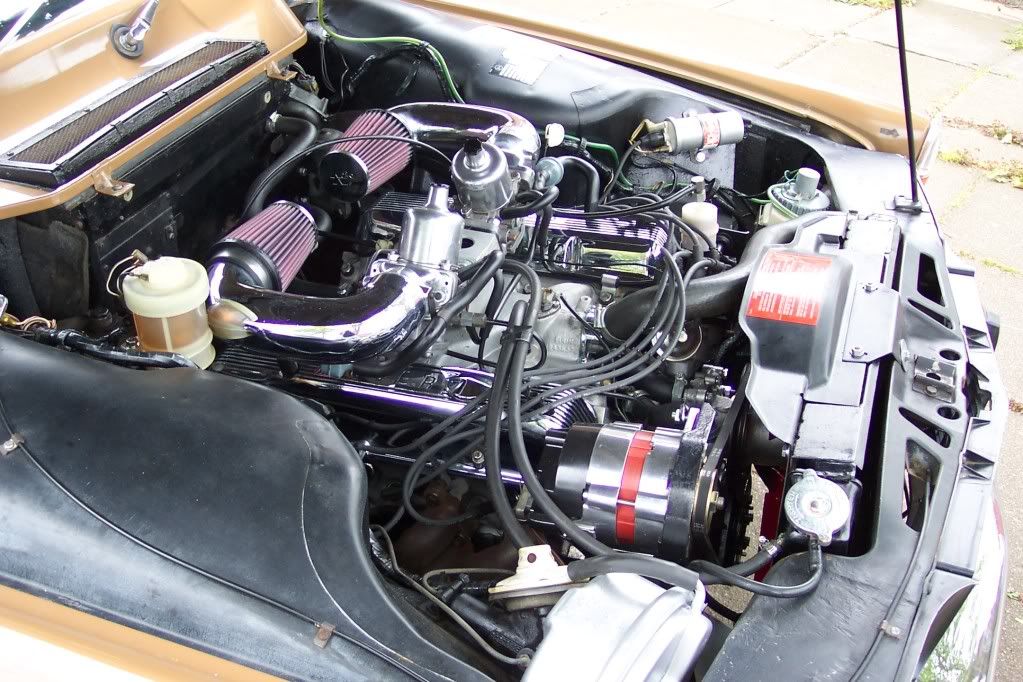
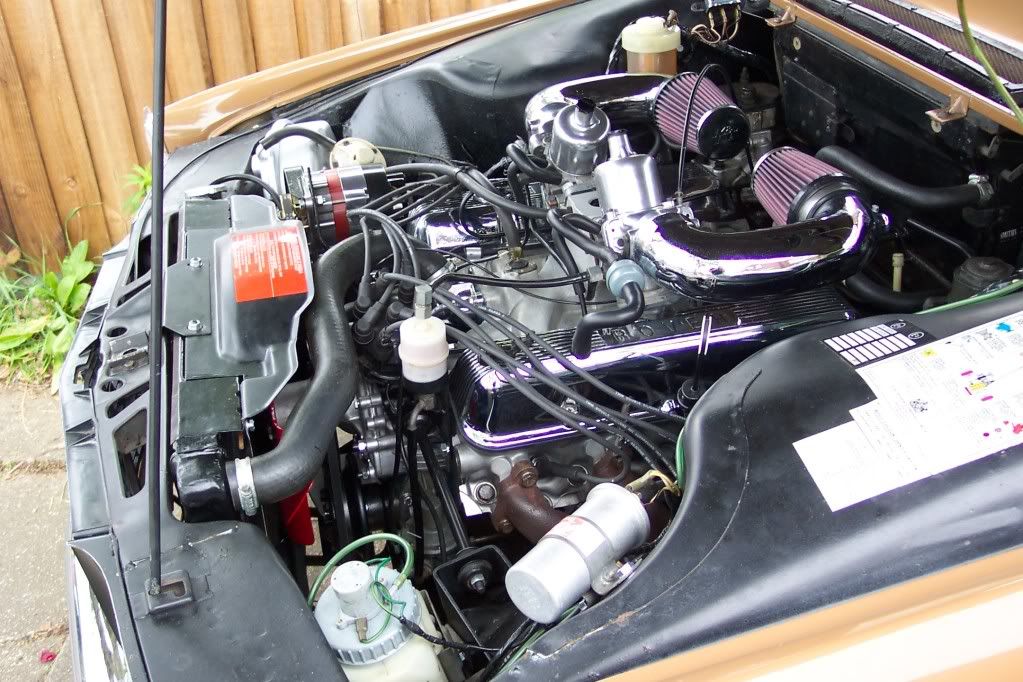
Stan - love the thread, your engine bay is best-in-show material. Makes the original setup really shine and I no longer only want to customise. How does she drive?
Regards,
Tor
1974 Norwegian V8 ex-auto
Comment for Testrider: this might be common knowledge, but on my HIF6's the needle code was printed on the needle itself, near the base, ie. I was able to see what mine were (not that I still remember, was it BRM..?) when I had the carbs apart. You'd benefit from a magnifying glass and would probably struggle if the carbs have seen a lot of wear.
Stan - love the thread, your engine bay is best-in-show material. Makes the original setup really shine and I no longer only want to customise. How does she drive?
Regards,
Tor
1974 Norwegian V8 ex-auto
vaultsman
Well-Known Member
Well...it's been a saga. But finally got there..back on the road with a fresh MOT with no advisories...and what a great feeling that is!
Just need to finally sort the carb needles out but she runs very smoothly now and picks her feet up really well. Oil pressure 40 psi hot @ 2000 rpm.
And the final form...well, for now anyway!
I'm glad I didn't know at the outset how long (and how many £££'s!) it would take...might never have started!
And a big thank you to everyone for all the helpful advice and comments along the way!
Cheers all,
Hello Stan,
It is great to hear that everything has gone really well. Top stuff!
Your engine does look great. 8)
Did you make up some brackets to support the elbows adjacent to where the filters attach?
Ron.
It is great to hear that everything has gone really well. Top stuff!
Your engine does look great. 8)
Did you make up some brackets to support the elbows adjacent to where the filters attach?
Ron.
vaultsman
Well-Known Member
SydneyRoverP6B said:Hello Stan,
It is great to hear that everything has gone really well. Top stuff!
Your engine does look great. 8)
Did you make up some brackets to support the elbows adjacent to where the filters attach?
Ron.
Thanks Ron,
Did think about brackets but wanted to keep it uncluttered, so I've used unobtrusive roll pins where the elbows locate on the carb adaptors. Seems rigid enough, and I can soon whip the adaptor nuts off if I need to.
Hello Stan,
I was wondering if you have fitted the BBW needles to you carburettors as you had intended, and if so how did they go? On you recent trip to the Yorkshire Dales, could I ask please what fuel consumption you achieved. The fuel economy that you are seeing now following your excellent top end overhaul, how does that compare to before undertaking the work?
All the best,
Ron.
testrider
Active Member
Hi Stan, how's the sun burn on your head?
I meant to ask you at the rally on Sunday if you'd done a oil change since rebuilding the engine?
I changed mine last week at around 250 miles since the first start up and was shocked at how black the oil was that came out even though I'd cleaned out the sump and oil pump and just wonder if that's normal?
vaultsman
Well-Known Member
SydneyRoverP6B said:Hello Stan,
I was wondering if you have fitted the BBW needles to you carburettors as you had intended, and if so how did they go? On you recent trip to the Yorkshire Dales, could I ask please what fuel consumption you achieved. The fuel economy that you are seeing now following your excellent top end overhaul, how does that compare to before undertaking the work?
All the best,
Ron.
Hi Ron,
Yes I did fit the BBW's, and the engine felt freer-revving and torquier afterwards. On the Yorkshire trip I put about 600 miles on at an indicated average of 25 mpg. My speedo's under-reading slightly though - according to the satnav, speedo reading 30 equals 32 mph true.
Not really sure what it was before, but quite happy with 25 mpg.
vaultsman
Well-Known Member
testrider said:Hi Stan, how's the sun burn on your head?
I meant to ask you at the rally on Sunday if you'd done a oil change since rebuilding the engine?
I changed mine last week at around 250 miles since the first start up and was shocked at how black the oil was that came out even though I'd cleaned out the sump and oil pump and just wonder if that's normal?
Hi Paul,
No, not changed it yet. It still seems pretty clear on the dipstick though.
I have noticed a bit of drop in pressure though..seems the same cold at around 40psi, but when the oil's warmed up it's a bit under 30 at 2000rpm whereas it would comfortably reach that straight after the rebuild.
How's your's behaving?