

You are using an out of date browser. It may not display this or other websites correctly.
You should upgrade or use an alternative browser.
You should upgrade or use an alternative browser.
The Elegant Thirsty Dinosaur
- Thread starter rottenlungs
- Start date
rottenlungs
Member
Hi Chris
Are the Facet pumps not very good, then?
In terms of temperature issues, I have taken a drillbit to the bleed nipple on the carb tower - I`ll need to check for turbulence in the radiator tank next time I run it. The radiator is a good 2nd hand item at the moment. I`m intending to get the other carcass I have recored with a three-row core, though that is not going to be cheap so if I can hold off for a few months I will.. I am also going to flush out the cooling system as best I can when I take the timing cover off for the seal. I will report back on the fuel issues once I`ve attacked the cooling. I think I might replace my crummy 1 litre ex-antifreeze-bottle expansion tank arrangement with something a little more professional looking. I noticed a car on here that had the bottle out of an SD1 and it looked pretty authentic.
On a good note, the wipers now have two speeds and auto park. Basically cleaned , lubed and reseated all contacts. Delay doesn`t quite behave - it takes the wipers halfway across the screen and then stops. However, I can live without delay for the WOF. I`ve also polished a wing and a door so just one wing remaining.
Fingers crossed on the oil seals perking up with use. I would prefer not to change the back seal unless I have to.
Cheers
James
chrisyork said:Well done that man!
We wait with baited breath for the driving reports!
Just one note; don't use a facet pump! Start by solving the problem (fuel vaporisation?) as often described on here - which is a cooling problem of the engine failing to bleed properly and or inadequate radiator. Then if it persists buy a rotary pump similar to the Huco type. But come back after the car's roadworthy and we'll talk you through it.
Oh, and you may well find that the crank seals will take up somewhat once you start driving it!
Chris
Sounds like the agenda's all in there! And well done with the wipers!
Facet pumps are OK if the shop that sells it you know what they are doing. But there a re a lot of different varieties and most over the counter sales are high pressure ones - ie to suit injection, racing etc. They are also rather cheap construction and noisy.
Have a look at the Huco pumps here:
http://www.gowerlee.dircon.co.uk/index.html
They sell under quite a lot of different names, so you could be lucky in NZ.
Chris
rottenlungs
Member
Chris, JVY
I had a look at the fuse box tonight. It`s the first time I`ve had a good look in there. The two left-hand most fuseholders (labelled as heater blower and rear window) have both melted in the past - before I owned the car. Someone has done a tidy job of rewiring those two fuses with inline fuse holders. I haven`t measured the fuses yet for size.
What I did notice was the the fuses are arranged with a separate LH and RH fuse for the dip / main units but a single fuse for the pair of main -beam only lights. So I can`t see how a single main beam lamp could be due to a fuse, unless the fusebox is incorrectly labelled. I think I`ll check the rather ugly knot of wiring under the servo next, its probably been tugged at a bit when I rewired the side light cluster. I`ll find the bullet connectors in question and put a meter on them. I also have a couple of replacement halogen units on order from Holden Classics. I don`t mind having a few spares about.
Final wing cut and polished tonight. Started swearing at the windscreen finishers. I think I have one just about fitted. Time for the 3.2mm drill and the pop-rivetter.
I`ll post some pics tomorrow, I found a couple of pics of the car from very early on in the repaint process so I`ll do a quick before and after
Thanks again, all.
chrisyork said:Check that your fuses are 32mm long rather than 30mm. This makes a huge difference to a P6. With the short fuses, the holders overheat and go loose (the plastic softens - and in extreme cases will catch fire).
Chris
rottenlungs
Member
Hi.
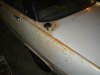
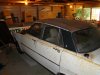
A couple of before and after shots to compare to the current state..
Definitely an improvement..!
Cheers
James
A couple of before and after shots to compare to the current state..
Definitely an improvement..!
Cheers
James
rottenlungs said:Hi
Thought it was time for a quick update. I have made plenty of progress over the last few weeks. All the painting is complete. I still have a few panels to polish, (Farecla G3 is good sh1t!) but its starting to look like a car again.
There are plenty of imperfections but the overall effect is rather pleasing, I think. I`m hoping to be finished in time for the 10th anniversary of me owning the car, October..
Hope she meets with approval - I`ll have to change my sig to reflect the absence of rust colouring now!
Cheers
James
Attachments


JVY
Active Member
8)  Awsome difference.
BTW, sorry of the main beam fuse advice caused confusion. My '75 S2 2200TC definitely has seperate LH & RH main beam fuses - so maybe there are variations?
The trim around the windscreen is one of those jobs where the ability to curse out loud is the only special skill required .
Awsome difference.BTW, sorry of the main beam fuse advice caused confusion. My '75 S2 2200TC definitely has seperate LH & RH main beam fuses - so maybe there are variations?
The trim around the windscreen is one of those jobs where the ability to curse out loud is the only special skill required
.v8guy
Active Member
James, Those before and after shots remind be of a Hans Christian Anderson Tale........
........................................................................................................
............................"The Ugly Duckling" when it turns into a beautiful white swan .
........................................................................................................
............................"The Ugly Duckling" when it turns into a beautiful white swan
.rottenlungs
Member
No worries JVY, I`m sure there are lots of variations on these cars. I`m pretty sure the unit has failed so I`ve splashed out on a set of halogen replacements for all four lights.
Thanks for the kind words, all.
Thanks for the kind words, all.
JVY said:8)
BTW, sorry of the main beam fuse advice caused confusion. My '75 S2 2200TC definitely has seperate LH & RH main beam fuses - so maybe there are variations?
The trim around the windscreen is one of those jobs where the ability to curse out loud is the only special skill required
rottenlungs
Member
Hi all
Well, I got all the cant rails and the windscreen finishers on in the end. Amazingly managed to not scratch anything in the process. I`m almost done!!
Which leads me on to my question:
After much consideration I have fitted the facet pump. Rigged temporarily into the fuel line It seems to work well and the noise is pretty imperceptible when mounted on the rubber spacers. I have the pump in the engine bay. Power is coming from the ignition-fed connection on the fusebox so the pump comes on with the ignition key moving to the running position.
The question is can anyone recommend a good route for the fuel line? I`m thinking of mounting the pump near where the coil is. Then the fuel pipe will come up from the trans tunnel behind the airbox (as per spec). Then it will snake past the power steering tank, along the inner wing via an inline filter to the pump. From the pump the fuel pipe will run along the engine stay (same route as the coil > dizzy low-tension lead) and then up through the (now redundant) fuel filter bracket to the carb. An alternative route would be pump on the driver`s side wing and then fuel line takes a long route round (similar route to the bonnet release cable and then back to the carbs) - I suspect this would be less good, due to the increased length of pipe exposed to the underbonnet heat.
I`m pondering moving the pump to down by the fuel tank. Even if I do , I still need a new route for the fuel line to the carbs. There doesn`t seem to be an obvious choice of path.
Oh and one more thing I just remembered - I`m going to have to make up a new battery clamp - the current one is missing the studding / wingnuts and doesn`t seem to fit my battery anyway.
WOF (NZ`s MOT) should be in a week or two now!!
I`ll take a couple of pics tonight . I need to move the Rover out in order to play "find the loose bracket" on the Honda Odyssey`s exhaust system..
Cheers
rottenlungs
Member
Woohoo!
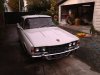
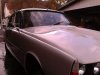
The Elegant Thirsty Dinosaur has a Warrant-of-Fitness! The old girl passed with flying colours, just an advisory on a couple of bushes and a front brake hose. Discovered that one of the tyres is a different profile to the rest , 185/75 and the rest are 185/70. New rubber is on the way.
Took it for a brief jaunt this afternoon. Pouring with rain, I had forgotten how much windows steam up on non air-con cars and pinking a little but pretty darn good for a car that drove once in 2010 and then November 2004 before that.
Now to start the serious driving and tuning...
Cheers!
Attachments

testrider
Active Member
WarrenL said:Looks fabulous! I'm gobsmacked with admiration. I've got to say that my experiences in painting have driven me so crazy (OCD sucks) that I've resorted to paying out large dollops of money to have my P6 dollied up. For me it was the lesser of two great evils.
Me too!
Your car looks great now though and well done on passing the WOF test.
rottenlungs
Member
Hi all
My experiment with an electric (Facet in this case) fuel pump has not been a success.
I installed the fuel pump and it seemed to work fine in the garage. Did some retuning work on the SU`s and wondered why it would pull nicely up my street but then struggle under anything more than light throttle once I`d gone a short distance.
I did have some problems with one of the floats. Replaced that and finally got both carbs providing the right mixture. I had high hopes but nope, still the same, pulls away sweetly then struggles terribly after about 200 metres. I was just getting the first inkling that I wasn`t getting enough fuel to the carbs.
Well. Today, out of frustration, I refitted the old mechanical fuel pump , in series and downstream of the electric pump. All of a sudden the old girl springs to life. In fact, she is performing better than she has for a long time.
It would appear that the little fuel pump I bought was insufficient for the job. I live and learn. I have left the electric pump in place for now but may remove it if it gets in the way. Looks like all those people that said 'just get the factory fit gear working properly before you faff about with an electric pump' were absolutely right.
With a large smile on my face, I racked up 30 kms burbling around the Lower Hutt area today. Having flushed the cooling system and renewed the gearbox oil cooler hoses I was extremely pleased to get back, leave the car idling on the drive, and see no leaks underneath. Temperature still climbs slowly (and the thermostat was reluctant to open today) but not bad overall.
On a separate, but related note, what does one do if they have (possibly) stripped the thread on one of the fuel pump to timing case bolts? I`m guessing the best case would be having some kind of helicoil inserted into the hole. Blimmin` annoying as I don`t really wan`t to rebuild the engine quite yet..
Cheers
James
Hi James
Well done!
As you say a helicoil is the answer to you're stripped thread, but give it a weeks grace as you may be about to strip a couple more....
If the thermostat seems slow to open that is prime face eveidence of not having a "jiggle pin". The thermostat should have a pilot hole located at about 12:00 as you look at it from the front of the car. So the thermostat cover will have to come off..... It's quite in order to simply drill a 1/8" hole in the stat yourself if it doesn't have one.
Whilst you are losing a few drops of coolant everywhere, best check that the coolant outlet from the carb "tower" between the two carbs is clear. Look for a strong flow of water from the hose from it into the top of the radiator when you rev the engine. This will have significant effect on both pinking and tendency to petrol vapourisation and stalling if it is blocked. To clear it if blocked you will need a vigorously wielded hammer on a spike or jewellery screwdriver!
Chris
rottenlungs
Member
Hi Chris
As part of the coolant flush I had the thermostat out and tested it - it does have a a jiggle pin and I fitted it at the 12.00 position. I think it was just a bit of air at the top of the system as I ran it some more with the cap off and the heater on full hot and crammed more water in. It seems to be fine now.
I guess the timing cover has to come off to get it helicoiled.. Oh well, I suppose it would present the perfect opportunity to replace the timing chain and seals.
At the moment the fuel pump seems to be holding so I`ll run with it for the time being. I really want to save up the $$ and do a more serious engine rebuild with a new camshaft / followers etc and it seems a pain to have to crack the timing cover now..
Now its time to play hunt the rattle in the front steering / suspension..
Cheers
James
rottenlungs said:I guess the timing cover has to come off to get it helicoiled..
I'd say not....
rottenlungs
Member
Interesting Harvey. I didn`t know it could be done in situ. My only experience of having engineering work done was when I had to get a rocker shaft bolt drilled out of my Ford Fiesta engine. I had to take the head to a machine shop for that one.
Don`t s`pose its something I can do myself is it?
Cheers
James
Don`t s`pose its something I can do myself is it?
Cheers
James
rottenlungs said:Don`t s`pose its something I can do myself is it?
You might have to get creative drilling the hole oversize because you won't get a normal electric or hand drill down there, but you could use an angle-drive or drill. Then you just need the Helicoil kit and some patience.
Just take precautions to avoid swarf going inside, and dont drill into the timing chain......
rottenlungs
Member
Re: The Elegant Thirsty Dinosaur - pre WOF work
Hi all
With the WOF due in late Jan it was time to get some stuff done on the ETD. Two critical jobs, one fun one. The first one, the brake hose , was easy and done in a few minutes. The extension case crossmember to body bushes.
To remove the trailing arms out must come the roadsprings:

Next extract pesky old metal-in-metal bushes

Cue faithful assistant (Alfie) with new urethane delights:

Use Mr Lungs` patent bush insertion tool (bits of two-legged puller with washers and old hole-saw) to drive said urethane delights home:

Back together again. Yay!

Took the ETD for a good run up to visit a friend with a rather interesting old motor (more in the cars spotted forum). 170Km round trip including 521m high summit over Peakakariki Hill Road (you Wellington Kiwis will know what I`m talking about) and she didn`t miss a beat. Though there is a rather high frequency vibration when under load above about 110km/h. Too high frequency to be wheel balancing, I suspect a propshaft UJ may be on the way out..
Oh yeah, the fun project is a new radio. The radiomobile radio, whilst fully functional is a little too basic for me. Has anyone installed 4" speakers in the front doors? Or is the parcel shelf a less intrusive option in terms of how much interior damage to inflict?
Cheers
James
Hi all
With the WOF due in late Jan it was time to get some stuff done on the ETD. Two critical jobs, one fun one. The first one, the brake hose , was easy and done in a few minutes. The extension case crossmember to body bushes.
To remove the trailing arms out must come the roadsprings:
Next extract pesky old metal-in-metal bushes
Cue faithful assistant (Alfie) with new urethane delights:
Use Mr Lungs` patent bush insertion tool (bits of two-legged puller with washers and old hole-saw) to drive said urethane delights home:
Back together again. Yay!
Took the ETD for a good run up to visit a friend with a rather interesting old motor (more in the cars spotted forum). 170Km round trip including 521m high summit over Peakakariki Hill Road (you Wellington Kiwis will know what I`m talking about) and she didn`t miss a beat. Though there is a rather high frequency vibration when under load above about 110km/h. Too high frequency to be wheel balancing, I suspect a propshaft UJ may be on the way out..
Oh yeah, the fun project is a new radio. The radiomobile radio, whilst fully functional is a little too basic for me. Has anyone installed 4" speakers in the front doors? Or is the parcel shelf a less intrusive option in terms of how much interior damage to inflict?
Cheers
James
JVY
Active Member
Re: The Elegant Thirsty Dinosaur - pre WOF work
Good to get an update James.
Regarding you speakers - there should already be a cut out on the rear parcel shelf for a single speaker that might help. My guess is that fitting speakers on (or under) the rear shelf looks better than "butchering" the door cards. Also, the rear shelf is a proper solid bit of wood (ply??) that is possibly a better material for mounting speakers on than a door?
Good to get an update James.Regarding you speakers - there should already be a cut out on the rear parcel shelf for a single speaker that might help. My guess is that fitting speakers on (or under) the rear shelf looks better than "butchering" the door cards. Also, the rear shelf is a proper solid bit of wood (ply??) that is possibly a better material for mounting speakers on than a door?
Re: The Elegant Thirsty Dinosaur - pre WOF work
My goodness, you have done some work on that car.
In regards speakers, I second the notion of door cards=butchering.
The rear parcel shelf is doable, but you need to cut through metal...I will be tackling such a job shortly, as my single centre speaker, whilst better than none, needs a mate for best effect.