

You are using an out of date browser. It may not display this or other websites correctly.
You should upgrade or use an alternative browser.
You should upgrade or use an alternative browser.
Shedtune P6 Progress
- Thread starter shedtune
- Start date
Cheers-the spitfire was a mission 6 weeks to get it ready for a 2,000 mile European event,I wont be putting my self under that pressure again!
Will update the blog when I've cut back to decent metal etc
In the mean time -which suppliers would people recommend for repair panels?,any pics of the panels in the flesh rather than a drawing?
Thanks in advance
Mr Shed
Will update the blog when I've cut back to decent metal etc
In the mean time -which suppliers would people recommend for repair panels?,any pics of the panels in the flesh rather than a drawing?
Thanks in advance
Mr Shed
there are a few p6 suppliers. Easy ones to try are:
rover-classics.co.uk / winsintltd ( same company)
jrwadhams.co.uk and
http://shop.roverp6cars.com/
Plenty comes up on ebay and a wanted ad here on the forum often yields results. There are a couple of smaller ones too. Have a google")
Rich
rover-classics.co.uk / winsintltd ( same company)
jrwadhams.co.uk and
http://shop.roverp6cars.com/
Plenty comes up on ebay and a wanted ad here on the forum often yields results. There are a couple of smaller ones too. Have a google
Rich
JVY
Active Member
Good stuff Mr Shed. It looks like you're getting stuck in and I'm looking forward to more updates.If it's any consolation, what you have found seems to be normal P6 rot spots. When I patched my sills up last year, the o/s was certainly worse than n/s on my car (I'm thinking there must be a scientific reason for this - :idea: mabe o/s is subjected to more salty road spray from oncoming traffic that get's forced under the sill covers??. Like a few others on the forum, I just made up repair panels. Though, plenty of others get the repair sections and often just cut them down to the size needed.
Those jacking points are a bit of a pain. I repaired one on my car but I can understand why some folk just opt to get rid of them.
JVY said:
If it's any consolation, what you have found seems to be normal P6 rot spots. When I patched my sills up last year, the o/s was certainly worse than n/s on my car (I'm thinking there must be a scientific reason for this - :idea: mabe o/s is subjected to more salty road spray from oncoming traffic that get's forced under the sill covers??. Like a few others on the forum, I just made up repair panels. Though, plenty of others get the repair sections and often just cut them down to the size needed.
Those jacking points are a bit of a pain. I repaired one on my car but I can understand why some folk just opt to get rid of them.
I must admit I was thinking to my self would I ever use them ? (the jacking pionts)might be an idea to do away with them and just carry a decent bottle jack or similar
Hello Im back!
Sorry havent been posting been totally taken up by house,children and shed activity- any way the Scimitar GTE is now Motd and will be taking on the "Shed to the Med" event - sponsor the "plastic pig here" http://uk.virginmoneygiving.com/fundrai ... sTeam=true
Needless to say I shall now be getting stuck into the P6 ASAP aiming to have it on the road for spring 2014
Must admit looking forward to a bit of tin bashing and welding !
This time I really am back!
I'm starting work on the P6 in earnest in the next couple of weeks- only a year behind schedule thanks to the Scimitar catching fire in France Sept 2013..anyway less of that it made it in Sept 2014 so its time to get cracking on the P6 ..
I have managed to pick up some decent useful parts over the last 12 months or so - some unused NOs sills being amongst them
so plan to start with the welding then brakes , suspension and general service etc and then MOT
Will get some pictures up soon -and of course update the blog..
Now for today's school boy question
I've sourced a 2000 TC head - so apart from inlet manifold and carbs what else do I need to convert to TC ? exhaust manifold? air box etc ?
Cheers in advance
chrisw
Well-Known Member
shedtune said:I've sourced a 2000 TC head - so apart from inlet manifold and carbs what else do I need to convert to TC ? exhaust manifold? air box etc ?
Let's see..
Inlet manifold
Carbs
Air Filter box
Exhaust manifold and probably the main exhaust section
Accelerator linkage
I think that's it.
I've got a complete setup from a 2200TC in the garage if you're after any parts.. includes the cylinder head and everything except for the exhaust itself.
shedtune said:Daft question is the 2200tc head the same as a 2000tc head?
No, and it won't fit on the 2000.
Thanks for the replies to my school boy questions-very useful
So work has started on the P6 -sort of
First up I decided "to tidy the shed up" this turned into sorting through all the various tupperware boxes full of old nuts and bolts I have collected for the last twenty years…just in case they might be useful for something?..sad hoarder I am !...this bout of tidiness rapidly got out of hand and led to spares being sorted and stored in the eves of the shed ...I also cleared out the “old shed of shame” which is to be demolished this year ..End result is I have loads of room to work on the car and will get the grinder on it this week..
One of the “tidying” up jobs was to put the seized 2000sc engine I had acquired with a decent manual gear box onto the engine stand I had liberated from the “shed of shame”-this will allow me to strip and re-build it at my leisure between other jobs-my plan is to get the P6 on the road in standard SC auto form then convert in the next couple of years to 2000tc manual –I have a 2000TC head to go on it but just wanted to check that a 2000tc head goes straight on a 2000sc block?
Will post up progress/pics on the grinder activities by the end of the week..
shedtune said:just wanted to check that a 2000tc head goes straight on a 2000sc block?
It does.
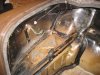
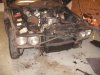
Well managed to get some time in the shed...old SC engine transferred to stand ...removed the panels ...no big surprises,some good previous repairs some bad..haven't spotted anything yet that looks terminal-but I am a P6 novice so all feed back welcome!
Attachments

marcus/rosie
New Member
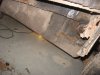
The sills are easy to repair and the boot area looks ok, But before you do anything I would have a good dig around the bulk head area to see how bad that rot is on it. The lower section panel is east to replace. I had the same with my rosie she had the same welded on outer covers which as yours was hiding rotten inner and outer sills, but I would have a good dig around and list all the areas that need work before starting. But if your in no rush then just tackle them one at a time. But check the bulk head first.
Good luck regards
marcus
Good luck regards
marcus
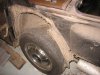
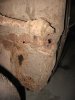
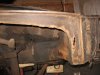
Thanks for the advice- not going to be able to get on it for a few days so made the most of tonight- here are some more pictures
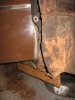
Got it jacked up and started wire brushing to investigate the worst side (O/S) -This side seems to have suffered the most rot and bodged repairs-I particularly like the patch covering the the bumper iron bolt head!-made me laugh
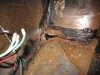
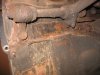
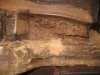
Ref the bulk head - O/S you can see some previous patches not the best as obviously done without stripping the suspension out
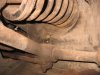
N/S - looks way better
I'm fully committed to restoring this P6 and fully intended to strip the suspension out to get at repairs -so not worried about the amount of work or time
Let me know your thoughts -cheers!
Got it jacked up and started wire brushing to investigate the worst side (O/S) -This side seems to have suffered the most rot and bodged repairs-I particularly like the patch covering the the bumper iron bolt head!-made me laugh
Ref the bulk head - O/S you can see some previous patches not the best as obviously done without stripping the suspension out
N/S - looks way better
I'm fully committed to restoring this P6 and fully intended to strip the suspension out to get at repairs -so not worried about the amount of work or time
Let me know your thoughts -cheers!
Attachments


 Yep I had that same feeling ....Ive been here before...mainly with Triumphs I have to admit
So you repaired yours ok? ...any links to pictures showing the inner sill to sill interface would be useful ..ie once the inner sill repalced how does the sill attach to the upper part of the inner ..is it spot welded? (I have a spot welder)
Not sure if I explained that school boy quest very well may have to sketch it!