Differential removal - is workshop manual correct ?

Sprout

New Member
Hi All
This may be a stupid question , first big job on my P6 1974 2200 TC
I am going to remove the diff primarily to fix rear brake calipers, not working, but also have oil leak from extension tube seal and rear hanger mounts look shot.
Workshop manual (Haynes) does not mention the cross car beam that the lower suspension links mount to... only the xtube mounting bracket.
Will the front drive flange of the diff extension tube pass between xbeam and floor, or am I missing something.
Help it's driving me mad thinking it through
Howard
 
Hi, Yes it will. Coincidently, it was the same job I did on my first P6b, occasioned by a previous owner letting the diff run out of oil and so was a bit 'noisy'. ;)

Colin
 
The later four cyl cars such as yours have a separate crossmember like the V8’s. That might explain its omission in the Haynes book of lies. Earlier 2000’s didn’t have that arrangement.
 
Thanks for the quick replies guys.
Thought I was going mad, I guess the crossmember makes a great place to Jack and support the rear of the car, as the load will go in to the body in the same way as when it's on its wheels.
I have been waiting a weather window as its a drive job and I'm getting a bit old for rolling around under the car in the cold and wet.
Looking forward to fixing the brakes so I can start using the car.
Many thanks again
Howard20240222_173005.jpg
 
Be sure to take careful note of all the spacer and washer locations on the long bolt at the front of the diff extension, nose height is critical to avoid vibration. Also whilst diff is out check all driveshaft UJs for smooth operation in all directions.
 
Be sure to take careful note of all the spacer and washer locations on the long bolt at the front of the diff extension, nose height is critical to avoid vibration. Also whilst diff is out check all driveshaft UJs for smooth operation in all directions.
Many thanks, have seen that it's important to mark / match flange positions on prop a driveshaft to diff / disc. So that's good info , thanks
 
I used to get at the rear calipers by undoing the 3 bolts from the rear diff plate and lowering the diff enough to improve access.
 
the last of the diffs came with extra seals at the tail shaft end (front) the intent of which is to stop oil wicking past the spline via the nut and washer. I think its only the E and F diffs (maybe just the F) that have that fitment but worth checking as you may just need to replace those O rings if the main seal area is dry but the flange wet. The Diff assembly is very heavy, I reccomend getting hold of a transmission jack to get it in and out...And JP's suggestion is good too but do make sure you take the weight off bracket (ie. support the diff) before trying to unscrew the special set screws.6
The diff will have a number stamped on the bottom of the main case followed by a letter. The Letter denotes what model diff you have. They run A to F, with F being 1976 vintage.
 
Last edited:
the last of the diffs came with extra seals at the tail shaft end (front) the intent of which is to stop oil wicking past the spline via the nut and washer. I think its only the E and F diffs (maybe just the F) that have that fitment but worth checking as you may just need to replace those O rings if the main seal area is dry but the flange wet. The Diff assembly is very heavy, I reccomend getting hold of a transmission jack to get it in and out...
That's good info to have, I will check that out, many thanks for posting.
 
the last of the diffs came with extra seals at the tail shaft end (front) the intent of which is to stop oil wicking past the spline via the nut and washer. I think its only the E and F diffs (maybe just the F) that have that fitment but worth checking as you may just need to replace those O rings if the main seal area is dry but the flange wet. The Diff assembly is very heavy, I reccomend getting hold of a transmission jack to get it in and out...
And Transmission jack, looking into buying one that fits on the trolley jack inplace of the saddle.
Thanks
 
I used to get at the rear calipers by undoing the 3 bolts from the rear diff plate and lowering the diff enough to improve access.
I guess I can have a look at that option once I have the diff ready to lower.
To be honest , there are so many posts about rear brakes it's all a bit daunting, given there positions and complexity (as a caliper) . I have done lots of conventional brakes over the years, just thought maybe better being stood the rightway up with it in the garage, might be the better option for my first experience. Maybe I'm getting less confident with age
Something definitely wrong, handbrake works very slightly on left, not at all on rh, neither on foot brake, loosing fluid, no obvious leak. I suspect RH caliper piston leak / jammed, due to previous being set up wrong. But I'm guessing
Thanks for the tip will definitely consider it.
 
And Transmission jack, looking into buying one that fits on the trolley jack inplace of the saddle.
Thanks
I find working on the diff is best done near the ground where you can lie down and look up. I looked into buying one of those transmission plates for my jack but found the whole assembly wasn't much more expensive and comes with four casters which is easier to maneuvre about than a jack with two casters and two fixed wheels.

I normally jack the diff end up using the transmission jack, remove the three set screws then lower it just enough to give you better access to the brake pipe connection to the body. That removed you can then undo the front flange mounting bolt. Note that there are two types. The 4 cylinder cars had one where the bolt came down from the top with a nut on the bottom. Later cars like yours it should be the other way around. nut at the top bolt going up from the bottom. Use a new lock nut as if it comes loose you'll lose the bolt...which are hard to come by in the right length.

Make sure you strap and pack the diff end very well to the jack or the whole lot will fall off when the forward nut comes off....

Getting the diff back in requires you put the forward nose up onto its shelf then gradually jack up the back and move the nose forward incrementally. I find with my jack i don't actually need the pump handle as I can easily pump with my hand on the bracket. eventually youwill be able to get the forward bolt back in and then line the diff up with the three on the back (don't put them in far as you need some play as there isn't much movement available in the bracket. If you need mounts PM me.
M
Hi, thanks for the reply, I have seen the type you are talking about, at £150, the one for the trolley jack are £45, but I hear what you say about them being safer and easier to use.
On refitting, when you said rest front end on the shelf is that the mounting bracket for the nose mount ?
Out of interest how much clearance is there for the front flange past the suspension crossmember and fhe floor ?
 
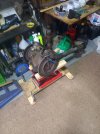
And so finally, with a dry day the diff is out. Thanks for all your advise .
 

Attachments

  • 20240318_172233.jpg
    20240318_172233.jpg
    1.2 MB · Views: 20
Replace the brake pipes while it's out, it's a lot easier on the floor than when it's in the car. ;)
 
Replace the brake pipes while it's out, it's a lot easier on the floor than when it's in the car. ;)
Absolutely, I intend to replace both hoses, suspect at least one if not 2 refurbished calipers , and a new diff nose seal. Replace the oil. At least I can take my time in the dry garage now should the bleed nipple on the LH caliper be in the lower port ?
 
Absolutely, I intend to replace both hoses, suspect at least one if not 2 refurbished calipers , and a new diff nose seal. Replace the oil. At least I can take my time in the dry garage now should the bleed nipple on the LH caliper be in the lower port ?

'Lower port'? It is usual, but I would agree it's questionable, so that it's easier to access. However, I would be tempted to pipe it to somewhere even easier, that way you can swap them over.
 
Good Idea to do a complete rear brake rebuild and clean while its out....Check the lines for plasticised brake fluid jelly too...

I find the easiest way to bleed the standard setup is to use the ring end of a short ring open end spanner and run the tube over the top of the mounting bracket onto the nipple. That allows you to drop the spanner or change its position without having to get it back into place. You'll find you can crack the nipple open and lock it closed using one hand and not much movement.

Fosseway make a remote bleeder kit for the P6
Thanks more good advise , I will check out Fosseway, going to the classic show Sunday will have a good look there too.
 
Back
Top