

You are using an out of date browser. It may not display this or other websites correctly.
You should upgrade or use an alternative browser.
You should upgrade or use an alternative browser.
Diff carrier bushes
- Thread starter GRTV8
- Start date
GRTV8
Well-Known Member
Hi, yes, peel back the carpet/mat under the tank and there you will find a small metal plate held by a self tapper. Under which you will find your treasure. Thr rest I'm sure you can work out.
Colin
Brilliant -thanks
jp928
Well-Known Member
Note that the book lists different length bushes there - 539042(1.375") AND 578080 (1.7"). Mine is a Suffix D chassis, needed long type - well, it had long ones in it, so thats what I fitted. Nearside bush was visibly badly sagged, offside seemed as good as new. Long one might be Metalastik 17-1258.
I got new ones from JRW 2 years ago - slightly different, but functional.
See Differential hanger bushes.....any ideas?. for a pic.
I got new ones from JRW 2 years ago - slightly different, but functional.
See Differential hanger bushes.....any ideas?. for a pic.
GRTV8
Well-Known Member
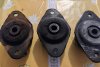
So taking advantage of a wet Sunday , I spent about three hours on my back replacing the two outside bushes #539042.
Getting the the heads up from Colnerov as where to start.
It was relatively easy on my own but would recomend another pair of hands to hold the 1/2" socket from the boot side while you do the undercar thing.
The second bush was quicker as I knew what I was doing.
I cleaned up and lubed the long holding bolts and generally rust proofed that area as everything was in very good nick.
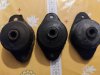
The drivers side bush was perfect but the passenger side was a little suspect , so Ive replace both with new ones [metalastic].
Im going to put her on a hoist to get at the third forward bush. The local vintage car club has a hoist I can use.
Bugger lying on my back on a concrete floor in the middle of winter. Even if it was on a thick blanket.
Happy with the results
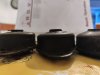
Pics show the two bushes I replaced on the left c/f the new one on the right. Not too shabby for 50years insitu.
Getting the the heads up from Colnerov as where to start.
It was relatively easy on my own but would recomend another pair of hands to hold the 1/2" socket from the boot side while you do the undercar thing.
The second bush was quicker as I knew what I was doing.
I cleaned up and lubed the long holding bolts and generally rust proofed that area as everything was in very good nick.
The drivers side bush was perfect but the passenger side was a little suspect , so Ive replace both with new ones [metalastic].
Im going to put her on a hoist to get at the third forward bush. The local vintage car club has a hoist I can use.
Bugger lying on my back on a concrete floor in the middle of winter. Even if it was on a thick blanket.
Happy with the results
Pics show the two bushes I replaced on the left c/f the new one on the right. Not too shabby for 50years insitu.
Attachments
GRTV8
Well-Known Member
Note that the book lists different length bushes there - 539042(1.375") AND 578080 (1.7"). Mine is a Suffix D chassis, needed long type - well, it had long ones in it, so thats what I fitted. Nearside bush was visibly badly sagged, offside seemed as good as new. Long one might be Metalastik 17-1258.
I got new ones from JRW 2 years ago - slightly different, but functional.
See Differential hanger bushes.....any ideas?. for a pic.
Hi JP928
Thanks for the info- I heard there were two different bushes.
I ordered 3x and just convinced myself I would add spacers if too different.
Fortunately when they turned up they were the same as what was originally on the car.
Thanks again.
Gerald
jp928
Well-Known Member
When you are single handed, and need someone to hold a bolt or nut, vise grips can be essential. I used a pair when I did these rubbers.
https://www.bunnings.com.au/irwin-vise-grip-2-piece-locking-plier-set_p6010174
There is also a narrow nose type, almost a needle nose, very useful.
https://www.amazon.com.au/Knipex-41...ocphy=9071362&hvtargid=pla-428275664141&psc=1
https://www.bunnings.com.au/irwin-vise-grip-2-piece-locking-plier-set_p6010174
There is also a narrow nose type, almost a needle nose, very useful.
https://www.amazon.com.au/Knipex-41...ocphy=9071362&hvtargid=pla-428275664141&psc=1
When you are single handed, and need someone to hold a bolt or nut,
When I fitted my jag diff on my own, I just gaffa taped the bolts in and cable tied a couple of spanners to the cross member

GRTV8
Well-Known Member
Brilliant idea. I used to be inventive like that. Lost it along the way unfortunately.When I fitted my jag diff on my own, I just gaffa taped the bolts in and cable tied a couple of spanners to the cross member
View attachment 23694
colnerov
Well-Known Member
Hi, FWIW, it's good engineering practice for components on a vehicle to have the bolts pointing down. If a nut does come loose and runs off you only lose the nut and not the bolt or even maybe the component as well. A loose bolt has half a chance at keeping the component in location.
Pedant mode - off.
Colin
Pedant mode - off.
Colin
jp928
Well-Known Member
Bit late, but...
The Finnish for 'pedant' is 'comma-f*cker'. Please continue being pedantic.
Once upon a time one of the US fighter jets (F5 or F20?)started having accidents, and the pilot ejecting, reporting 'the ailerons locked up at full deflection' - ailerons control roll about the logitudinal axis. Finally they sent Chuck Yeager up in one to see if he could reproduce the problem and save the aircraft, which he did, barely. The build specs had a bolt on the aileron shaft fitted with the nut on top. One of the mechanics decided this must be a typo, so he fitted them with the nut on the bottom.
Hi, FWIW, it's good engineering practice for components on a vehicle to have the bolts pointing down. If a nut does come loose and runs off you only lose the nut and not the bolt or even maybe the component as well. A loose bolt has half a chance at keeping the component in location.
Pedant mode - off.
Colin
I've had a few of these diffs out, and have never seen the bolts pointing downwards. When I first removed it during the rebuild, I was very happy they pointed upwards as the nut was well protected against rust, up inside the crossmember.
I'm fairly confident that the WSM has them upwards.
But that won't do anything to stop the diff plate dropping down, all it might do is stop the bolt going through the screen of the bloke driving behind you.I have my carrier bolts facing downwards. My logic told me the bolt would remain if the nut came loose
GRTV8
Well-Known Member
thats if Murphy's law came into being and all nuts dropped off at the same time.But that won't do anything to stop the diff plate dropping down, all it might do is stop the bolt going through the screen of the bloke driving behind you.
Besides , am I the only guy that checks all nuts are in place each day before taking the car out of the garage?
I am OCD ,
GRTV8
Well-Known Member
HaHa -you get me Harvey.It only needs one bolt to drop out for the plate to drop down on that side. Every single nut and bolt should be checked for tightness before and after each journey. (BTW, it's not OCD, it's CDO, the letters should always be in alphabetical order....)")
My next life Im going to build a pit to save all the time doing pre-drive inspections