

You are using an out of date browser. It may not display this or other websites correctly.
You should upgrade or use an alternative browser.
You should upgrade or use an alternative browser.
Brass drain plug
- Thread starter ocarros
- Start date
j_radcliffe
Active Member
Mine does not have any thread tape or pipe dope on it. I think it is tapered pipe thread. Put two sides of a caliper and check. So thread tape is not a bad idea, or pipe dope. There is no mention of the thread type in the shop manual that I can see.
ocarros
Member
Now for the daft question... how does this work? I can't actually get the existing plug out. It's seized in tight. Have WD40'd it so see what happens. I'm presuming I turn the nut anti-clockwise? Not the t-bar? Once the new plug is in place, does the t-bar then need to be turned so it's as far away from nut as possible?
cobraboy
Well-Known Member
Now for the daft question... how does this work? I can't actually get the existing plug out. It's seized in tight. Have WD40'd it so see what happens. I'm presuming I turn the nut anti-clockwise? Not the t-bar? Once the new plug is in place, does the t-bar then need to be turned so it's as far away from nut as possible?
The item is called a Petcock.
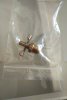
The hex screws into the block with a right hand thread, install with PTFE tape. The Petcock in the picture is closed, the end that goes in the block has a tapered centre that seats in a taper in the outer threaded part. Play with it now before it is fitted to see how it works - hold the hex with a spanner and turn the T bar to open the Petcock.
You may have to get a blow torch to heat the old one and surrounding block to remove it, a note of caution, be careful, if you snap it off and leave part of it in the block it will ruin your day !
ocarros
Member
The item is called a Petcock.
The hex screws into the block with a right hand thread, install with PTFE tape. The Petcock in the picture is closed, the end that goes in the block has a tapered centre that seats in a taper in the outer threaded part. Play with it now before it is fitted to see how it works - hold the hex with a spanner and turn the T bar to open the Petcock.
You may have to get a blow torch to heat the old one and surrounding block to remove it, a note of caution, be careful, if you snap it off and leave part of it in the block it will ruin your day !
Thanks for that. Extremely helpful! And if my petcock is leaking is the only solution to swap out for a new one?
Or is it better to live with the leak?
cobraboy
Well-Known Member
They don't usually leak. Determine where the leak is coming from, could be from the main ( larger) thread into the block, or more unlikely the valve itself.
You could try gently undoing the valve, then doing it back up again if it is the valve. They do not need doing up super tight.
K Seal is an additive that will seal leaks like that without clogging the radiator, you must shake and mix all the bottle contents before adding to the coolant. A much better solution than a broken off Petcock in a block.
ocarros
Member
They don't usually leak. Determine where the leak is coming from, could be from the main ( larger) thread into the block, or more unlikely the valve itself.
You could try gently undoing the valve, then doing it back up again if it is the valve. They do not need doing up super tight.
K Seal is an additive that will seal leaks like that without clogging the radiator, you must shake and mix all the bottle contents before adding to the coolant. A much better solution than a broken off Petcock in a block.
Great! Thanks for that. I did try turning the valve but no joy there. Well and truly stuck in position. Will get me some K Seal
redrover
Well-Known Member
I've just checked my NOS side plates as I was convinced the petcock was sweated on, not screw fit. But I was wrong - it is screwed on. The Parts Catalogue corroborates this, and reveals that it's the same part number (602915) as the petcock on the radiator.
Having taken an old set of side plates off before and seen all the gunge and corrosion they collect, I imagine you probably have a small pin-hole in the side plate itself which is weeping, or the cock just needs nipping up to crush a bit of silt that's stuck in there.

Having taken an old set of side plates off before and seen all the gunge and corrosion they collect, I imagine you probably have a small pin-hole in the side plate itself which is weeping, or the cock just needs nipping up to crush a bit of silt that's stuck in there.
ocarros
Member
Thanks redrover. I had new hoses fitted before this leak and block and rad given a flush out. I suspect that whats happened is that whatever grunge was in there was masking the pinhole as no leak was occurring prior to this. Nothing is moving on the petcock though. Main screw itself nor the valve.
redrover
Well-Known Member
That sound very plausible. Here's the back on mine when I removed it. When I opened it to drain the block, nothing came out so I assumed it was empty. When I removed all the bolts, I learned it was very full indeed! Yours may be in a similar state. I know that Wins and MGBD now stock reproduction side plates, which may be worth investigating. They're not to the original design however - they're just sheet steel with all the holes pre-drilled. Whatever torsional strength these plates added to the block (which probably isn't a lot), I imagine the repro ones don't add as much.I suspect that whats happened is that whatever grunge was in there was masking the pinhole as no leak was occurring prior to this.

colnerov
Well-Known Member
Many years ago I used to think why not use a suitably drilled flat plate as a replacement on cost grounds, however I was told it's shaped or sculptured to promote or encourage the coolant to flow around the cylinder walls more efficiently and not create eddies and dead spots.
Colin
Colin
redrover
Well-Known Member
On that side, no. You can do it in situ. But it involves supporting the engine from underneath and removing the crows foot mount. You can just about get to all the studs with a ring spanner, but it is tight behind the auxiliary drive housing. @BrianMac123 has recently successfully replaced a side plate with this method.Thanks redrover. Removing them side plates - is that an engine out job?
ocarros
Member
On that side, no. You can do it in situ. But it involves supporting the engine from underneath and removing the crows foot mount. You can just about get to all the studs with a ring spanner, but it is tight behind the auxiliary drive housing. @BrianMac123 has recently successfully replaced a side plate with this method.
I've been keeping in touch with @BrianMac123. Was a biatch of a job alright...!
redrover
Well-Known Member
I never considered that factor, but it makes complete sense. I assumed the pressing was to add a degree of torsional rigidity to the block, as it's quite thick gauge steel, and very very stiff. But aiding flow makes more sense on reflection.I was told it's shaped or sculptured to promote or encourage the coolant to flow around the cylinder walls more efficiently and not create eddies and dead spots.
Vern Klukas
Active Member
I think the the sideplate stamping has more to do with managing water flow of the cooling system than adding strength to the engine block.
Yours
Vern
Yours
Vern
Objective
Member
Just reviewing the discussions on replacement engine side plates and wondering what is the resulting consensus . . . hang out for the original stamped plates, or go with the flat plate replacements ? Has anyone put a engine cooling problem down to having installed the replacement flat plates, or maybe in retrospect would recommend avoiding the flatties?
I have the job to do, although they are not off the car yet. I see they certainly get 'gunked up' but is it better to clean up and reseat original plates or just go for replacements?
P
I have the job to do, although they are not off the car yet. I see they certainly get 'gunked up' but is it better to clean up and reseat original plates or just go for replacements?
P
Speedfreak
Active Member
I replaced my water jacket plate with a flat plate from Wins about five years ago. My cooling system is working absolutely perfectly. On the offside, I still have the original plate, but on the nearside replacement flat plate.
Objective
Member
Thanks SF,
I think I'll source both sides ready for the worse case when I take off my leaky engine plates. The LHS plate (looking forward) clearly has a problem. Do the originals erode or warp, or are they just not worth cleaning off/renovating? I see that new securing bolts are also available - did you plump for replacements?
I think I'll source both sides ready for the worse case when I take off my leaky engine plates. The LHS plate (looking forward) clearly has a problem. Do the originals erode or warp, or are they just not worth cleaning off/renovating? I see that new securing bolts are also available - did you plump for replacements?