ironandcopper
Member
I did a tiny bit of work to my little V8 petrol drinker this weekend, and I wanted to just write up a quick summary of what I did, and how I did it - as well as why I suspected I should have done it in the first place.
Ever since I bought the little fellow, it has made a clunk every time I go from drive to reverse, or when overtaking lorries on the motorway by requesting second..
I had the car put on a lift and checked over, and all that was found was that the engine mounts were loose, and it had a slight exhaust leak from the NS down pipe flange.. No big deal, the mounts were tightened.. But the clunks continued..........
Seeing as engines do move somewhat when changing gear, and all the mechanics I knew told me that it was normal, I ignored the clunk for nearly two years.. I had even put the car on ramps and had a look under there myself, the mounts looked fine, you could even read the METALASTIK embossing on the rubber..
More recently my mechanic told me that my transmission mounts were a bit squidgy, so I should change them.. Being a friendly fellow, he quoted me £160 to change them :shock: - enough motivation for me to do it myself. So I thought since I was changing the transmission mounts, I might as well change the engine mounts too..
Here is a twelve step guide explaining what I did...
Step 1: Take your P6 to a secluded location where there are tools, ramps or some way to lift the car (I once witnessed a chap using a pile of paving slabs to hold up his car.) Personally, I like to use ramps") - because I don't have a lift :cry:
- because I don't have a lift :cry:
Step 2: Once the car is up in the air, open the bonnet and loosen the engine steady bar on the engine side, then unbolt the side on the NS wing - you won't need to remove it completely.
Step 3: Find a nice thick chunk of wood, you will need this to prevent any damage to the engines sump as you will be jacking it up. Take the wood and look at it carefully, have a good sniff to make sure that it is not too moist, as moisture can hurt P6s! - Oh sorry, its SD1s that can be erased using a damp cloth.. Never mind - just put the wood to one side.
Step 4: Get underneath and unbolt both of the engine rubbers from the cars body (don't worry, the engine won’t fall on you, and it won’t move either.) Pay close attention to the engine locating plates, as it is quite possible that some nit-wit has installed one or both the wrong way around (one of mine was upside down :roll: ) The curved bit should be up towards the top, facing away from the engine.
Step 5: Make sure the cars rear wheels are chocked and the handbrake is on, and the car is in park or in gear.. Should have mentioned this earlier - do that now, as I am not responsible for you getting squished (I had my P6 V8 weighed, and it was 1270Kg - 590Kg over the front axels, 680Kg over the rear) - so it won’t kill you, but you might not look the same anymore.
Step 6: (Skip this if you have an electric fan, and you previously removed the finger chopper). Remove the fan cowling (the part with all the safety guff written on it.) As the engine fan will come up and foul it :roll:
Step 7: Using a large jack (trolley or bottle jack) - you might even be able to use a big scissor jack! Slowly jack up the engine with the wood between the jack and the FRONT of the sump, as this is the strongest part.. As you jack it up, keep checking underneath to make sure you don't lift it too high. You will know when this happens, because you will start jacking the car off the ramps :roll:
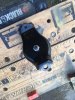
Step 8: Get under there and have a good look and a good feel around.. For me, this was the time that I noticed that the OS mount was not moving up! I suspected that the engine was coming up a bit pissed, but when I felt the mount, it came away in several bits, soooooo..... :roll:
Step 9: Now there are two ways to remove these little rubber blobs.. If you are lucky and the rubber is still bonded to the engine side, then you have just gained yourself enough time to justify having some tea. If the engine side has come away, then you are going to spend some quality time with a spanner. If they are intact, then you should have a good feel, they should be more or less solid, if they are squidgy, get rid.. If they are solid, still intact and seem otherwise okay. You have just wasted your time, and you should stop what you are doing, put everything back how it was, and return the new mounts to the cupboard with all the other P6 parts.
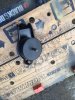
Step 10: Using a 9/16th combination spanner (or a 14MM spanner if you are unable to get hold of imperial spanners) - have a feel around behind the mounting bracket so you know where the nut is, and then insert the spanner. Using the spanner as a lever, turn the rubber mount to loosen it. If the mount has broken off nearest the engine, you are now going to be here a while. There is not enough clearance to insert a ratchet spanner, so you should find a pillow you don't mind ruining, or a car creeper. Use the spanner to loosen the nut, bit by bit, as soon as the metal plate starts turning, hold it in place for a few more nut faces, then just spin it off. I should mention that it might be a bit fiddly to get the mounts out of there once they are unbolted. Down, up and away worked for me - pull them down from the engine bracket, move them up towards the exhaust and away from the engine altogether.
Step 11: Now you just need to do the opposite for the installation of the new ones. The mounts I bought came from WINNS international, and for some reason they had 15MM nuts on them. As well as a flat disc washer and a lock washer. Its fiddly to get all this to fit together behind the engine bracket, so I wrapped them in a bit of masking tape in the correct order, slid that behind the engine bracket and then spun on the mount (harder than it sounds.) Then I tightened it fully with the spanner - Don't worry about leaving the masking tape there (even though most of it won’t survive the spanner) - the heat from the engine will dry it out and it will just fall out anyway (I’ve seen it before )
Step 12: Carefully drop down the engine, line up the locating plates, bolt up the mounts, put back the fan cowling (if you needed to take it off), re-assemble and tighten the engine steady bar, and do all the other things you need to do in order to get the car safely off the ramps. If you wake up in the night, roll over and notice that your P6 is now in your bedroom looking at you, then it’s trying to tell you that you have forgotten something.. Remember, these are advanced cars! They sometimes do weird things, but that’s because they are more clever than some people!
The clunk is now gone, and the car feels a lot smoother to drive, also there is less vibration at idle. The cars body also moves when I rev it - so it can now intimidat people at the lights 8)
Ever since I bought the little fellow, it has made a clunk every time I go from drive to reverse, or when overtaking lorries on the motorway by requesting second..
I had the car put on a lift and checked over, and all that was found was that the engine mounts were loose, and it had a slight exhaust leak from the NS down pipe flange.. No big deal, the mounts were tightened.. But the clunks continued..........
Seeing as engines do move somewhat when changing gear, and all the mechanics I knew told me that it was normal, I ignored the clunk for nearly two years.. I had even put the car on ramps and had a look under there myself, the mounts looked fine, you could even read the METALASTIK embossing on the rubber..
More recently my mechanic told me that my transmission mounts were a bit squidgy, so I should change them.. Being a friendly fellow, he quoted me £160 to change them :shock: - enough motivation for me to do it myself. So I thought since I was changing the transmission mounts, I might as well change the engine mounts too..
Here is a twelve step guide explaining what I did...
Step 1: Take your P6 to a secluded location where there are tools, ramps or some way to lift the car (I once witnessed a chap using a pile of paving slabs to hold up his car.) Personally, I like to use ramps
- because I don't have a lift :cry: Step 2: Once the car is up in the air, open the bonnet and loosen the engine steady bar on the engine side, then unbolt the side on the NS wing - you won't need to remove it completely.
Step 3: Find a nice thick chunk of wood, you will need this to prevent any damage to the engines sump as you will be jacking it up. Take the wood and look at it carefully, have a good sniff to make sure that it is not too moist, as moisture can hurt P6s!
- Oh sorry, its SD1s that can be erased using a damp cloth.. Never mind - just put the wood to one side.Step 4: Get underneath and unbolt both of the engine rubbers from the cars body (don't worry, the engine won’t fall on you, and it won’t move either.) Pay close attention to the engine locating plates, as it is quite possible that some nit-wit has installed one or both the wrong way around (one of mine was upside down :roll: ) The curved bit should be up towards the top, facing away from the engine.
Step 5: Make sure the cars rear wheels are chocked and the handbrake is on, and the car is in park or in gear.. Should have mentioned this earlier - do that now, as I am not responsible for you getting squished (I had my P6 V8 weighed, and it was 1270Kg
- 590Kg over the front axels, 680Kg over the rear) - so it won’t kill you, but you might not look the same anymore.Step 6: (Skip this if you have an electric fan, and you previously removed the finger chopper). Remove the fan cowling (the part with all the safety guff written on it.) As the engine fan will come up and foul it :roll:
Step 7: Using a large jack (trolley or bottle jack) - you might even be able to use a big scissor jack! Slowly jack up the engine with the wood between the jack and the FRONT of the sump, as this is the strongest part.. As you jack it up, keep checking underneath to make sure you don't lift it too high. You will know when this happens, because you will start jacking the car off the ramps :roll:
Step 8: Get under there and have a good look and a good feel around.. For me, this was the time that I noticed that the OS mount was not moving up! I suspected that the engine was coming up a bit pissed, but when I felt the mount, it came away in several bits, soooooo..... :roll:
Step 9: Now there are two ways to remove these little rubber blobs.. If you are lucky and the rubber is still bonded to the engine side, then you have just gained yourself enough time to justify having some tea. If the engine side has come away, then you are going to spend some quality time with a spanner. If they are intact, then you should have a good feel, they should be more or less solid, if they are squidgy, get rid.. If they are solid, still intact and seem otherwise okay. You have just wasted your time, and you should stop what you are doing, put everything back how it was, and return the new mounts to the cupboard with all the other P6 parts.
Step 10: Using a 9/16th combination spanner (or a 14MM spanner if you are unable to get hold of imperial spanners) - have a feel around behind the mounting bracket so you know where the nut is, and then insert the spanner. Using the spanner as a lever, turn the rubber mount to loosen it. If the mount has broken off nearest the engine, you are now going to be here a while. There is not enough clearance to insert a ratchet spanner, so you should find a pillow you don't mind ruining, or a car creeper. Use the spanner to loosen the nut, bit by bit, as soon as the metal plate starts turning, hold it in place for a few more nut faces, then just spin it off. I should mention that it might be a bit fiddly to get the mounts out of there once they are unbolted. Down, up and away worked for me
- pull them down from the engine bracket, move them up towards the exhaust and away from the engine altogether.Step 11: Now you just need to do the opposite for the installation of the new ones. The mounts I bought came from WINNS international, and for some reason they had 15MM nuts on them. As well as a flat disc washer and a lock washer. Its fiddly to get all this to fit together behind the engine bracket, so I wrapped them in a bit of masking tape in the correct order, slid that behind the engine bracket and then spun on the mount (harder than it sounds.) Then I tightened it fully with the spanner
- Don't worry about leaving the masking tape there (even though most of it won’t survive the spanner) - the heat from the engine will dry it out and it will just fall out anyway (I’ve seen it before )Step 12: Carefully drop down the engine, line up the locating plates, bolt up the mounts, put back the fan cowling (if you needed to take it off), re-assemble and tighten the engine steady bar, and do all the other things you need to do in order to get the car safely off the ramps. If you wake up in the night, roll over and notice that your P6 is now in your bedroom looking at you, then it’s trying to tell you that you have forgotten something.. Remember, these are advanced cars! They sometimes do weird things, but that’s because they are more clever than some people!
The clunk is now gone, and the car feels a lot smoother to drive, also there is less vibration at idle. The cars body also moves when I rev it
- so it can now intimidat people at the lights 8)