jamesdean2112
Active Member
i'd say 50 miles in a car that hasn't moved in 36 years is a great achievement mate well done. I thought the ignition light on the dash was normal lol :roll: something i need to fix

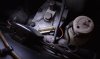
christopher storey said:In nearly 60 years of playing with engines I have never yet seen an engine with ignition timing after TDC. The reason for progressive ignition advance as speed rises is that the flame front travels at a constant speed of about 120 feet per second, and thus if the process is initiated just before tdc the flame front is just about reaching the piston as it starts its downwards journey in the bore. For an SC I think you will find that the correct setting is 6 degs Before TDC . This is why the timing marks are all on the advanced side of the flywheel teeth
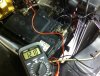
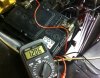
 . It has also allowed me to set the idle speed correctly which wouldn't get below 1000rpm before. We live & learn . so I've managed to get another one.
Phil Robson said:No I haven't had it skimmed, Chris. It was off an early-ish car, so may be pitted on the inner surface but I don't recall seeing anything abnormal. I've fitted the correct new gaskets, but no sealing paste of any kind.
On another point; you commented about your '64 car's build date in an earlier post as 22/4/64 & 'out' 27/4/64 for chassis 179. Presumably this was no. 3179, as mine's 3670
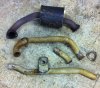
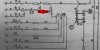
.You've got a good memory, Tony!Rubythursday said:I had a 64 model about 30 years ago so memory a bit dodgy but I think the fuse you have highlighted was an inline fuse under the bonnet branching off the main harness. It is just a vague recollection though.
The moral must be to avoid the salt, as many of you will do. I have a bit of work to do on Hazel as well from the same issue I suppose, & have just started another thread.