You are using an out of date browser. It may not display this or other websites correctly.
You should upgrade or use an alternative browser.
You should upgrade or use an alternative browser.
OCC 469 - restoring & running a "sharkstooth" 2000
- Thread starter Phil Robson
- Start date
Phil Robson
Well-Known Member
I may have to do that Paul, although if I could get an original item that would save me some work! 
Phil Robson
Well-Known Member
Thank you for your efforts Paul. I'll have a look myself & report back in due course.
Willy Eckerslyke
Well-Known Member
I'm sure I have a spare or two if you're stuck. I won't get a chance to look for a day or two though.
Incidentally, I did notice on a spare set of twin carbs that the surface against which the roller rolls had become worn into shallow steps. It must have made the throttle action very jerky. Something to check if anyone suspects a problem.
Incidentally, I did notice on a spare set of twin carbs that the surface against which the roller rolls had become worn into shallow steps. It must have made the throttle action very jerky. Something to check if anyone suspects a problem.
Phil Robson
Well-Known Member
I would appreciate that, thank-you
Willy Eckerslyke
Well-Known Member
Drop me a PM around Sunday if it looks as if I've forgotten.
Phil Robson
Well-Known Member
I've been getting on quite well recently with OCC 469 & nearly have the back axle together again.
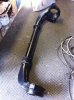
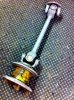
Here is the refurbished de-Dion tube ready to go back in. This is an oil-filled version, with braced elbows that I have mentioned before which seem unique to the early cars.
Both drive shafts had been sawn through by a previous owner, presumably because the brakes were siezed at some point. The car had no wings on, so I suppose this would be the easy thing to do... :roll: Because they are solid shafts on the early 2000s, I wanted to replace them as original. Therefore I'm hopefully picking up a re-connected one next week, however I was fortunate enough for Ian Wilson to kindly let me have this one for the other side, which apparently was from 16 DYF. It was all yellow (mostly flaked off) when I got it:
Attachments
Dave3066
Well-Known Member
testrider said:Early drive shafts look so delicate don't they?
I've never seen those, but that's exactly what I thought!
Dave
Phil Robson
Well-Known Member
Re:OCC 469: Lights Camera Action!
Back to the painting now. The roof was heavily affected with microblisters, which were more like 'major' blisters:
In hindsight I would have gone back to bare metal, but having decided to leave the roof panel in situ, I was concerned that it would be difficult to remove all traces of paint stripper particularly in the guttering, so I sanded the old paint down & used fine filler / stopper to get everything smooth. All has gone pretty well really, although there are some pock marks that I've missed. However, on the whole I'm happy with the results. The roof must be one of the hardest panels to paint because of the difficulty in keeping the gun at right angles to the surface. I got some orange peel, but was able to cut it out OK. I sprayed 6 or 7 coats & after a bit more polishing it should be finished.
Fortunately the colour match is better than it looks in the pictures!
Attachments
Willy Eckerslyke
Well-Known Member
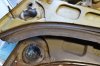
Phil, I've just removed the roller and clip off a set of carbs that I've been cannibalising. Unfortunately the roller is worn flat on one side so not worth reusing. It's made of white plastic or nylon or similar so I'd guess that S/H ones are all likely to be worn to some extent so you'd be better off finding something new to replace it with. I do have another spare set of carbs but they're complete so I'd prefer not to start cannibalising them for such a small and potentially worn part.Phil Robson said:My 2000 still needs the roller & clip on the accelerator 'finger' as ringed in the photo:
Dimensions of the roller are 6.4mm outside diameter (up to 7mm would fit) x 7.8mm long. The shaft it sits on is 3mm diameter.
I can send you the clip (and worn roller for reference) if you'd like to PM me your address.
Phil Robson
Well-Known Member
Thanks very much for this. I would appreciate seeing some originals as I can get a brass one made up to suit. PM sent
Phil Robson
Well-Known Member
I've now got the wings & doors sprayed & there is very little 'orange peel' . I have been using a DeVilbiss FLG5 'gun & it's made a huge difference to the quality of the finish straight from the gun. I've still got a few lines & marks that I hope will flat out; I have put 5 coats of topcoat on everything so I have got a bit of depth to play with. You can perhaps see a short vertical line in the reflection in this door top:
A bit of an issue for me is that I don't have any bolts for the wings at all . Does anyone on here have any collections of these fixings for sale? I suppose they never get saved off cars in reality. In particular, I need the front wings' front bolts & upper bolts & the rears' leading edge bolts for the D-posts. I've got new rear special captive bolts, the straps for the front wing to valance & the rear special bolts & plastic fixings for the rear valance; it's just the 'standard' stuff I need. Unfortunately, I'm hopeless with quoting sizes etc . I know the front bolts have a point on!
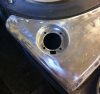
I've also now moved on to doing the decker panels. The rear needs a fair bit of refurbishment which I have started by using a later one as a 'section donor' . Interestingly even these panels are different on the early cars. Apart from the lack of a filler lock, there is also the fact that the outermost pressing on the underside is complete metal, whereas on later cars this area is merely a 'hole' as can be seen:
The metal strip that holds the rubber in place is also one piece, rather than a half-section on each side.
I must be getting (more) nerdy in my old age! :roll:
. I have been using a DeVilbiss FLG5 'gun & it's made a huge difference to the quality of the finish straight from the gun. I've still got a few lines & marks that I hope will flat out; I have put 5 coats of topcoat on everything so I have got a bit of depth to play with. You can perhaps see a short vertical line in the reflection in this door top:A bit of an issue for me is that I don't have any bolts for the wings at all
. Does anyone on here have any collections of these fixings for sale? I suppose they never get saved off cars in reality. In particular, I need the front wings' front bolts & upper bolts & the rears' leading edge bolts for the D-posts. I've got new rear special captive bolts, the straps for the front wing to valance & the rear special bolts & plastic fixings for the rear valance; it's just the 'standard' stuff I need. Unfortunately, I'm hopeless with quoting sizes etc . I know the front bolts have a point on! I've also now moved on to doing the decker panels. The rear needs a fair bit of refurbishment which I have started by using a later one as a 'section donor'
. Interestingly even these panels are different on the early cars. Apart from the lack of a filler lock, there is also the fact that the outermost pressing on the underside is complete metal, whereas on later cars this area is merely a 'hole' as can be seen:The metal strip that holds the rubber in place is also one piece, rather than a half-section on each side.
I must be getting (more) nerdy in my old age! :roll:
Attachments
vaultsman
Well-Known Member
Hi Phil,
All looks to be coming on great now...sterling (and stirring!) stuff!
From the 1963 Parts Book
Front Wings
For the front mounting, you need 5/16" UNF x 3/4" long setscrews. You're right, they should be cone-pointed (to help location) but I'm pretty sure I used standards when putting Occie's front wings back on after the respray. Just a bit more of a fiddle.
Rear Wings
The D-post mounting screws are also standard 5/16" UNF x 3/4", and the rear mounting screws are listed as 5/16" UNF x 1.1/4" long, cone pointed.
All screws have both spring and plain washers.
Keep the updates coming!
Demetris
Well-Known Member
Phil Robson said:A bit of an issue for me is that I don't have any bolts for the wings at all
Hi Phil, these are a common UNF thread and size bolts (that i don't remember
), so if you dive into your bucket / can of nuts and bolts (everyone involved with cars has at least one ) and test a few for bolting nicely into the base unit, you' ll soon find yourself equipped with a full set. Indeed, these holding the front wings are pointed but i guess that this was purely for easier assembly on the line reasons.Phil Robson
Well-Known Member
Thanks guys - I should have looked in the book myself!
That should help me get some new ones from a local engineering firm
That should help me get some new ones from a local engineering firm
Phil Robson
Well-Known Member
Phil Robson
Well-Known Member
I've now got about 20 weeks left if I want to get OCC MOT'd in time for its birthday & the Spring :shock:
Whilst the paint on the roof has unfortunately settled a bit & shown up some of the original problems underneath , I'm flatting & polishing the wings & doors that I sprayed some time ago.
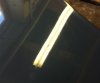
This osf wing has come up a treat. Not perfect, but for a first time sprayer like me I'm very pleased with it. I have not yet polished it with any finishing polish.
What do others do with cellulose? I'm hand-flatting using 1500 grit paper with water & a touch of soap, then Farecla G3. Should I be flatting with 2000 grit? Any other tips for a novice?
Whilst the paint on the roof has unfortunately settled a bit & shown up some of the original problems underneath
, I'm flatting & polishing the wings & doors that I sprayed some time ago.This osf wing has come up a treat. Not perfect, but for a first time sprayer like me I'm very pleased with it. I have not yet polished it with any finishing polish.
What do others do with cellulose? I'm hand-flatting using 1500 grit paper with water & a touch of soap, then Farecla G3. Should I be flatting with 2000 grit? Any other tips for a novice?