Leaking core plug

dmblbit

Active Member
Deep sigh. Leaking reserve tap successfully reassembled and working, but while messing about with it, noticed green water leaking from above the starter motor. Removed motor. I was expecting to see a core plug seeping around the edges, and hoping to resolve with a gentle tap or two, but the core plug actually has a small hole in it. As I recall these are an interference fit. So, how the devil do you get them out?

Steve
 
Hammer a screwdriver (borrow someone else's, don't use one of your own :LOL: ) or prybar right through it and then just lever it out. It's a good idea to drain off the coolant first!
 
Waiting for new plug to arrive before attack. Here's a picture of the poor little chap though. Looks like whoever out this one in used Hermetite. Is this best practice?
 

Attachments

  • IMG_0868.jpg
    IMG_0868.jpg
    250.2 KB · Views: 1,459
Steel plug, and it has corroded through! I initially thought it must have been leaking around the join between it and the block. Have you ordered a brass plug? Do they still make steel ones, and if so did you order one of those instead?

Permatex #3 would be ideal to use around the interface prior to fitting the new one. Hylomar also make a coolant resistant coating which you could use if you prefer.

Ron.
 
I was expecting a joint leak too, so the little hole was a bit of a surprise. I ordered the new plug from Land Rover Direct but have no idea what it's made of (Princely sum of £0.34). I was assuming the rust was due to neglect and lack of coolant/inhibitor. Surely, if I keep the anti-freeze mixture right in future these little guys shouldn't rust. Should they?

Where would I get a brass one from?

Steve
 
Hello Steve,

When coolant is left in an engine for longer than is recommended, the acids that form result in corrosion attacking parts like the core plugs. Coolants should always be changed as directed regardless of how few miles a car may travel in that time. The correct concentration should also be adhered to, and never just top up with water. I am not saying that your actions are to blame, rather I am just making a statement about coolants.

I expect that you could buy brass plugs from any Land Rover parts centre.

Ron.
 
Well Ron, I appreciate your restraint in not passing judgement, but the sad fact is I am completely to blame as I left the car untouched for over 12 years with the same coolant (and oil and petrol) during the entire period. Shame on me!

Still - onward and upward. Lrdirect have just told me they don't make brass plugs anymore. Have sent a request to http://www.coreplugs.co.uk/ and am waiting for a response.

Meanwhile old plug has finally submitted and allowed itself to be removed, although it put up quite a fight. I had to drop the exhaust in the end to get sufficient leverage, and no screwdriver in my toolkit would move it so I ended up using an 18" long cold chisel. Hmmmm. As you can see from the pictures I made a bit of a mess of the poor little chap. Also the new plugs which I ordered (not brass) are the wrong size anyway, so this job goes onto the back burner once more. Ho hum. Think I'll do some weeding instead then.
 

Attachments

  • IMG_0875.jpg
    IMG_0875.jpg
    148.5 KB · Views: 1,430
  • IMG_0877.jpg
    IMG_0877.jpg
    176.8 KB · Views: 1,430
  • IMG_0874.jpg
    IMG_0874.jpg
    156.9 KB · Views: 1,430
  • IMG_0871.jpg
    IMG_0871.jpg
    130.6 KB · Views: 1,430
Hello Steve,

Rimmer Bros have them....http://www.rimmerbros.co.uk/Item--i-602152A

Isn't it typical..there are 8 core plugs of the same size fitted into the RV8 block and only one other which has a larger diameter, and that is the one that they send you!

In actual fact Steve, looking through one of my text books on the Service Stability of Metals, the Galvanic series for dissimilar metals in the presence of an electrolyte. In this case sea water, but the principal remains irrespective of the electrolyte composition,..steel and aluminium are very close together while brass and aluminium are much further apart, thus the latter combination have far greater potential for corrosion, with aluminium in both cases being more anodic...the one that will corrode first. Given the size of the anode (aluminium alloy block) compared to the cathode (brass or steel plugs), the driving force for attack on the block is very small indeed. So with coolant that is renewed as advised by the manufacturer, the possibility for corrosion of the block and / or core plugs will be negligable indeed.

When you fit the new plug, coat the inside surface of the block and the surface of the plug that will make contact, that way there will be a neutral barrier between the two dissimilar metals, and this will further reduce the possibility of corrosion in the future.

Lets know how you go.. :wink:
Ron.
 
So, Ron; if I understand correctly, the brass plugs are (contrary to previous wisdom) NOT a good idea, as they will induce the block itself to corrode, albeit at a somewhat slower pace due to size of exposed area. I think I got the chemistry right but please say if I'm off track.

Anyway, the saga continues. This very nice email from Paul at LRDirect:

Hi Steve
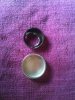
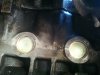
As far as I am aware they no longer make the core plugs in brass I'm afraid. I have found a core plug that is 1.5 inches diameter but unfortunately I only have two of them.
They were in a misc parts box so there isn't a part number attached to them. I have measured all the ones we have in stock and looked at all the V8 manuals but can't find out where they have come from. I will put these in the post to you. I have asked our suppliers if they come across any to let me know.
Sorry I can't be of more help.
Best regards,
Paul


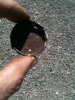
I was pretty impressed! There was no charge for the additional/replacement items. The ones he has sent are nickel plated mild steel, and I assume the nickel plating helps limit corrosion for halfwits who leave the coolant in the block for 12 years without changing it.

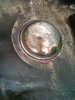
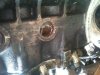
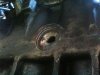
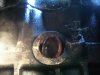
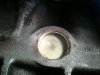
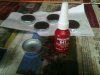
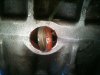
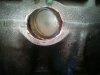
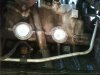
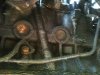
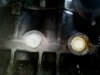
The plugs arrived and I fitted the first one using Red Hylomar, which says on the packet that it resists steam, and also helps inhibit corrosion between dissimilar metals. Sounds like just the job eh? It went in very easily (too easily?), and flushed with success I decided to replace its next door neighbour while the exhaust was dropped and the starter was out. I decided to try a different extraction method which I saw on a US thread. Using a screwdriver and hammer you just tap one edge of the plug and basically spin it round in the hole - then extract with pliers. The second one came out a treat. Took about 5 minutes instead of the 1.5+ hours that it's compadre took. Also much less muscle required.

Fitted second plug using Hylomar also.

Very excited, and a little bit proud.

Refill with coolant.

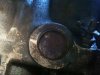
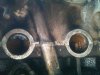
Both new core plugs are leaking precious emerald fluid all over the drive.

I have managed to stop the second plug from leaking by judicious tapping at the edges - it obviously wasn't in straight. I emptied the system again and using the "spin round in the hole method" removed the first plug and re-fitted it. It still leaks, but not as badly. I think I must have distorted it when I put it in the first time. I have another plug on order from coreplugs.co.uk. Am hoping that I will be more successful with this one - on reflection I should have ordered half a dozen.

So more still to come on this I'm afraid.
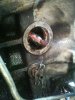
 

Attachments

  • IMG_0900.jpg
    IMG_0900.jpg
    235.4 KB · Views: 1,389
  • IMG_0894.jpg
    IMG_0894.jpg
    313.1 KB · Views: 1,389
  • IMG_0892.jpg
    IMG_0892.jpg
    223.7 KB · Views: 1,389
  • IMG_0889.jpg
    IMG_0889.jpg
    226.8 KB · Views: 1,389
  • IMG_0891.jpg
    IMG_0891.jpg
    194.1 KB · Views: 1,388
Gee Steve, what a pain.. :evil: Maybe these were a twizzle too small in diameter.

Hopefully you will have more success with the replacements.

Look forward to hearing how it goes.
Ron.
 
Ron: I did see another thread about core plugs, which suggested that not all 1.5 inch core plugs are created equal, so am hoping that these will indeed be a better fit. Am also going to take Dave's advice and use some Loctite.

Dave. Under the circumstances, definitely worth a try. Have ordered some Loctite 641 from Bearing Boys, and 4 more plugs from coreplugs.co.uk, as I've decided, in view of the parlous state of the last one I removed, that I'd better do the two on the other side while the exhaust is off (and have a coupe of spares. So will update again when all the bits and pieces arrive.

If anyone wants a further laugh at my expense, I'm just about to start a new thread concerning carburettor related incompetence . . . . .

Thanks again for all the support

Steve
 
So, we have 5 new core plugs to hand and a tiny bottle of Loctite 641. Leaking new plug removed with relative ease using spin round method. Surfaces thoroughly cleaned with Meths. Loctite 641 applied to both surfaces.

Then we have a slight problem, as the only way I can see to apply product to the hole is using my finger, however the data sheet suggests this stuff and human skin do not agree with each other. Never mind - do it anyway, and wash hands straight away afterwards. Am hoping I will not be posting photos of a dissolving finger later in the week . . . Loctite 641 doesn't look like much - has appearance and consistency of runny Maple Syrup (didn't taste it though). So it leaves a very clean job when it's all done, but I can't help feeling something a bit more gooey would inspire more confidence. Anyway, this stuff apparently needs 24 hours to cure so I have to leave it til tomorrow before we can test it anyway.

Remove the two plugs on the passenger side, and repeat process, but without the frantic handwashing - becoming blase in old age. Goodbye finger.

Now I just have to sit and wait. Will post some pictures after Graham Norton.
 

Attachments

  • IMG_0920.jpg
    IMG_0920.jpg
    175 KB · Views: 1,350
  • IMG_0917.jpg
    IMG_0917.jpg
    209.5 KB · Views: 1,350
  • IMG_0916.jpg
    IMG_0916.jpg
    183 KB · Views: 1,350
Hello Steve,

I really hope that the Loctite works and that there are no leaks at all....ever. Reason being,..according to Loctite...http://www.sjgogo.com/pdf/641-en.pdf you will need to apply heat of approx 250 degrees C in order to dissasemble. I don't think that would be at all wise for the aluminium alloy engine block to do that, so fingers crossed it works.

Ron.
 
Here are the pictures of the passenger side. We won't find out until Saturday afternoon whether I have permanently fixed some new, but leaky, core plugs into the block and thereby possibly ruined it forever. The suspense is killing me.
 

Attachments

  • IMG_0927.jpg
    IMG_0927.jpg
    229 KB · Views: 340
  • IMG_0925.jpg
    IMG_0925.jpg
    228.9 KB · Views: 340
  • IMG_0923.jpg
    IMG_0923.jpg
    248.1 KB · Views: 340
  • IMG_0922.jpg
    IMG_0922.jpg
    247.4 KB · Views: 340
  • IMG_0929.jpg
    IMG_0929.jpg
    202 KB · Views: 318
They look good Steve, so I hope that they work good too.

I don't know enough about the ramifications of localised heating of an aluminium alloy block, whose alloying elements may or may not be known. Need a Materials Scientist to offer some words of wisdom in this area. At the very least, running flames near a fuel line is not a particularly exciting idea. Hopefully all will be well.

Ron.
 
I see your point. Flames. Fuel line. Definite potential for unscheduled excitement there.

Anyway, I am guessing you you don't think that bashing the rims with someone else's screwdriver and a large hammer to spin them in the hole is going to work next time then? I mean - how strong can that stuff be?

Steve
 
Back
Top