It started with a front screen seal...

mtb_tuli

Active Member
Thread follows "rust never sleeps". Just an idea to make some notes about a rolling restoration. Rolling is not really the right word. Bought the car in Netherlands, drove home (500 kms at hottest day of the year) and started cleaning and learning about the car. An interesting period. Then you go deeper.
The car (1974 V8 auto, solid base, clean interior, 132tkm) should have had some water leakage at the passenger´s side (little rust, carpet rotten, car does not smell good :confused:).
Found out, that a lot of strange sealing material was added to the old front screen seal, no support frame, no brackets, nothing. It took some time to fix this....
Ok, done.
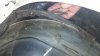
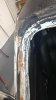
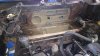
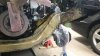
A look into the wheelarches. Looks good, but the coating shows some small cracks, must look, what´s behind o_O.
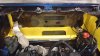
Must say, the wheelarches of my former 280SE were not that complexe, but once you started, it´s too late. Wheelarches ? not enough, the (impressive) front frame needs cleaning and maybe there´s something behind ?
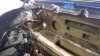
Cleaning is an easy word, how can you get away 41 year old mud in your home garage ?
Heat gun, a scraper, brake cleaner. Again and again.
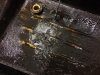
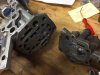
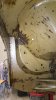
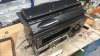
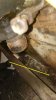
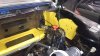
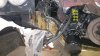
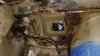
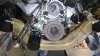
Working on the motor bay, you can see the old bulkhead insulation, which can hold water. Maybe also the reason for the leak, a rust hole ???
How can you get there ? What´s that black box in the middle ? Heater, ok. Everything worked well.
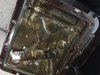
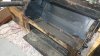
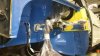
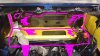
Ok, out with it for a short inspection. Some hours later, lying in the footwell area with some ratchet extensions, I realized, that was a mistake :(.
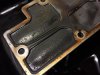
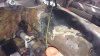
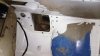
The heater box looked like a 41 year old metal box looks. Matrix good, not blocked, but the rest created some days of work. Before I started work on the heater, I finally could inspect the bulkhead area for rust holes.
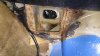
No holes (except a small hole at the side wall near the steering gear box, but on the wrong side...).
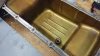
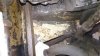
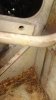
At this point I began to hate the Rover engineers responsible for insulation and bonding.
Now, it´s maybe interesting for you. This glue is hard like glass, but it´s agressive and, aaah shi...., text limit
 

Attachments

  • rovi_0081 (22).JPG
    rovi_0081 (22).JPG
    164.2 KB · Views: 102
  • rov_0063 (37).JPG
    rov_0063 (37).JPG
    125.2 KB · Views: 91
  • rov_0063 (41).JPG
    rov_0063 (41).JPG
    130.3 KB · Views: 92
  • rovi_0081 (34).JPG
    rovi_0081 (34).JPG
    111.7 KB · Views: 93
  • rovi_0081 (38).JPG
    rovi_0081 (38).JPG
    110.1 KB · Views: 92
  • DSCo_0185 (1) (15).JPG
    DSCo_0185 (1) (15).JPG
    136.7 KB · Views: 91
  • DSCo_0185 (1) (33).JPG
    DSCo_0185 (1) (33).JPG
    177.5 KB · Views: 92
  • DSCo_0185 (1) (34).JPG
    DSCo_0185 (1) (34).JPG
    158.4 KB · Views: 89
  • DSCo_0185 (1) (44).JPG
    DSCo_0185 (1) (44).JPG
    152.7 KB · Views: 94
  • DSCo_0185 (1) (47).JPG
    DSCo_0185 (1) (47).JPG
    170.4 KB · Views: 91
continued...
This glue is hard like glass, but it´s agressive and beneath this stuff, rust feels well. Problem is to get this stuff out. You need a hammer and a "customized" screwdriver and then you work mm by mm. Do not think, areas are protected by this material. If you have any chance, remove it, especially at the area, where the main frame is connected to the bulkhead. Why they have used this bond here, I do not know.
There´s one photo with a yellow arrow. It was well coated, but underneath very rusty.
The front frame under the radiator I want to clean only but have to paint some (slightly) rusty sections. Never buy colour from a paper print image. It looked like this original mustard colour. In reality a little bit brighter. I used it for the bulkhead, a bright colour is good for inspections (....). It´s Brantho Korrux 3in1, on my opinion the best for bodywork.
Oh, originally I wanted to change the kickdown cable only (hanging on 3 wires only). It´s not fixed yet (but ordered).
to be continued...
 

Attachments

  • DSCo_0185 (1) (67).JPG
    DSCo_0185 (1) (67).JPG
    139.1 KB · Views: 78
  • DSCo_0185 (1) (50).JPG
    DSCo_0185 (1) (50).JPG
    136.5 KB · Views: 71
  • DSCo_0185 (1) (60).JPG
    DSCo_0185 (1) (60).JPG
    198.5 KB · Views: 67
  • DSCo_0185 (1) (65).JPG
    DSCo_0185 (1) (65).JPG
    151.4 KB · Views: 73
  • DSCo_0185 (1) (62).JPG
    DSCo_0185 (1) (62).JPG
    123.4 KB · Views: 67
  • DSCo_0185 (1) (64).JPG
    DSCo_0185 (1) (64).JPG
    151 KB · Views: 76
  • DSCo_0185 (1) (63).JPG
    DSCo_0185 (1) (63).JPG
    151.2 KB · Views: 74
  • DSCo_0185 (1) (66).JPG
    DSCo_0185 (1) (66).JPG
    171.2 KB · Views: 73
Looks in remarkably good condition under there. I don't know what you mean by glass like glue/sealant though, possibly a previous owner fibreglassed it?

I removed all of the underseal with a hot air gun, 3/4" chisel until my arms got tired, then a 1/2" one, and some solvent I nicked form work :)

Just remember it's supposed to be fun :)
 
It´s not the underseal, what I mean. This stuff was in a good shape or let´s say not too hard to remove. My 1972 Mercedes underseal did not have this quality.
What I mean is the bonding, which they used for the insulation on the bulkhead (vertical and horizontal section where the heater sits and is connected to the passenger´s ducts).
Ok for the insulation, but this material was accurately used for the sections marked margenta in the encl photo. That was really a mess, because you must "break" it mm by mm and with inches it´s not easier. All sections beneath this bonding were very rusty (let´s say, 5 minutes before noon) except one small frame section which is connected to the bulkhead on the driver´s side (it´s a LHD car), see pic ......(60). On the first view these sections look homogene and ok like metal, but it´s not metal....
This bonding contains solvents, the solvent eats the painting, the bonding gets hard and starts to show small cracks.

You are right, it´s fun. If a German writes, it always sounds like a little bit a "must", but it´s not easy to write in a language where I cannot express an ironic side which is more familiar to me.
This morning my arms felt like bolted to the ground ;)
 

Attachments

  • DSCo_0185 (1) (64)modif.jpg
    DSCo_0185 (1) (64)modif.jpg
    413.6 KB · Views: 52
as usual, you are almoste ready with the work, but then...
As I wrote, the car had some rust on the passenger´s side floor pan, which obviously came from the air opening (from the heater box). But why ? Must be sure, that this will not happen again. I think, one of the most important seals on the car is the rubber seal at the bottom of the front screen which is under the support channel for the screen. This car did not have the support channel and so no rubber seal.
2nd possibility, the seal under the heater box. 3rd ? What happens, if the upper air flap of the heater is open ? Ok, crawled into the car to inspect the area of the heater outlet, took away the insulation and :confused:
Ok, some more evenings with rust removal, Owatrol and Brantho Korrux. On both sides, there´s a cover which is worth to be removed. In the motor-bay you will see his brother and this cover also should be removed (one holds the brake master cylinder and I think, S-models have the clutch cylinder also here.
Removing the cover(s), you can see inside the front frame and on the side with the water problem it has rust, dirt. Use a vacuum cleaner and try not to break your fingers. I will treat the frame´s inside with Fluid Film, because it´s perfect for those sections with a rusty surface. On the inside cover I drilled a center hole, so I can use a cavity probe (right translation ?) easily without removing the cover.
Always when I´m a little bit frustrated, I look for brake cleaner and petroleum, so my engine and the motor bay looks better now. Remove the brake lines from the front frame, there is mud, mud, mud.
Played a little bit with the radiator fan, ok, no I know where the water goes. New water pump. And follow your manual, loosen the pulley, there is one hidden bolt :p
So, maybe it´s worth that you are looking behind a cover also...
 

Attachments

  • DSC_016401 (1) (5).JPG
    DSC_016401 (1) (5).JPG
    130.8 KB · Views: 69
  • DSC_0168a (1) (6).JPG
    DSC_0168a (1) (6).JPG
    158 KB · Views: 62
  • DSC_0168a (1) (9).JPG
    DSC_0168a (1) (9).JPG
    100.8 KB · Views: 62
  • DSC_016401 (1) (8).JPG
    DSC_016401 (1) (8).JPG
    135.1 KB · Views: 63
  • DSC_016401 (1) (9).JPG
    DSC_016401 (1) (9).JPG
    123.7 KB · Views: 65
  • DSC_016401 (1) (14).JPG
    DSC_016401 (1) (14).JPG
    161.3 KB · Views: 68
  • DSC_016401 (1) (12).JPG
    DSC_016401 (1) (12).JPG
    156.5 KB · Views: 67
  • DSC_016401 (1) (2).JPG
    DSC_016401 (1) (2).JPG
    170.3 KB · Views: 65
Thats looking great.
Water can also leak into cabin through gromets on choke/reserve cables and that same area where wiring looms goes.
If you still have steering/idler fitted check that section of chassis under them as they fill with road muck and corrode through causing leaks into that pedal box area.
As long as the heater box unit has not corroded through water in heater drains out at lower drain tube and at long side drain rubbers( if still present)
Clive.
 
There are a lot of gromets o_O but good to know. The section with idler and steering box required long cleaning and removing of this bloody, hard bonding from the old insulation. It was in good shape. Ok, the lower drain tube, yeah, that should work (if it´s not blocked....). Side drain rubbers, which side drain rubbers ;) Luckily, got them from Wadhams.
 
Your very lucky with the lack of rust in that bulkhead area.
Many moons ago took my mates heater unit out for repair and found complete bulkhead rotted so much you could see top of gearbox casing !
Mind you rest of car was no better and have not seen one as bad thank goodness.
Clive.
 
Last edited:
Update...
Everything takes a little bit longer than expected. Front side almost finished. For the wheel arches I do only use a wax finishing (Elaskon UBS), which has a dry surface. Some parts sand blasted and painted. Radiator given to a specialist, some minor repair and a M14 socket for a temperature switch, so I can use a Spal fan. There is a foto with the new shock and no front wheel. There´s a real pressure on the lower mounting deforming the new rubber bush. New water pump. Then wanted to replace the gasket at the rear side coolant flange at the inlet manifold. Clear, snapped the bolt :mad: Found a manifold, obviously with low mileage. With the manifold off, looked at the camshaft and found 3 cam lobes with more or less heavy wear, the whole cam looks not good (coloured, pitting). Looks like the mileage is original (approx 140 tkms) or it´s the 2nd cam...
Now, I´m not sure, if I sould replace the cam (with followers, timing chain and wheels and maybe some other things on this "train") or bring it first to MOT and then make it over the winter.
Found a new 3.9 cam with followers on the private ibäh site, so I could do it now (together with new steel sprockets and duplex chain) or ?
By the way, taking off the manifold, found a small resident. He didDSC_0173a (1) (11).JPG DSC_0173a (1) (11).JPG DSC_Jun2016 (1) (30).JPG DSC_Jun2016 (1) (9).JPG DSC_Jun2016 (1) (10).JPG DSC_Jun2016 (1) (22).JPG DSC_Jun2016 (1) (16).JPG not look very well, but how did he got there ?
 
Hi Jørg,
It would probably be smart to change the cam, lifters and duplex chain also now that you have everythinh open. It is much more work to first build everything up, then tear it down for the camchange later.
Regards, Barten
 
I'm with Barten. Now is the time to put in a new cam and lifters, and fit a dual timing chain. I wouldn't worry too much about the bush at the bottom of the GAZ shock being a little bit deformed. Looks ever so clean!
 
If I have the timing cover off, is there anything else to modify then ?
I have read something about the low capacity of the oil pump. Yes, it goes down at idle very far, but did not get a low oil pressure alert yet. Have seen a conversion kit at V8Tuners, but not cheap (nearly 80 GBP....).
V8Tuner now also offers a "Street" timing chain kit, which is not that expensive than the competition sets, so I plan to order this one.
 
I'd have another look at that shock mount, too.
From the picture it looks to me like the chassis pin is almost too small for the bushing. It looks off centre in the shock housing. Maybe it's a trick of the picture, though.
I would fit a "penny" washer to contain the rubber adequately, though.
 
Sorry, John, late reply. It looks like, but it´s simply the shock, which is deforming the bushing, when the car is off the ground and the shock then is completely compressed and not parallel to the chassis pins.
Ok, time was goeing on. Took off the engine and gearbox sump pan. Think, it was the first time, as you can see from the photos. Do not know, if this is normal, but everyone should do it some time...
The timing cover has an updated seal now (no more rope seal) and the oil-pump was ugraded with the wider gears from the SD1. With the gaskets from the set impossible to have free running gears.
The ERC0216 heads (sold as "overhauled, ready to go") are :mad:, not even the seats were grinded. You should never buy parts late in the evening in a pale light. Ok, next job.
What I learned is, do one job in one turn. Took off the engine sump, left some weeks, cleaned everything and back to the car with a new compound gasket. Hmh, some smaller screws left ? The following night I woke up (really..), the splash shield under the crank was somewhere in my garage o_O
 

Attachments

  • IMG_0906.JPG
    IMG_0906.JPG
    126.1 KB · Views: 45
  • IMG_0908.JPG
    IMG_0908.JPG
    169.5 KB · Views: 44
  • IMG_0909.JPG
    IMG_0909.JPG
    195 KB · Views: 42
  • IMG_0955.JPG
    IMG_0955.JPG
    138.9 KB · Views: 42
  • IMG_0957.JPG
    IMG_0957.JPG
    111.5 KB · Views: 42
  • DSC_0253.JPG
    DSC_0253.JPG
    115.6 KB · Views: 43
  • IMG_0971.JPG
    IMG_0971.JPG
    113.7 KB · Views: 39
I have seen engines with sumps worse than that one. As an Apprentice I spent a lot of time in front of the cleaning machine, and I was amazed with the state of some engines.
It's an old engine and probably hasn't been regularly serviced or had decent oil every change, so no surprises there.
 
some update and a question...
SD1 heads are ready now, carbs also. The P6 heads have each one "splash shield" over the rocker shafts. Do I need them ?
DSC_0279s.JPG DSC_0281s.JPG DSC_0287a.JPG DSC_0279s.JPG DSC_0281s.JPG DSC_0287a.JPG DSC_0282s.JPG
 
Back
Top