Getting back on the road

Glad to say Beryl has been running well recently. After her sortie out on the track the other week I did notice the brake pedal was dropping a little lower. Along with it the handbrake was getting higher. I popped under the back end and sure enough the RHS caliper could be waggled a fair amount. Not wanting to dismantle the whole thing I removed the cover with the caliper in place and tried moving the serrated wheel of j the adjuster. Sure enough it wasn’t moving easily, so a little silicon spray and teasing it started to move freely again. I’ve moved it to the correct place and I’ll keep an eye on things. With luck she’s back to self adjusting, I guess the heavy use got them a little warm?

I’ve just adjusted the valves for the first time in a good while. The car was still ok at idle but not great on warm days. After measuring the clearances I found all the intakes 0.001” too tight. Well all but in no. 2 cyl as I must have mixed up something in the past. That was at 0.012” (my guess is I adjusted it to exhaust spec). So now all valves are in the middle of their range again. It surprises me how smooth these engines can be when you’re not an idiot (like me) and the clearances are in spec.
 
Cross posting from my question on the electrics forum:

Beryl had to take the flatbed of shame this week. I lost battery power while on the garden state parkway at 6pm in the dark at 70mph.

When I got home I found the battery was charging fine and when started the next day I was getting 14.2v at idle. Quite the head scratcher. I took it for a 15 min test drive and then measured the volts at idle again. It was showing 12v and slowly dropping. Something was obviously failing when warm. The car still had its 11AC alternator, external regulator, and 3AW unit in place. It’s about time to modernise the charging system I thought. After some help on here and a bit of research I was able to find a Lucas A127 meant for a Defender available here in the states.

I fitted the new A127 today. Smaller pulley as others have mentioned but seems fine. I had to shim the pulley, the pivot for the adjustment strap and the bottom mounting bolt slightly so the new belt would be aligned with the other pulleys (I have the long nose water pump for ref). Belt was 930mm and is now 900mm in length, it could be 910mm for a perfect fit I think.

The new alternator has studs instead of spade connectors, so I added ring terminals with heat shrink to make sure they stayed clean. I was alble to use the existing 10 gauge wire to the + terminal of the solenoid and the AL (ign light) wire that used to go to the 3AW unit and bridged the wire from the alternator to the ign light with a small tail with two insulated male spades, again heat shrinked to ensure they were sealed.
I’m glad to report that everything works and the charge continues after ten mins of driving. I’m a happy bunny and have extra juice if I decide to add an electric cooling fan or halogen headlamps.
 
Last edited:
I haven’t posted much as Beryl has been behaving herself. Managed to get a parking spot near my former Local, the Ear Inn I’m SoHo. Loved the vibe of it.
 

Attachments

  • 986F07E5-ABCD-4DE4-984C-1E6210A3DBC0.jpeg
    986F07E5-ABCD-4DE4-984C-1E6210A3DBC0.jpeg
    1.4 MB · Views: 27
Last edited:
I’ve been toying with revising the suspension on Beryl for a while. She handles well enough, but the front end always seems to be sitting high. I’ve also noticed the center of gravity seems high when cornering. I’ve been chatting with @cobraboy about the coilover conversion he’d made to his group 2 replica. He’d used a setup similar to @sowen. I like this approach for a few reasons.
1) It’s easily reversible if I prefer the factory setup.
2) There are a huge range of 2.5” coilover springs available at a reasonable price for fine tuning.
3) It’s fairly easy to make the parts
4) it will complement the stuff ARB and adjustable Koni shock absorbers already fitted to Beryl.

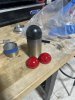
So far I’ve managed to source the steel threaded Coil-over sleeves, spring seat domes and springs.

945E2A82-0536-4CC9-903B-41699B2F9BF0.jpeg
Sleeves cut down to length. Domes cut and cleaned ready for welding. They’re just placed together for test fitting here. I’ve media blasted the plating off the top 5mm of the sleeves and added a chamfer to encourage full weld penetration between the sleeves and domes.
3D1C891D-61FF-4E52-BA2E-1DB316794EFA.jpegA0A3C7AA-997D-4E07-AACC-7D309800BA76.jpeg
the domes welded in place, welds dressed. I’ve left a fair amount of bead in place to add strength.
984090E5-D731-4E02-A64C-166887F678BD.jpeg
Final part, painting over the weld, dome, and unplated areas. I want to keep everything clean and rust free going forward.

I still need to make seats to hold the 2.5” springs on the 2.25” sleeves and bulkhead seats.

Next steps will be to remove the uprights, fit new ball joints and switch everything over.
 
Last edited:
Because I can't help myself I tried a very quick and dirty photoshop or the car lowered. I'm most interested in the handling improvements of lowering the car and its center of gravity. But I have to say I like how it will look.
BERYL-NYC-orig.jpg

Above as she looks now.
BERYL-NYC.png
How I expect her to look when finished.

Not 'slammed' but filling the front arch a little more with the wheel.
 
The poly domes need to be slightly modified to fit inside the Coilover sleeves. I do wonder if I’m being trolled by @cobraboy though….
 

Attachments

  • image.jpg
    image.jpg
    2 MB · Views: 18
So, I've been looking at the adaptor ring for using a 2.5" spring on a 2.25" sleeve. I've decided to have a go at just machining with my CNC and using a single point thread mill to make the internal thread. Here's a few screen grabs from CAD to show the thinking.
1655145440361.png1655145450030.png
1655145459951.png
 
I finally had some time to work on the suspension parts this weekend. I’ve machined the threaded seats that will run on the 2 1/4” coil over sleeve but hold a 2 1/2” spring. It was my first time using a single point thread cutter on the CNC mill and much to my surprise I got the thread spot on the first try.

I’ve also machined the seats that’ll go on the bulkhead and 3D printed a pair of polyurethane insulators for them as they’ll be mounted onto the old steel seat. I wanted a bit of insulation to stop electrolytic corrosion starting.

They look pretty good, even if I do say so myself. I just need to find a weekend to strip down the front suspension, replace the ball joints and fit the new setup. Wish me luck!
662880A8-8EDE-493B-8EB5-78371C8223B2.jpeg
 
Looks like a proper bought in kit !

When you extract that long original boingy spring you will be so surprised how easy it is to fit the new parts. IIRC disconnecting the damper gives enough movement for it all to slot in.
 
@sdibbers Where do the printed poly insulators go, between the bulkhead and the springs?
There's two I'm making. The ones you see in the photo go between the aluminium spring seat I machined and the original steel spring seat that sits against the bulkhead. I'm probably overthinking it, but I've had terrible experiences with electrolytic corrosion between the two materials in the past. The second insulator will sit on the adjustable seat to let the spring have a little give without making noise. Its the dark grey bit in this cross section.
1657638718920.png
 
Gotcha. As cobraboy has remarked, it looks very professional! Colour me impressed, and fascinated. I'll follow your progress with great interest.
I've just ordered some new front shocks for my car, and when they turn up I'll be booking it in with my P6-friendly mechanic for fitment, along with a new pair of those poly 'clown nose' buffers and, most importantly, new standard type swing arm bushes, to replace the awfully noisy poly ones. I do hope it will then stop creaking, clacking, groaning and squeaking! I'm wondering if I shouldn't also get some new insulators for between my bulkhead and the spring seat, and what they should be made of. I imagine mine are a bit knackered after 50 years and I want to have everything to hand when it is apart. Sorry to hijack your thread with my meanderings!! Good luck with your installation.
 
The insulators for the spring seat to bulkhead is just rubber iirc. They seem to hold up very well, I guess not too much heat and and no UV radiation in there helps a lot.
 
Last edited:
Waiting on custom rear coil overs for the rear end before switching the front coils to the coil overs I’ve made. In the mean time I decided to clean up the Rostyles and repaint the black segments. I used some alloy wheel cleaner to get rid of a lot of crud and some surface rust that had made it through the chrome plating.

I then masked the areas l, scuffed with steel wool and painted in Montana Gold satin black aerosol. If you haven’t used Montana’s products before I would strongly recommend them. Very high pigment content, super robust and comes to a tough perfect finish. (I’ve not been paid to say this!). After painting the wheels went off to Euro Tire (it’s the US they don’t know how to spell tyre here). For Pirelli CN36 185r14 tyres and balancing, they have a bolt plate for balancing bolt centering wheels (moderns tend to be hub centering) and they did a great job.

For the last 7 years I’ve had Vredenstien Classic Sprints on. They’ve been ok, but their wet weather performance has always been dodgy in my book (certainly as they aged). The steering was also quite heavy along with noticeable road noise at highway speeds.

The CN36s so far have been a revelation. Much lighter steering at the same pressure, quieter at speed (but that could just be newer, softer rubber) and much better turn in. In fact avoiding potholes locally almost had me on the wrong side of the road at first! So far a big improvement. Once I get the coil overs in Beryl will be quite the Q car. But even now she feels good.
 

Attachments

  • 4ADDFB0A-FE6E-42A9-880C-FAF4E76B3E0F.jpeg
    4ADDFB0A-FE6E-42A9-880C-FAF4E76B3E0F.jpeg
    3.2 MB · Views: 26
  • C43FE703-E8DB-4BE9-9C9E-7C49AADAC4DB.jpeg
    C43FE703-E8DB-4BE9-9C9E-7C49AADAC4DB.jpeg
    2.8 MB · Views: 26
Back
Top