Getting back on the road

When I picked up my P6b from the dealer, she was shod on Pirelli Centurato.
Years later I replaced with Dunlops. I didn't need to -just had a brain fart.
That has been one of my worst decisions regarding the P6.
Makes me wonder if the P6 was designed for Pirelli
 
Last edited:
When I picked up my P6b from the dealer, she was shod on Pirelli Centurato.
Years later I replaced with Dunlops. I didn't need to -just had a brain fart.
That has been one of my worst decisions regarding the P6.
Makes me wonder if the P6 was designed for Pirelli
It was, the Cinturatos were standard fitment from new on P6’s. The CN36 is a stickier version developed for the 911 (amongst others) later
 
Last edited:
It was, they Cinturatos were standard figment from new on P6’s. The CN36 is a stickier version developed for the 911 (amongst others) later

The difference was remarkable. Noise ,grip and wear. I think I moved to Dunlops for the price in those days.
 
Finally had a bit of time to give Beryl some attention this weekend (more on the suspension stuff I’m playing with at the moment later).

I’ve been very happy with the HIF6s and the 2200TC airbox on Beryl. However, the internal edge of the intakes from the airbox to the carb mouths has a sharp cutout. This causes a lot of turbulence and pressure waves just where you don’t want it: right over the jet. The 2000TCs all had a nicely radiuses aluminium casting to smooth intake airflow. My solution was to measure up the intakes and bolt patterns, design a quick radiused intake adapter (think shortest of velocity stacks as there’s not an awful lot of room between the carb faces and the filter).

I’ve 3D printed a couple of parts for testing, if they work out well I’ll either machine from aluminium (for the bling) or print in a higher temp plastic. The little fins are to hold back the filter a little more for a cleaner airflow, I had to snap off the rear most two on the rear carb as they were hitting the metal frame of the filte

First impressions are interesting. Induction noise is greatly reduced. There seems better throttle response (enough I’m sure it’s not entirely imagined) and I’ll see how fuel consumption feels going forward. I’d also add idle is a lot smoother.

Here’s some photos:

Sharp edged intake as fitted.
7CE795AB-1E6B-4967-AF69-38D476EF47B3.jpeg

The ‘very short stack’ before fitting:

8E6A32A3-7387-47E9-85D5-1617AAD6CB48.jpeg

How it looks fitted:
73F34355-3F6C-4CB1-A923-45000077E5A5.jpeg

I think now I know I have some extra room I might try different profiles on the intake, see if I can improve further. I also noticed the inner edge of the airbox it’s not perfectly aligned with the carb openings, so maybe time to play with the die grinder too.
 
Last edited:
I was so impressed with the results of the first version stacks I decided to read up more on Vizard’s findings for velocity stacks in his A series tuning book. So Rev B is taller (19mm vs Rev A’s 11mm). It has a full quarter elliptical radius leading into the throat of the carb with a flatter elliptical radius on the outer edge spread over a larger area. This in theory will give a cleaner approach to the mouth encouraging laminar air flow into the carb. This should give a clean, fast flow over the jet. Indeed I noticed I had back off mixture a fair amount afterwards.

Here’s a photo of them fitted inside the 2200TC airbox.
B1A4139F-7CE5-499C-BBC2-86928F9A0B69.jpeg
I’m currently using a K&N flat filter given to me by @Demetris a few years back (many thanks!). I think an improvement would be to remove it, add a round snorkel going down to beside the radiator with cone filter at the end. This should give cleaner flow into the airbox plus a colder intake down in front of the engine.

First impressions over Rev A: Even quieter at idle and mid throttle. Smoother idle after leaning out the mixture again. At higher speeds the engine revs more freely, power staying on until 5500-6000rpm compared to 4500-5000 with the standard setup. I think it’s a worthwhile improvement and easy to print too boot.
 
Last edited:
Targeted smart gains must be very satisfying for such a relatively small outlay:thumb:

I have a few of David’s books which are great but he’s doing a fair bit on YouTube at the moment too. Low production value but high content, the sort of learned information you are amazed is being given away free these days..much like Ron Covell’s channel if you’re into sheet metal shaping!

(Auto correct was intent on keeping his surname as Cowbell lol)

Jim
 
I'm well aware of David Vizard and his knowledge of A Series engines.

I recently built a 1330cc A series engine for my A35 Van.

All good stuff
 
Targeted smart gains must be very satisfying for such a relatively small outlay:thumb:

I have a few of David’s books which are great but he’s doing a fair bit on YouTube at the moment too. Low production value but high content, the sort of learned information you are amazed is being given away free these days..much like Ron Covell’s channel if you’re into sheet metal shaping!

(Auto correct was intent on keeping his surname as Cowbell lol)

Jim
@corazon I’ve heard he’s become active on YouTube, need to go find him.

Absolutely on the small outlay. I’ve just printed in PLA+ at present for these. They’ll hold up for a good while. Now I feel confident in performance I might machine in some ally or the like.
 
Great development there.
The Lotus Elan has a very shallow tin airbox, inside which live four very short ram pipes for the Weber DCOE carbs. Bolted to this is a GRP airbox and trunking down the the filter in the nose of the car.
I don't know how deep the Rover air box is, but if you are doing away with the filter at the carbs and can indeed work on creating a shallow ram pipe to bolt to the carbs it will be the way to go.

There needs to be adequate clearance between the rear ram pipe and the filter outer cover.

1671352316215.png
Weber DCOE 40mm Velocity Stack Carb Trumpet - IDF Dellorto DHLA DRLA Solex ITB | eBay
 
Indeed, the factory 2200 TC set up is rather crude, especially compared with the 2000 TC solution.
It's hardly surprising then that the stub stacks that Steven created show such an improvement.
To my eyes the Elan set up looks very good, but i am not sure that there is enough space within the Rover's engine bay for something like this.
The biggest issue is indeed space. Not just for velocity stacks but also alternative carb options and filter arrangements.

@cobraboy thats very similar to the lines I’m considering for sure. Current ram height is 19mm. Without the filter I might get away with 45-50mm.
 
Last edited:
Well, with the unseasonably warm winter we’re having in New Jersey I decided to do the top link bushes on Beryl. I’m keeping the standard springs in for now, I’ll fit the new ones when I find five minutes to design and make up the rear adjustable spring seats to accept coil over springs at the rear.

I used ratchet straps to compress the spring before removal. As soon as I removed it I placed standard spring compressor clamps on the spring just to be safe. I will say the ratchet straps worked well and felt safer than just undoing and waiting for that bang!

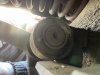
The outer bushes on the passenger side (rhs) were very worn. With massive concentricity.
ADE836BA-1C41-4F60-BA68-C32EA072403B.jpeg

The inner one that side wasn’t too bad but I had a replacement waiting and did it while out. The press being needed to push it and the bracket in position after removing the old one.

I’m now struggling to get the spring and top link back in place, I think I need to compress the spring a little further to align the inner bush bracket with the bolts. I’m giving up tonight and will continue tomorrrow.

Looking at the way the system is setup I might just do the outer bushes on the drivers side, I took a photo of the inner bush with my phone and it looks concentric and in good condition,

I’m sure the outer is still rough of course. think I can replace the outer bushes without dismantling the top link and spring from the car, that’ll save hours of swearing I’m certain!
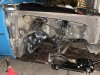
Current state of play

ADE836BA-1C41-4F60-BA68-C32EA072403B.jpeg

There were quite a few shims on the bulkhead that removed (some I’d added myself due to heavy steering etc). I’m pretty sure these were compensating for the shifted outer bushes. I’m going to reassemble without them first, measure caster and camber and see if I need to readjust again after this. I think it’s going to be pretty telling when done.
 

Attachments

  • D4CF2BA2-3013-45D2-B64D-8678A8757A38.jpeg
    D4CF2BA2-3013-45D2-B64D-8678A8757A38.jpeg
    1.4 MB · Views: 23
  • FFAC0CEF-0615-4202-945B-C82DD55FDFDC.jpeg
    FFAC0CEF-0615-4202-945B-C82DD55FDFDC.jpeg
    1.7 MB · Views: 23
It was all going so well! The spring and top link was back in place. The bolts torqued to spec, the ratchet straps cut and tension released. Fan-bloody-tastic.

Then I released I’d left out the lock washer strap on the inner bolts. ‘no problem’ I think, I’ll leave one bolt tightened and replace it one at a time.
I removed the bottom one, then added the lock strap, go to tighten it back up. Look in the inner wing and the bracket had flexed away. The angle didn’t match. Fine I think, I’ll loosen the top one and that should make it straighter, nope - bollocks! I go to tighten the top one and BANG! if snaps. So, I end up having to remove the whole thing again. I’ll order new bolts from the usual suspects and set things up again.
The good news is that I know how to get everything back in much quicker next time (and not forget the lock strap). Hey ho…

I’m going to have a shower and a pint now.
 
I’ve found 8” long 3/8 UNF grade 8 bolts which should arrive on Tuesday. According to specs they will be well within strength with the 30ft/lbs torque rated in the manual.
 
Steven, what are those white polka dots in your third photo of the inner wheel arch all about? Good luck getting it all reassembled, take care and be methodical.
 
I did think that, but I wanted to ask just to be sure.
And let's be honest. Who doesn't like a little sparkle in their inner wings?

In other news I've found grade 9 threaded studs that will work for the bolt replacement (I know later cars used studs instead of bolts). Being delivered tomorrow AM for the princely sum of $28 for two 12" lengths. Hopefully I can get this buttoned up shortly. Excited to drive a car with suspension attached correctly.
 
Well, thanks to Dermot Harvey in NY I get to borrow the rover factory spring rods. Surprisingly short and small but works well. I'll measure and draw them up before returning them. Plan is to get them laser cut in tool steel, with a light bit of grinder work I reckon I can make them pretty easily and safely.

Beryl is back together, I replaced the outer bushes on the driver's side (LHD remember) as the passenger side ones were really bad. Get it all together again, I removed the shims that had been used on the suspension mounts as I had an idea they were used to mask the bad bushings. Sure enough, the car tracks straight and true and has much better road manners. Well worth the pain of the job for sure!

To replace the broken inner mount bolt I used some grade 9 3/8-24 stud, cut down to 8.25" length and screwed into the top hole of the mount with some loctite to ensure it stays in place. Having that in place made lining up and fitting the top link and spring a lot easier! I used a nyloc nut on it when fitted. The bolts I used a grinding stone on a dremel to make a lead in stub on the end of the bolt, its only about 3mm deep and just a little smaller than the thread's minor diameter. But it really helps with aligning everything on reassembly. The lost thread engagement wouldn't be a problem.

Taking the car out for a test drive and on the highway proved how much better it is. Initial things noticed are:
[1] Less road, brake noise being transmitted into the cabin.
[2] Less vibration from the road.
[3] What I thought was poorly balanced front tyres turned out to be a poorly attached front suspension assembly (scary when you think about it) The car had no vibrations, noise or wandering at speed. High speed stability is much improved. It finally feels like a car to rival an XJ6 for ride now. Plus the handling is even more sure footed.

So, I think I will live with the current setup for a while, check alignment when its settled down, adjusting if needed.

I did have to reset the steering wheel on it's splines, it was quite a way off from where everything was back in place.

Worth the job, just don't break the bloody bolt!
 
Back
Top