

You are using an out of date browser. It may not display this or other websites correctly.
You should upgrade or use an alternative browser.
You should upgrade or use an alternative browser.
GAN 340J 1971 series 2 V8
- Thread starter drabbers
- Start date
drabbers
Active Member


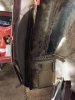
Work progresses on sills - sill tread plates - sill ends.
The round hole is one of several along sill and inner D post to allow wax treating on a regular basis.
These will have rubber bungs fitted.
Mark.
Attachments


drabbers
Active Member


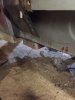
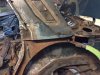
Drivers side - typical P6 type rust.


Drivers side sections being deconstructed - these will be despatched for blasting.
I liked the idea in Phil Robsons 'Bop Bop' thread to use rust free sections from another vehicle for repairs.
The only difference - Jamie prefers to fit panels in same order as originally built - hence deconstructing sections.
This also allows removal of surface rust from between the seams when panels are blasted.
Mark.
roverp5Bcoupe
Active Member
Nice work Mark!. It is good you have a donor car to take pieces from but this again is a lot of work to remove these without damaging these.
It is high quality work you are doing! I went threw the same proces with a p5B and even removed the skins from 3 doors and the bonnet to repair the frame and the skin.
It took me 3 years. Then the car was shot blasted and is now in the paint shop.
Keep up the good work and keep posting this interesting art
Peter
drabbers
Active Member
Thanks Peter,Nice work Mark!. It is good you have a donor car to take pieces from but this again is a lot of work to remove these without damaging these.
It is high quality work you are doing! I went threw the same proces with a p5B and even removed the skins from 3 doors and the bonnet to repair the frame and the skin.
It took me 3 years. Then the car was shot blasted and is now in the paint shop.
Keep up the good work and keep posting this interesting art
Peter
You're right - a donor car has saved the day for me.
Sounds like you are well ahead of me with your car !
Mark.
roverp5Bcoupe
Active Member
I used lots of repair panels from wadhams but most required a fair bit of modification. Still happy that these repair panels are available at decent prices
I brought the car to a one man shop. He provides excellent quality work at a reasonable price (not a fancy workshop, no secretary ect) but these kind of people have loads of work so i was only allowed to bring the car when i accepted 1 year before it was finished which could easily have further delay. He previously did a fabulous job for me on a heavily dented Ducati classic motorcycle fuel tank . The tank, 2 side panels and a fairing took him 1 year to finish.
So you could be finished earlier. I don't mind the long time as it gives time to finish the other parts.
Peter
drabbers
Active Member
Hi Peter,
I have bought some Wadhams panels - they seem to vary in quality & fit.
Sills are excellent and thicker gauge - rear splash panels good - front hockey sticks needed fair amount of work as too flat.
That said - its really fortunate for all of us that so many of the panels are readily available.
Your workshop setup sounds the same as where my car is - when passenger side is finished it will wait in turn for a couple of weeks while other cars are worked on.
Mark.
Last edited:
drabbers
Active Member
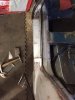
Panels to passenger side were all trial fitted to highlight any alignment issues.

Bonnet - front wing - doors - fitted.

Both doors and catches fitted - they shut really well.
The doors were removed from a car 25 years ago - dry stored - and are totally rust free.


Rear door to D post alignment with rubber fitted.
Rear wing was also trial fitted but forgot to take picture .
The doors will now be removed - stripped out - then blasted and etch primed.
Mark.
Bonnet - front wing - doors - fitted.
Both doors and catches fitted - they shut really well.
The doors were removed from a car 25 years ago - dry stored - and are totally rust free.
Rear door to D post alignment with rubber fitted.
Rear wing was also trial fitted but forgot to take picture .
The doors will now be removed - stripped out - then blasted and etch primed.
Mark.
unstable load
Well-Known Member
Looking good, Mark!
drabbers
Active Member
Thanks John.Looking good, Mark!
Its been a long time 'in the planning' !
Mark.
drabbers
Active Member

Squeezed in a flying visit to workshop just over a week ago.
Front splash plate fitted.
Rear splash panels - closing panels - also now fitted - so passenger side welding complete (will photograph these next time I am there)
I have bought NOS - F/R splash plate - rear wing channel - rubber seals and a full stainless steel retaining strip set from Classeparts.
Mark.
Last edited:


roverp5Bcoupe
Active Member
Top job how the sills are fitted and the lines and gap of the rear door and rear wing! You won't need much filler to get a nice overall good fitment and a very nice car
Keep up the good work!
Peter.
Keep up the good work!
Peter.
drabbers
Active Member
Thanks Colin,Great work being done here, I have never seen body sections being stripped and repaired like that.
You are going to have an awesome car when all complete.
Colin
This is a keeper so going the extra mile.
Mark.
drabbers
Active Member
GAN - has had to stand in the queue for a few weeks now while other customers cars get their turn at the workshop.
Reality check - the Rover won't be ready for this years Le Mans trip.
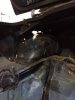
With the pressure off - decision was made to remove - engine / box - heater box - front screen.

Stripped bay to bare metal.

Pleased all metal is sound in this area.

Engine bay will be etch primed and finished in satin black 2 pack - cross member and lower area stone chipped.

Brake master cylinder - servo - heater box - will be rebuilt while they are out and radiator recored.
Substitute V8 transport for Le Mans.

Mark.
Reality check - the Rover won't be ready for this years Le Mans trip.
With the pressure off - decision was made to remove - engine / box - heater box - front screen.
Stripped bay to bare metal.
Pleased all metal is sound in this area.
Engine bay will be etch primed and finished in satin black 2 pack - cross member and lower area stone chipped.
Brake master cylinder - servo - heater box - will be rebuilt while they are out and radiator recored.
Substitute V8 transport for Le Mans.
Mark.