Finally a tidy 3500S!

The Rovering Member said:
rockdemon said:
that wheel looks fab...

Whereas to me, it looks the polar opposite! :LOL:

I like the wheel, the chrome the centre peice and the thickness of the rim, perhaps the rim could be wood in that thickness but whatever it does look quite classy.

But Where does the airbag fit :?

graeme
 
quattro said:
are you going to have a good look (A real good look) at the lower elbow mounting? Mine looked fine until I wire brushed them

Second that!

Well worth a good look after a god scrub with a wire brush.

The steering wheel looks smart but I'm not a big fan of after market steering wheels.

Dave
 
All the pinion bolt washers and spacers have been incorrectly fitted so that could well account for the mounting being loose and failed as well as the soaking it's had from the diff oil.
 
quattro said:
With the rear trailing arm bushes looking like that, are you going to have a good look (A real good look) at the lower elbow mounting?

Thanks for the tip Richard, I'll get the wire brush out.

harveyp6 said:
All the pinion bolt washers and spacers have been incorrectly fitted so that could well account for the mounting being loose and failed as well as the soaking it's had from the diff oil.

Thanks for pointing that out Harvey. I'll consult the book to get it right :!:

I'm not a fan of aftermarket stuff either, unless it's "period" and I think the wheel actually freshens up the interior as a whole and is more sporting without taking it too far. And it feels great in the hand, and to me that matters every mile...
 
Hello Tor,

There is no problem with aligning the bracket which secures the pinion extension case to the bush located in the pinion cross member. You will have to correct the assembly order of the washers and spacers as Harvey has mentioned too, that certainly won't have helped matters. When I replaced the original pinion oil seal in 1991 along with a new mount, which like yours had been destroyed through diff oil contamination, I used Castrol EPL2 grease to prime the seal. Twenty years on and not a drop of oil has passed it, and it has one and half times the mileage of the original too, so I am very pleased.

J R. Wadhams have all the suspension bushes if you have yet to order.

With your rear calipers,..if there is even the slightest pitting in either bore, then resleeving is the only option. I am assuming that your rear calipers have never been resleeved in the past? Once they have been, they never need doing again as the stainless steel liners won't corrode like the OEM did. Then with future rebuilds, it is largely just the seals that need replacing.

All the best,
Ron.

P.S : I do like your steering wheel... :)
 
Thanks Ron :) Good tip.
I have all the bushes either here or in the mail, coming from Ian (SuperFlex, rear) and Pierre (Metalastiks for the front). I'm opening the calipers today, but I do think it's the piston itself that was corroded in the seal recess, which I'm assuming is where the fluid seeped through. The other caliper had a single drop of fluid on the wrong side of the piston, so I've done the good thing I think to order two new pistons. They've not been sleeved before, no, but so far getting them done in a machine shop is going to cost more than two NOS calipers. This country is getting weirder by the week. But I've not yet given up...

ghce said:
But Where does the airbag fit :?
graeme
There's often a bag of hot air behind the wheel, if that's what you mean... 8)

Erm, I'll get on with my fettling now shall I.
 
that wheel looks fab...

Can be ordered from the manufacturer together with a P6 steering boss ( Part number B34 )

http://www.moto-lita.co.uk/our-products/Wheel_Details_02.aspx?WH_ID=5

Suggest: there are 2 sizes of wheel center + I think 3 1/2" fits the "3500S" Badge, ( Tor, correct me if I'm wrong! ) a dished wheel is better than a flat wheel for the P6
*It was cheaper to buy a new wheel from Moto-Lita than the quotes I got here to renew the leather on a used one*

Superb quality... these were OEM on cars like Shelby Mustangs, compare these to original style VW steering wheels, which are much, much more expensive... :shock:

http://www.vw-online.co.uk/acatalog/Karmann_Konnection_Steering_Wheels_and_Horn_Buttons__5.html

GW
 
rockdemon said:
200 quid all in isn't bad....
I got away with £173 or thereabouts with UK shipping from a Moto-Lita authorised eBay seller mentioned elsewhere here (classicsteeringwheels), very helpful chap. Yes GW, the quality is pretty much top. It's the 15-inch type IV dished. The badge I took off the old wheel like adamhotrod did with Jinx, polished the backing plate and made myself an adapter using a broken P6 battery lid.

One alternative is to use the plastic one that comes with the boss, (spray it silver) and order a 40mm stick-on horn push badge from http://www.classiccapsule.com to fill out the entire roundel recess in the centre. I think they can make them with logo to order actually. I ordered a 3500S badge - they already do keyring fobs - but decided to modify the old one, which came out looking right.
 
Tor wrote,...
I do think it's the piston itself that was corroded in the seal recess, which I'm assuming is where the fluid seeped through. The other caliper had a single drop of fluid on the wrong side of the piston, so I've done the good thing I think to order two new pistons. They've not been sleeved before, no, but so far getting them done in a machine shop is going to cost more than two NOS calipers.

Hello Tor,

The piston that has corroded and the two pistons that you have ordered,...I am assuming that these are the piston cup assemblies (601916)...that you wind in?

If so, they do suffer from pit corrosion, but they make no contact with the brake fluid. So the pitting that they exhibit have no impact on fluid loss. The brake piston (601918) is a tiny item by comparison that runs down inside the bore with a seal fitted around its outside edge. The seal makes contact with the bore, not the piston, so even if there was pitting on the actual piston,..again it would make no difference to fluid loss. Fluid loss from the rear calipers only occurs when the bores are pitted and the seal which fits around the piston cannot seal as it should with the bore.

I think you will find that resleeving is the only option, and far better than buying an old OEM pair as they too will likely have corroded bores by now, so they too will likely leak right from the start if purchased and fitted.

Ron.
 
I think you will find that resleeving is the only option
; it pays to spend a bit extra and have the resleeving done in Stainless, will last for decades...

I know a good company does this, but they are in NZ They will also fabricate Stainless brake pistons ( $$$$ ) likely overkill tho'

GW
 
SydneyRoverP6B said:
I am assuming that these are the piston cup assemblies (601916)...that you wind in?
Hi Ron.
No, I've ordered new hydraulic pistons. By memory, the corrosion was where the seal seats in the recess and not elsewhere on the body, but it's all theoretical until I pull them out. The idea is it would leak between the seal and the piston, not btw the seal and the bore. Time will tell!
 
Tor wrote,...
Hi Ron.
No, I've ordered new hydraulic pistons. By memory, the corrosion was where the seal seats in the recess and not elsewhere on the body, but it's all theoretical until I pull them out. The idea is it would leak between the seal and the piston, not btw the seal and the bore. Time will tell!

Hello Tor,

Interesting indeed! If it is indeed leaking between the piston and the seal, then it would seem very likely that the cylinders at some point prior to your ownership, have already been resleeved.

I look forward to hearing what you find.

Ron.
 
Pulled the calipers apart this afternoon. Found one pitted bore, the other developing a bit of the same :roll: I've been put on to a workshop at the university to investigate for the sleeving job, after having a chat with my brakes people. The guy had recently overhauled a P6 system and hated the self-adjusters on it... Assemble, no clicks. Pull apart, check, all good. Assemble, no clicks. Argh. Third time lucky, though. In his opinion the system is great, lots of stopping power, but a little too intricate at the rear. If the sleeving work is going to be as hard to sort out as I fear, I'm going to get the bores honed and stick S/S pistons with fresh seals in and leave it for next decade (yah, one can always hope). At least I see why the one sprang a leak virtually straight after the overhaul and that I should always inspect hydraulics carefully. He also said he had noticed the OEM piston seal is firmer and a tighter fit than the aftermarket ones - ie. lasts longer in his books. I was quite surprised that he knew the system so well :)


I've de-greased, scraped and sanded the suspension components while I'm waiting for the last of the bushes to arrive. They're getting treated with rust converter, zinc primer and some gray metallic on top that I bought as a compromise, as none of my suppliers had plain dark gray (like the rest of the undercarriage) or POR-15. I wouldn't mind a Halford's or something where staff know a bit about what they sell and actually have the right stuff part of the time... grumble grumble.


Another P6 owner has access to a press and has offered to help with the bushes, which is marvellous. I've read up on the order of the spacers etc. on the diff extension bracket, so that'll be going in right. I'm debating whether to do the inner driveshaft U joints - maybe even the halfshaft if need be - as one has a touch of play in it, but I will have to figure out just how tricky it is by consulting the manual. I'm assuming they will reveal play fairly well when tugged and wiggled.
 

Attachments

  • bilde.JPG
    bilde.JPG
    504.9 KB · Views: 702
  • Panhard rod.JPG
    Panhard rod.JPG
    87.8 KB · Views: 702
I agree 100% that the brake adjuster mechanism is too intricate and delicate to be safely used in such a harsh environment! The solution is to reverse engineer back to the Dunlop brakes 8)

If you can detect play in a UJ it is most definitely shot. Also, I'm afraid it is likely that the others are too, even though you can't detect play. That on the assumption that they are the same age with the same service history. Once you have the half shaft out you are likely to find they have stiff spots and/or are crunchy. Sorry.

Chris
 
Tor wrote,...
If the sleeving work is going to be as hard to sort out as I fear, I'm going to get the bores honed and stick S/S pistons with fresh seals in and leave it for next decade (yah, one can always hope).

Hello Tor,

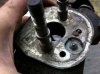
I strongly advise to have stainless steel liners fitted now while the opportunity presents, else if you fit them back without you can guarantee without fail you will be doing this all again. Stainless steel pistons if you wish, but stainless steel liners most certainly should be fitted.

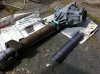
Looking back through my log book,..my rear calipers had stainless steel liners fitted into the bores in 1986 after they were leaking and the bores were found to be pitted. Up until that time, 48,000 miles (77,000km) had been covered. In 1993 some 70,000 miles (110,000km) later while fitting two new diff drive axle assemblies (done as a precaution only), the rear calipers received a new seal kit, not because they were leaking, rather the opportunity to do so with ease was there. The next time that they were removed was in 2007, a further 14 years and 91,000 miles (147,000km) later, and once again not because they were leaking, rather I needed to fit new pads along with new flexible brake hoses and new discs, so prevention is much better than cure.

So as you can see, once the original steel bores are ground so as to insert stainless steel liners, the life of the rear seals is considerably increased. In 1993 and in 2007 upon inspection, the stainless steel liners remain in perfect pit free condition. No polishing or honing required, just new seals. Definitely the way to go! :wink:

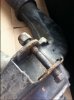
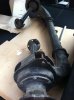
On the universal front, as Chris advised,..if one has play then they all should be changed as a matter of course. Much better to do it all now and then not have to worry about uni joints for another 200,000km.

Ron.
 
At this point, can I just say, "Sigh..."? :|

Cheers guys, mileage and time passed duly noted Ron! It's quite impressive. For sure, I really want to get sleeves in but I'll struggle at this time if it's going to cost in excess of £400 just for rigging, drilling and fitting. Updates to come.

So, to inspect a U joint, can I tell its condition by rolling it about and noting any resistance, notchiness, crunchy noise or whatever? If it moves freely, easily and feels smooth and tight, it should be good?

The suspension has yellowish primer and a good layer of dark gray paint on it, which looks like stone-chip paint and is probably part of an old restoration. I've never seen what was put on at Solihull but it seems too thick for factory, and these days new suspension parts come with a thin dusting of black paint that turns to rust in weeks.

Most components on this car have come out looking good. The car has been cared for and I'm finding no - zero - bodge jobs, only a handful of, I dunno, honest mistakes. The diff tube bracket sitting like it did is a case in point, and the trailing arm bushes I put down to ignorance. I've noticed before how quite a few nuts and bolts have not been torqued down - including the diff carrier which rattled over every bump :? - so someone's definitely been at the car quite comprehensively in the past.

Unsure how the vibration shield sat on top of the tube, I decided that the front lip is designed to slip under the clamped rubber damper where the tube has an elevation, so it's actually metal to metal at both ends and the thing is held in place with two jubilee clips.

Managed to remove the rear trailing arm bushings with a drill, chisel and hammer, in five minutes they were so shot. The rest I'll need help with.

Under the car it looks like this - I'll try to post better pics later on.
 

Attachments

  • elbow.jpeg
    elbow.jpeg
    46.3 KB · Views: 681
  • deDion.jpeg
    deDion.jpeg
    81 KB · Views: 681
  • diff.jpeg
    diff.jpeg
    148.6 KB · Views: 680
  • links.jpeg
    links.jpeg
    128.3 KB · Views: 680
  • underseal.jpeg
    underseal.jpeg
    151 KB · Views: 680
It is a pity Tor that you cannot pay off the 400 Pounds over 40 years, seeing the sleeves will be good for that time and more, but I do appreciate your viewpoint. Most likely the previous owner also baulked at the cost and opted for NOS calipers instead.

If the universal joints at the moment are free of any impediments to free movement, then they are ok at present. If one is notchy then it is fair to say that the others won't be too far behind, assuming that they are all of the same age. The shafts will need to come out of the elbows so as to get a proper feel of those universal joints closest to the hubs.

I'll be under the Rover today doing some greasing, so I'll have a close look at my pinion extension case and its shield, take some pics and post so you can use them as a reference if you wish to.

Your Rover does look nice and clean under there too, and no corrosion to speak of either..that is always nice to see. How many kilometers has your Rover covered Tor?

Ron.
 
Pics as promised.

P5040158.jpg


P5040153.jpg


Ron.
 
Back
Top