Coppertops 2000TC

Coppertop

New Member
Started to find whats what today here is a few pics to follow
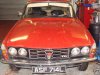
Sticker in window for P6 ASF 714L Club so some of you may know the car?


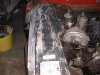
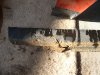
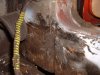
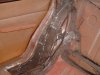
Drivers wing off some welding to wing drip rail not done tidy


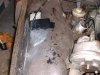
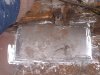
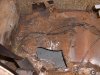
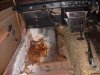
as you can see plenty to do but 1st day was productive with no major problems Outer sills removed inners all solid no nasty suprises (Yet)

sorry if pics are out of sinc
 

Attachments

  • Rover 1.jpg
    Rover 1.jpg
    39.3 KB · Views: 1,484
  • Drivers Inner Wing Rust Kill & Preperation 3.JPG
    Drivers Inner Wing Rust Kill & Preperation 3.JPG
    321.4 KB · Views: 1,484
  • Drivers Inner Wing Rust Kill & Preperation 4.JPG
    Drivers Inner Wing Rust Kill & Preperation 4.JPG
    318.6 KB · Views: 1,483
  • Rover 30.01.10 005.JPG
    Rover 30.01.10 005.JPG
    318.9 KB · Views: 1,483
  • 002.JPG
    002.JPG
    317.1 KB · Views: 1,484
Work progressing well all interior now out found rust & rot in a few places
all now cut out back to good metal with plates made & shaped prepared ready to weld.

Passengers side was 95% ok, but inner rear drivers arch and floor needed plenty of attention.

A few pics of progress - All interior scrapped nothing worth saving unfortunatley but i did find the missing carb spring under the old carpets.

Note the lovley wiring job and contrasting tape darent take it off at mo enough on with bodywork
 

Attachments

  • 003.JPG
    003.JPG
    325.3 KB · Views: 1,419
  • 014.JPG
    014.JPG
    318 KB · Views: 1,418
  • 011.JPG
    011.JPG
    311.3 KB · Views: 1,418
  • 002.JPG
    002.JPG
    320.7 KB · Views: 1,417
  • 006.JPG
    006.JPG
    327.4 KB · Views: 1,418
What's with the screws?
Is that a cheat to save holding it in place before seam welding? :)
 
What I do is clean all the surfaces and make the plates to best fit.Then drill & screw them in place , so my son can come and do the welding when he is free.

it holds the plate nice & secure for welding and then he removes screws and spot weld the holes.

Works fine for both of us. and keeps the job tidy

"may not be the recognised way, but adaptation is the mother of invention"

cheers

Keith
 
Coppertop said:
What I do is clean all the surfaces and make the plates to best fit.Then drill & screw them in place , so my son can come and do the welding when he is free.

it holds the plate nice & secure for welding and then he removes screws and spot weld the holes.

Works fine for both of us. and keeps the job tidy

"may not be the recognised way, but adaptation is the mother of invention"

cheers

Keith

I knew you were cheating :LOL:

Makes it easy for him to just show up and blast away with the welder :wink:
 
All interior floor and rear arches and front inner wing now plated & welded then sealed - Looking good so far .

Replacement interior in preperation(Thanks Deadstar)

Started on rear inner wing Batery Section in boot, as expected nothing much left when rot was taken out.
I will have to refabricate a new battery housing surround and inner wheel arch.

Fortunatley the chassis is solid all way through - 1 positive point at least and i am having fun doing the project.

I have not taken the rear wing off yet, but by the look of it the inner arch would protude by about 2" to nearly touch the inside of the rear wing ?

Has anyone got the Pictures /dimensions of of how this should look to help me rather than making it as I think it should be.

I will add some pics of progress when i have got rid of this mancold.

cheers
 
Cold Gone playing again on rear arch Area- Well not really on arch as when rot was cut away there was little left.

A few pics

Arch from inside boot with rot cut out


RearArchcutout.jpg


Back of Drivers Rear Wing

BehindDriversWingTop.jpg


Drivers Bootwell Hole
DriversBootwell.jpg


Passengers Bootwell Hole
PassengersBootwell.jpg


All cut out and Battery box formed
RearArchcutout.jpg


Making of new arch
RaerArchWelding.jpg


RearArchFabrication2.jpg


RearArchFabrication3.jpg


RearArchFabrication4.jpg


RearArchPlate1.jpg


RearInnerArchFabricated.jpg


Drivers Inner Wing Now finished
007-1.jpg


Enough Pics for now

All the main welding is completed on the drivers side with just a few bits left to finish off.

Well pleased with the fabricating to date all in nice new plate that will last a long while after i have done.
Once its completed I will underseal all areas then repair or replace wings \only drivers door to sort and all drivers side will be completed

Interior all cleaned and ready for redying black
 
Just pondering as to making the new splash seal metal fitting strips for rear wings , with some patience and an hammer it should be possible and interesting.

RearArchSplashSealfitting.jpg


I dont fancy just sticking the new splash seals on
But before i spend hours fabricating new metal to shape are these or something compatalbe available what have other done?
I dont mind spending the time, but thought i had better check out first as others may have replaced them an easier way before i start

cheers
 
Keith that is some nice welding your son has done.

The seal retainer is available from JR Wadham in lengths although it may be available from someone like Woolies. I have bought the section from JRW and also made smaller bits myself. You just need to weigh up the cost of buying over spending hours on them.

Your car has an Edinburgh registration number. Do you have much history for it? My car had the same black painted front valance also Edinburgh registered.

Colin
 
Thanks for comments & info Colin I will check web pages out.

Not much info on car other than 4 previous owners all in Edingburgh
Service book stamped up to 41k in 84 then a 15 year gap to Dec 09 with 67k on clock where it was stamped again.

I can only presume the car was parked up and then restored approx 07/08 for the condition of the car & interior, its not had much TLC.

But thats changing it will be a very nice example, when (eventually) I get finished.
 
Drivers Side now all welded up ,Glassed over and ready for 1st underseal.

Just out of interest before i went any further checked out passengers rear arch - You guessed it just the same to repeat again.

Think i will have the petrol tank out just in case,I dont want to sort out all the holes then blow it up.

At moment I do feel like blowing up the dingbat that sold it to me ,my fault for trusting others I know,but again its all interesting work and should be fine when done.

Seal retainer made
001-4.jpg


002-6.jpg


Lower wing mounting point refabricated

002-5.jpg


001-5.jpg


The work continues
 
Hi Dave
What i do when the welding is completed "courtsey of my son"
is to treat area with kill rust
then use fibreglass to cover this area" You can see this at the bottom of the boot corner where i have glassed over the weld before fine filling later as it will be visible here"
before either line sealing if it would be visible or undersealing a couple of times if it was on underside.
I just prefer the finished result to be tidy and provides as much protection as possible to the area .

Previous owners have just used filler and mesh to bridge holes leaving it looking a dog and not a permanent repair at all. Supprised i havenot found any newspaper as packing yet.

Cheers

Keith
 
Seems a shame to use fibreglass when you've gone to the trouble of putting a nice bit of metal in :)
Coming on well :wink:
 
I would have though the fibreglass would have made an MOT tester think twice - ie that it's hiding something ,Better to have a seam weld , seam sealer and finish with paint
 
Good point Dave
if the areas where we were welding were on the chassis or astructural mot area, I would cetainly agree.
I will ensure i take this point into consideration as job progresses, maybe just use the seam paint and underseal in areas like the inner arch.
I am thinking of making some plastic inner arches at a later stage has anyone adapted any to fit the P6 ?

cheers

Keith
 
Back
Top