Car now starts but floods - where next?

I mean more that it's flooding itself when you try to start still.

And yeah I am inclined to agree about the bar. A bit of a pickle because he had the same problem I did, that it wasn't possible to rotate the dizzy enough with the bar there.

I'd hope that there was some way to get it in time with the distributor in a different position but he didn't have any luck either.

Once the carbs are done that will be the priority I guess but with it not wanting to start/run I need to deal with them first I guess.
 
pardonthewait wrote,...
A bit of a pickle because he had the same problem I did, that it wasn't possible to rotate the dizzy enough with the bar there.

On your distributor, is the vacuum module closer to the thermostat housing or closer to the engine tie rod (stabiliser)?

Ron.
 
Do you need to re set the dizzy position? Take it out marking position - and use a long bladed screwdriver to move the oil pump round by an amount, and if you move it by 90 degrees you then know the rotor arm has to be 90 degrees different as well? Just thinking if it's position thats the issue maybe you can change it?

Rich
 
My thinking Rich is that the new electronic distributor that the OP has installed could be one for a Range Rover. On these, the vacuum module is in an entirely different location, placing it very much closer to the tie rod. So even if the distributor has been fitted correctly, when it comes to timing adjustment, the location of the module will mean that rotation will be compromised by the proximity to the tie rod.

I have not seen a photo of the distributor in question, so I cannot be entirely sure, but this is where my thoughts are.

Ron.
 
It's actually the ignition module that's catching on the stay bar.

The vac advance is in the same position, close to a water pipe, on your left looking into the bay from the front. The ignition module and the connector are what's in the way.


Re: moving it around - am I correct in thinking that if I note which leads are where and where the rotor arm is pointing, if I move the whole dizzy round and put everything back to where it was relative to the engine not the distributor, there should be no difference in the end result? Yes? I will do that - but not til I've got it running! I don't want to add any more variables at the moment but will definitely be replacing the stay before it gets driven anywhere.
 
If you dont unplug the leads from the dizzy cap it will be correct when you put it back on.

With regard Ron's comment above, do you have a photo of your dizzy in situ? I can get one of mine and we can compare?
 
I'll fetch a pic over the weekend.had carbs off tonight, stripped them down part of the way. Float is intact in the one I've done, not too horrific in there but the float needle is quite scored. I've ordered up a pair of float needle kits and some new gaskets.

I'm going to take them to work and stick them in the ultrasonic cleaner before I fit the bits.

I haven't actually checked if the float level set is right - I'll do that over the weekend.
 
Right... So I got the carbs off, stripped them down and cleaned them out, and I have replaced the float needles and float needle valve seat things. Both sets of needles and seats were worn, so maybe this is it. All I have done so far in terms of setup is set both of the mixture screws to 2.5 turns out from all the way in, which is what I've read to be a baseline. Planning on getting them back on the car on Saturday.

Both floats floated and I've set the float levels. i set them upside down and level with a straight edge across the float chamber and made it so that the scoop of the float was about 1mm below the straight edge. I found that on an HIF6 video not specifically for P6s, but I assume it's the same regardless of the car they're on?
 
Update! The car has now run, absolutely horribly, for a total of about one minute. So I'll call that progress.

Carbs with their new float needles/seats are on. What I said in the above post about 2.5 turns from all the way in was complete cobblers obviously and I've misread something, as it wasn't running at all. So I went from that point, taking both of them out by a quarter turn, together, and trying each time.

It did run a couple of times but not for long enough for me to get to the dizzy and try and get the timing better.

I now can't get it to start again! But it's good that it actually can run. But it's been running just horribly, barely running.

I don't think it's flooding any longer though.

I feel as though it's going to be a big hurdle for me to get past this point, having no 'ear' for it and no real experience with carbs it's really hard to tell if what I'm doing is even the right thing let alone is it having an effect! The guy who tried to time the car before said he'd come back and do it but seeing as he thought it was ok to take that stay bar off the engine I'm really not feeling that. I may have to pay a visit to a garage nearby that often have classics outside and see if I can tow it down to them possibly.

Any advice re: getting it to idle is obviously welcome but I've read and heard various and I just think it's a matter of me not knowing wtf I'm doing on a fundamental level!
 
Unless you did something horribly wrong at the carbs assembly, and the choke works as it should, i very much doubt that the engine cannot start and run (no matter how badly) just because of wrong mixture settings. That is if you still have a healthy supply of fuel to the carbs at cranking.
Something that points towards the ignition...
 
The initial setting for the carbs that I mentioned was 2.5 turns down from the top of the bridge. You can use a straight edge across the bridge, wind each jet up till it makes contact, then lower from that point accordingly. Provided there is nothing amiss elsewhere, the engine will now start and run very well. If it does not, then there is a problem elsewhere that needs attention.

From what you indicated in terms of how you set the float heights, that is correct.

Did you change the metering needles or are they as they were? Is the collar that retains the needle flush with the underside of the piston and are they biased correctly? You can tell if they are by looking at the arrow on the collar and noting that it is central between the ridges where the air holes are. Does the needle spring back to its initial position if you touch it?

Ron.
 
rockdemon said:
get some one to crank the ignition while you turn the dizzy

Will try this tomorrow night hopefully as long as I can get a pair of hands.

SydneyRoverP6B said:
The initial setting for the carbs that I mentioned was 2.5 turns down from the top of the bridge.

Aha! I knew I'd heard 2.5 turns from something, somewhere! Shame I decided to fabricate the rest of it.

SydneyRoverP6B said:
You can use a straight edge across the bridge, wind each jet up till it makes contact, then lower from that point accordingly. Provided there is nothing amiss elsewhere, the engine will now start and run very well. If it does not, then there is a problem elsewhere that needs attention.

Having trouble picturing this - because I took the carbs apart to replace the float needles/seats, a lot of what I've seen of the inside of the carbs is upside down and dismantled so I'll go through it now to get it in my head. So if I take the dashpot off, I can remove my piston and the needle will be poking out from there - so I want to be adjusting the jet until it makes contact with a straight edge across the bit I've now exposed?

SydneyRoverP6B said:
Did you change the metering needles or are they as they were? Is the collar that retains the needle flush with the underside of the piston and are they biased correctly? You can tell if they are by looking at the arrow on the collar and noting that it is central between the ridges where the air holes are.

I left them as they were. I am positive they were BBV needles. I didn't notice anything amiss with them but I wasn't looking for anything in particular aside from whether they were straight and undamaged which they were. The collar sat flush. I didn't see how they were biased - but they were located in a specific direction, and when I took them apart to clean them they went back in the only direction they would fit.

I will check this tomorrow though.

SydneyRoverP6B said:
Does the needle spring back to its initial position if you touch it?

Yes they do.
 
pardonthewait wrote,...
Having trouble picturing this - because I took the carbs apart to replace the float needles/seats, a lot of what I've seen of the inside of the carbs is upside down and dismantled so I'll go through it now to get it in my head. So if I take the dashpot off, I can remove my piston and the needle will be poking out from there - so I want to be adjusting the jet until it makes contact with a straight edge across the bit I've now exposed?

There is no need to remove the dashpot and piston in order to set the jet height, although you can if you wish.

You will need to remove the adapter that attaches to the elbow side of each carb though. This will allow the straight edge to be placed directly on the top of the bridge. The bridge is the raised rectangular section that the jet passes through when you wind it right up.

With the straight edge in place, wind the mixture screw out. This raises the jet, which will make contact with the straight edge. Once contact is just made, (you don't want the jet to lift the straight edge at all), note the position of the mixture screw and then wind in by 2.5 turns. This will then give you the initial setting which will be extremely close to the mark. From here, any adjustments can be made later, but will only be fractions of a turn in either direction. In any case, both jets need to be set exactly the same. If they have to be different in order for the engine to run properly, then there is something wrong, and that will require investigation.

I have taken some photos so as to provide further assistance. They are of a spare set of HIF6 carburettors that I have.


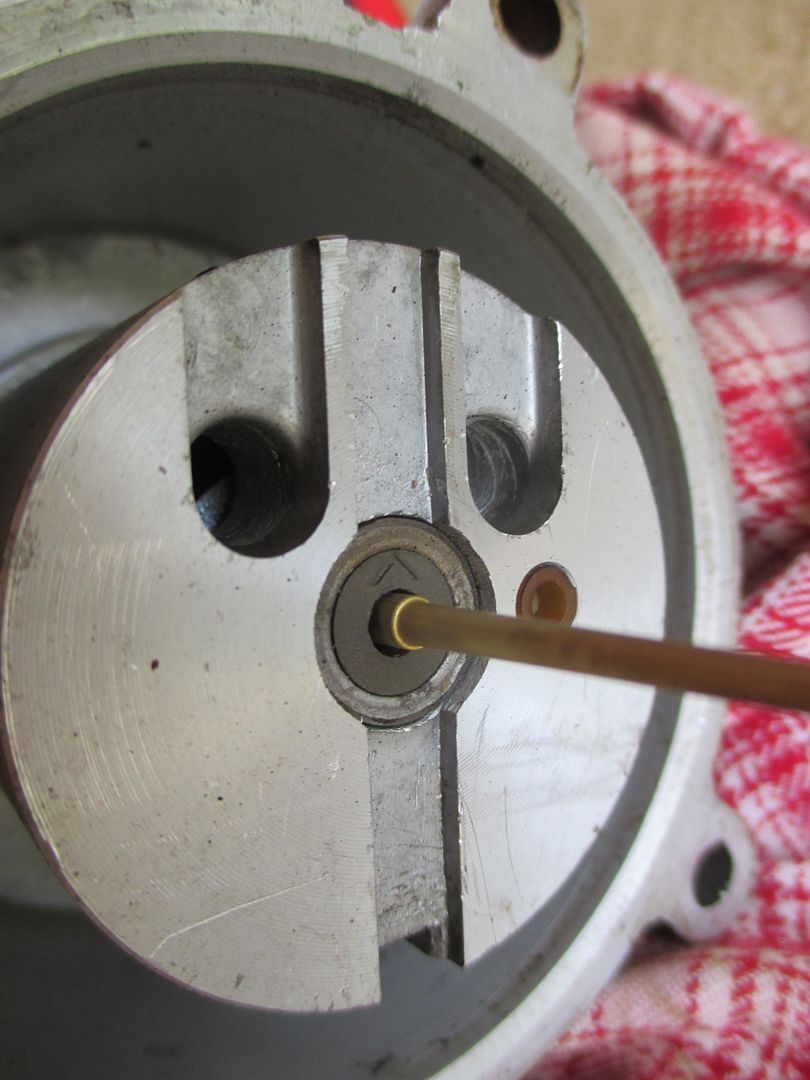
The collar is located flush with the piston base, the arrow points as shown, the needle is thus automatically biased in the right direction.


The nylon plug that is being indicated needs to be just proud of the piston surface. This prevents the piston from sitting directly across the surface of the bridge. Ensure that this is the case.


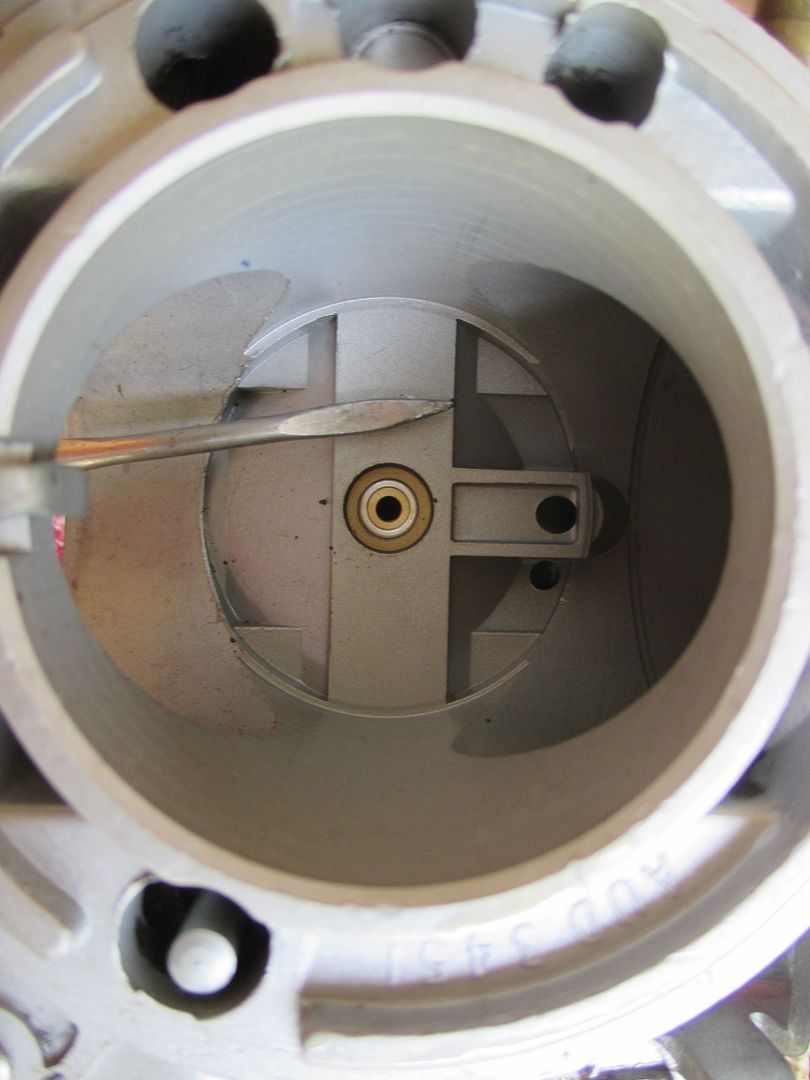
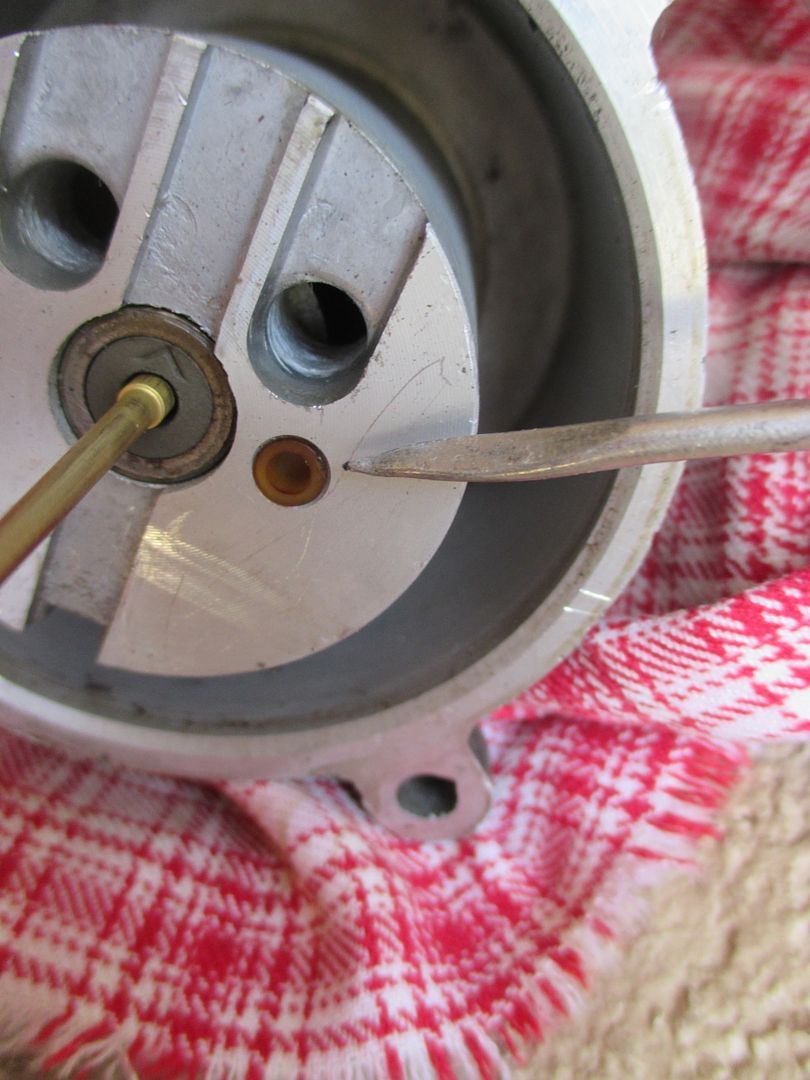
The scribe rests upon the surface of the bridge.


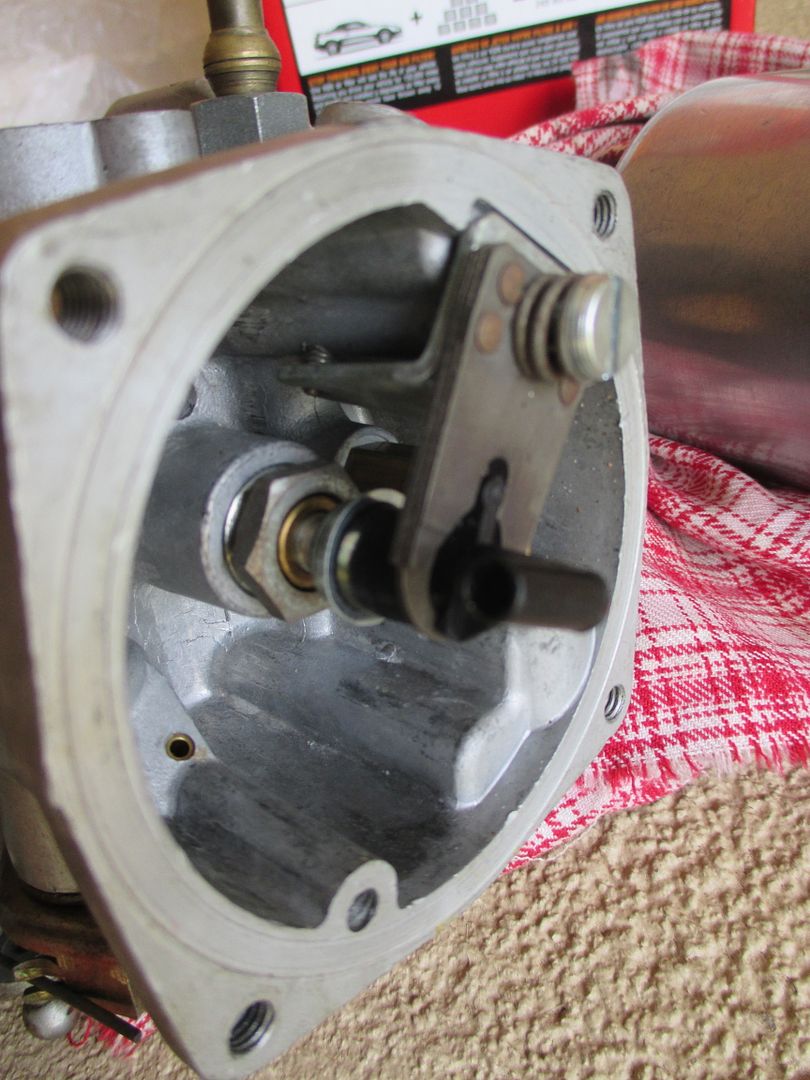
The jet passes through the jet bearing. The bimetalic strip locates the jet. The mixture adjustment screw can also be seen. Although not clear in the photo, the jet has an 'L' piece on the end.

Ron.
 
Incredibly helpful post, thank you. I will get to that as soon as I can, hopefully will be able to do it tonight or one evening this week and won't have to wait til the weekend.

Thanks again for the photos etc, they'll be a huge help.
 
on the manifold is a 8 digit number along the lines 18536474 That is the firing order and on each runner there is also a number, which is the cylinder number to which the firing order refers. check to make sure that your leads are connected in the right positions. also check to ensure that number one cylinder is firing to number one lead post at the distributor. to work that out turn the engine till the timing mark lines up and youwill either have the rotor button pointing to the right post posision or 180 degrees out 9in which case turn the crank one more turn and it will line up.

Swapped leads will cause what you are experiencing
 
I'm only a tinkerer and no expert. Fuel regulation is controlled by the carbs. The pump simply delivers fuel unaware of how much you need. If you are flooding the engine then I would take the carb(s) off. Noting where everything is positioned and how many rotations each jet or screw took to undo and clean. It is important to get the carb rebuild exactly how it was taken to bits otherwise you could be for ever tuning it.

Clean with brake fluid be aware that brake fluid is incredibly toxic but it's a great carb cleaner. Replace oil in the carb with sowing machine oil.

pay particular attention to the float and overflow return pipes, make sure these are not blocked. Before refitting take the fuel cap off and force air through the overflow lines.

As I say I'm just a tinkerer. The thing to remember is to make sure it goes together exactly how it came apart. Video or take pictures if you have to.
 
Sod it! It's going to the mechanics, I give up!

There's not really any reason why it shouldn't be at least running so I've come to the conclusion that whatever it is, if I haven't found it yet I'm not going to!

I reset the timing again today as it wasn't me that timed it last time, still nothing, so that's it from me. Bit of a wait at the local (and very reputed) classic specialist but hopefully they'll have little trouble. It'll be a couple of weeks before it can go in.

Hopefully Ive just either fiddled with the carbs or something too much, or previous owner did. Either way I don't know whether I'm coming or going really as its been misbehaving from day one so I think unless I have someone with some knowledge sort her out I'll be running round in circles forever!
 
Hi, pardonthewait, any updates, how you getting on? I'm interested reading this thread as I'm having similar problems with MVD307P. I think part of my problems might be down to the battery, can anyone suggest a decent replacement, the one in the car is so big the battery box has been removed and two brackets fabricated to support it!

Mick
 
Back
Top