Dangermouse
Member
Hello all.
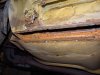
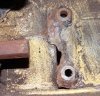
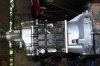
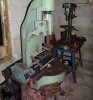
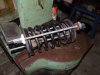
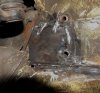
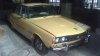
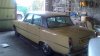
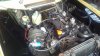
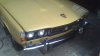
We have just purchased a lovely 1974 2200TC P6, Having wanted a Rover P6 for a long time to tow our vintage caravan with, we purchased a Monza red 2200 last year. We were told it was immaculate and as it was 270 miles away from us we had quite a lot of photos sent to us. So we bit the bullet and went off with a hired trailer to purchase it. Well when we got there, I discovered, what was immaculate to them was pretty patched and rough to us. However after such along trip we decided it was restorable and as the rice wasn't too bad we bought it. After we got it back home the full horror of it became apparent. It really was a rust bucket. Even thought it had been welded , the job was total crap. All the patches had just be "welded" over the original rust, which had festered inside for years. We did decide to try and save it, spending quite a bit of money on new parts . The mechanical side was just as bad as the body. We reconed a replacement engine, bought lots of new brake parts, bushed etc etc etc ! But then I took off the steering box to find a huge hole in the chassis underneath which spread into the bulkhead under the insulation. so That was a head scratcher for sure. Did we continue or give up. As fate would have it, a friend of ours in Coventry got in touch and told us a chap had messaged him on Facebook asking if he was interested in a 2200TC P6 1974. As our mate had a P6 already he wasn't interested, but asked us if we knew of anyone who might be. Always interested in P6 cars I told him to email the details and photos and I'd pass it around. Well what a surprise to find the car was 4 miles from us in Cornwall!!!
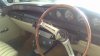
The photo's looked good, so we though " why not" and we arranged to meet the owner on Saturday 3rd of Jan. Not really thinking "this is the one for us" Well we arrived and the guy, Dean, opened up the huge garage he rented space in and WOW ! there she was. Such a lovey car, but wait, that bloody red one looked nice and shinny!! So on went the overalls and with a large screwdriver in had it under the car for a 100% poke about. After a lot of "poking" inside and out, I came to the conclusion , this was a virtually rust free car. The base unit was rust free, it had been repaired in the past in places, but to a very high standard, the front N/S sill had a small amount of rust on the front end, a couple of the door bottoms were bubbling, . The interior was very good. The engine started, but the exhaust was blowing like mad and the engine was misfiring, ( since found the electric fuel pump was shot) but there was no knocking or rattles. So we decided there and then to buy this one and break the red 2200. The car was purchased new in 1974 by the owners Great uncle, who ran it until he died, then his wife used it until she was 85 in 1998 , it was then laid up in her garage and after she died in 2009 it went to the chap we purchased it from and he has never had it on the road.
So the plan is to make this Almond 2200TC into a mint car, we will use all the new stuff we have for the old red one and get her up to as new condition as we can. But to start with will just be putting her through the MOT and driving her for 12 months then start in on the task of getting her really sorted.
We have just purchased a lovely 1974 2200TC P6, Having wanted a Rover P6 for a long time to tow our vintage caravan with, we purchased a Monza red 2200 last year. We were told it was immaculate and as it was 270 miles away from us we had quite a lot of photos sent to us. So we bit the bullet and went off with a hired trailer to purchase it. Well when we got there, I discovered, what was immaculate to them was pretty patched and rough to us. However after such along trip we decided it was restorable and as the rice wasn't too bad we bought it. After we got it back home the full horror of it became apparent. It really was a rust bucket. Even thought it had been welded , the job was total crap. All the patches had just be "welded" over the original rust, which had festered inside for years. We did decide to try and save it, spending quite a bit of money on new parts . The mechanical side was just as bad as the body. We reconed a replacement engine, bought lots of new brake parts, bushed etc etc etc ! But then I took off the steering box to find a huge hole in the chassis underneath which spread into the bulkhead under the insulation. so That was a head scratcher for sure. Did we continue or give up. As fate would have it, a friend of ours in Coventry got in touch and told us a chap had messaged him on Facebook asking if he was interested in a 2200TC P6 1974. As our mate had a P6 already he wasn't interested, but asked us if we knew of anyone who might be. Always interested in P6 cars I told him to email the details and photos and I'd pass it around. Well what a surprise to find the car was 4 miles from us in Cornwall!!!
The photo's looked good, so we though " why not" and we arranged to meet the owner on Saturday 3rd of Jan. Not really thinking "this is the one for us" Well we arrived and the guy, Dean, opened up the huge garage he rented space in and WOW ! there she was. Such a lovey car, but wait, that bloody red one looked nice and shinny!! So on went the overalls and with a large screwdriver in had it under the car for a 100% poke about. After a lot of "poking" inside and out, I came to the conclusion , this was a virtually rust free car. The base unit was rust free, it had been repaired in the past in places, but to a very high standard, the front N/S sill had a small amount of rust on the front end, a couple of the door bottoms were bubbling, . The interior was very good. The engine started, but the exhaust was blowing like mad and the engine was misfiring, ( since found the electric fuel pump was shot) but there was no knocking or rattles. So we decided there and then to buy this one and break the red 2200. The car was purchased new in 1974 by the owners Great uncle, who ran it until he died, then his wife used it until she was 85 in 1998 , it was then laid up in her garage and after she died in 2009 it went to the chap we purchased it from and he has never had it on the road.
So the plan is to make this Almond 2200TC into a mint car, we will use all the new stuff we have for the old red one and get her up to as new condition as we can. But to start with will just be putting her through the MOT and driving her for 12 months then start in on the task of getting her really sorted.
Attachments
-
 10388211_979207415429711_4040032285832640166_n.jpg101.9 KB · Views: 886
 -
 10456464_979207392096380_5635770992670540619_n.jpg71.9 KB · Views: 885
 -
 1800276_979207642096355_8255527988426604154_n.jpg90.9 KB · Views: 885
 -
 10678817_979207442096375_216618355489026524_n.jpg88.2 KB · Views: 885
 -
 10686900_979207555429697_4517652002529555680_n.jpg48 KB · Views: 884
")