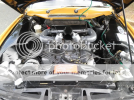
1972 P6 V8 - The Lush

So the last few garage sessions have been spent taking the carbs off (again!) to fit the new 'stay-up' floats and BBW needles. Well, the needles were fitted while the carbs were still attached to the car, but I couldn't do that with the floats sadly.

I also took the opportunity to upgrade the air filters (per cobraboy and I think possibly others) to the larger 'Montego' type filters, which are used in all kinds of things, including LDV Vans as mine came in Vanfit packaging :D

There is a huge difference in filter area:
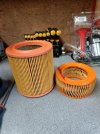
IMG20240203152932web.jpg

I ran an M6 tap through the already threaded hole in the filter mount (I'm guessing UNC/UNF) and screwed in a length of M6 studding.
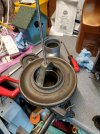
IMG20240203151330web.jpg
Originally I secured the studding with a nut under the bracket but later thought that, should that nut come loose, it could drop into the carb, and possibly the intake manifold and cause chaos. With the original screw, if it were to come loose it would be on the outside of the filter, not the inside, preventing it from dropping in.
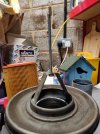
IMG20240203152354web.jpg
In the end I took that nut off and secured the top onto the filter with two nuts to lock it in place, so it shouldn't come loose and nothing should drop into the carbs/manifold. All in all, I think this upgrade took me less than an hour, cost hardly anything in parts and in conjunction with the richer needles has made a huge difference to the car.
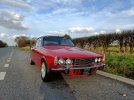
IMG20240210155326web.jpg
As it was dry, I couldn't resist going for a quick test drive and what a difference! The flat spot at low revs is gone and she just wants to keep pulling right through all the gears. I'm pretty sure there's a bit of intake noise that wasn't there before, so there must be a significant difference in air flow. It smells like it's running a little bit rich at idle, but that's not really a surprise as I had the carbs set up on the old needles, so I'll get that sorted at some point. There's no smoke however and I'd rather it was running a little rich, than a little lean. It's hard to tell which bit of the changes has made the most difference, but overall the effect is superb.

I also took the opportunity to change the choke cable at the same time, as I've had a new one sitting around for a while and the lock on the old one didn't work properly. To make things easier, I cut the lever end off, securely taped the carb end of the new one to the old one and used the old to pull it through the bulkhead. It worked a treat - you just need to remember to put the securing nut and washer onto the right side of the console before, which I nearly didn't...

All in all, a worthwhile few hours work that's made a huge difference. The sticking float appears to be cleared too, so no more clothes pegs to keep the choke out and no more tapping the RH carb with a hammer periodically! And a photo for posterity, I don't think I've ever taken it out in February before.

Here's to the spring - I'm planning on putting a fair few miles on this year.
 
I went the same route with the bigger filters. Used some securing bolts out of an SD1 filter box. Same difference as yours. No nuts falling into the inlet.
My imagination ? , but Im sure she runs better . By the way for those in the Antipodes -RYCO A1705 are the ones.
 
My imagination ? , but Im sure she runs better .
I can't quantify it, but the throttle just seems that bit more responsive, which I guess could be the needle change too. It's probably a combination of the two, but it would have been running really lean on the original needles.
The thread in the air cleaner is 1/4-20. I fitted the A1705 filters a couple of years ago.
That explains why an M6 tap ran through it so nicely!
 
Out of interest, are you using the SD1 air filter cannister. Not sure from looking at your previous posts.
As you know, this will provide increased air intake volume - as it happens, I have listed one for sale on this site , with integral high flow conical filters included. I used this on my 3.9L to good effect.
 
I think it's the P6 one, but I'm not sure, it was fitted to the car when I bought it, but I also know that the engine block is from an SD1. Is there any way of telling the SD1 and P6 filter canisters apart?
 
The P6 cannister takes the bigger A1705 filters but it is still restricted with the narrower inlet port c/f the SD1 cannister. As I dont do high speed motoring much nowadays ,I stuck with the P6 cannister. She does breathe and accelerate better Im sure of that.
 
The SD1 cannister has a significantly larger intake diameter, as a consequence of the cold and warm air intake options, permitted by the SD1 set-up.
SydneyRoverP6B has a good picture of it when used on a standard P6 engine. I used to use the same spec cannister.
@ SydneyRoverP6B, I trust you don't mind the use of one of you forum pictures

1709162509424.png
 
The P6 cannister takes the bigger A1705 filters but it is still restricted with the narrower inlet port c/f the SD1 cannister. As I dont do high speed motoring much nowadays ,I stuck with the P6 cannister. She does breathe and accelerate better Im sure of that.
I guess one school of thought is that the smaller intake will increase the ram effect into the filter canister, which might speed up the flow. However, the smaller intake could restrict the overall volume of air entering.
 
Indeed. There is a good discussion on the merits of this and the OEM spec canister amongst other related isdues in the thread ‘ Lucky Breathes easy ‘, Chrisyork.
 
Last edited:
I've tried to find this "lucky breathes easy" thread on here but cannot find it. Can anyone nudge me in the right direction
 
 
Thanks for the link to that thread, there's some really interesting info in there. Looks like I should think about enlarging the intake pipe.
 
If you do go down the SD1 cannister route , just be aware the larger throat will hit the top of the carburettor tower. May be a lump of rubber between the two will absorb that wear point.
I also had to redrill the two holes on the frame that fit on the pegs at the back of the motor. Otherwise the SD1 cannister is a straight swap for the P6 one.
 
Back
Top